
These cranberry ginger chocolate cookies are the perfect balance of sweet, spicy and indulgent. Studded with tart cranberries, warming ginger and little bursts of chocolate, they have a wonderful chewy texture when lightly baked or can be baked longer for a crispier biscuit. Made with wholesome ingredients like almond meal and oats, they feel a…
biscuit
Matcha White Choc Chip Biscuits
These matcha white choc chip biscuits are a delicious twist on a classic cookie. With a crisp outside and burst of white chocolate, they’re perfect for green tea lovers and anyone after a delicious sweet treat without too much sugar. The earthy matcha pairs beautifully with the sweetness of the creamy white chocolate, and they…
Choc Almond Chunk Cookies
These Choc Almond Chunk Cookies are one of the best cookie combos ever (according to my family). They are loaded with oats, coconut, almonds and choc chips, so extremely satisfying and look great too. Having almonds, these may not be suitable for a lunchbox – if not, these are a perfect cookie to have in…
Almond Maple Shortbread (3 ingredients)
This Almond Maple Shortbread is a gluten and dairy-free treat to enjoy alongside a cuppa! The dough is a little sticky to work with which is why I roll it between two pieces of parchment paper. I like to cut the shortbread into simple little bite sized squares as its quickest and easiest, but if…
Healthy Home Made Tim Tams
I’ve had many requests for Healthy Home Made Tim Tams, and here it is. Tim Tams are such an iconic Australian biscuit, however they do contain many questionable ingredients including vegetable oil, many additives and also cochineal which is a food colouring derived from insects (and known to cause severe allergies). These are easy enough…
Biscotti
Who doesn’t love the Italian classic biscuit – Biscotti! Whilst the dough is surprisingly simple to make, you do need to follow the instructions closely and you absolutely need a very sharp serrated knife to cut them. Biscotti, otherwise known as “cantucci” are the classic twice-baked Italian biscuits from Tuscany and, if you haven’t heard about them before,…
Gingernut Biscuit
This gingernut biscuit recipe came from a need to fulfil my love of ginger biscuits, but without breaking the bank. I purchased a pack of gluten-free and vegan gingernuts as a rare treat but based on the biscuit’s popularity with my children I knew I’d have to have a go at replicating these for the…
Jam Drops
These delicious Jam Drops are my refined sugar-free version of a good old fashioned favourite. Easy to make and delicious too! This recipe first appeared in my popular Well Nourished Lunchbox ebook and now it is coming to the website to make adding to weekly planners a breeze! My kids have always loved the sweetness…
Honey Cinnamon Cookies
These Honey Cinnamon Cookies are simple to make but delicious to eat. Being nut free, they are perfect for the school lunch box but equally good enjoyed alongside a relaxing cup of herbal tea. These will be very easy to whip up in a hurry for impromptu gatherings- mix, roll and bake, and you’ll have…
Lemon Coconut Slice
This zesty lemon coconut slice is an easy, low-sugar treat that’s perfect for lunchboxes or snacks, and it’s a staple in the Harding household. With simple steps, it’s a great recipe to get the kids involved—little ones can help mix and press the base, while older kids and teens can tackle the whole thing (with a bit of oven supervision). Whether you’re baking solo or with the family, this recipe is sure to become a favourite!
Take a look at the variations (below the main recipe) for suggestions to alter the recipe to suit your specific dietary requirements.
For more easy to make, delicious healthy sweet recipes, click HERE.
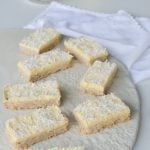
Lemon Coconut Slice
This lemon coconut slice is the perfect mix of zesty lemon and creamy coconut in an easy-to-make treat. It’s a wholesome, homemade alternative to store-bought snacks.
Servings: 12
Ingredients
- 150 g butter or coconut oil
- 85 g rice malt syrup, honey or maple syrup (¼ cup approx.)
- 1 lemon/s – zest (juice reserved for icing)
- 120 g wholemeal spelt flour (1 cup)
- 90 g rolled oats (1 cup)
- 100 g desiccated coconut (1 cup)
Lemon Buttercream (see below note)
- 70 g butter – at room temperature (important it's not over softened or too cold)
- 20 ml lemon juice – no more or it may split
- 3 tbsp rice malt syrup or honey
- 3 tbsp tapioca flour – or arrowroot
- 2 tbsp desiccated coconut – for decorating, optional
Instructions
- Preheat your oven to 180°C/350°F (fan forced).
- Melt your butter (or coconut oil) in a large pot. If using a Thermomix 90, 1 minute, speed 3.
- Add the sweetener and mix to combine by hand or in a food processor. If using a Thermomix 30 seconds, temp 90, speed 4.
- Add all of the other ingredients and process or mix well until combined. If using a Thermomix, reverse speed 4, 30 seconds.
- Press firmly into a lined slice tin (approx. 17 x 27cm) and bake for 10-12 minutes. Take care not to overcook this as it can dry out. If your oven runs hot, reduce the temperature to 160°C.
- Allow to cool in the tin (it firms as it cools) and once cooled, pop it into the fridge to chill for 30 minutes or more.
Lemon Buttercream
- Beat the icing by mixing all of the ingredients together in a small bowl until smooth and creamy. Thermomix butterfly, 20 seconds, speed 3.
- Spread over the chilled slice.
- Sprinkle over a little extra desiccated (or shredded) coconut.
- Chill for 10 more minutes in the freezer, remove from the tin and carefully slice into squares by pressing straight down with a large sharp knife.
- Refrigerating before slicing makes it much easier to cut without crumbling.
Troubleshooting the icing…
- If it's grainy or curdled – means the mixture is too cold. It usually needs warming up (either with a hair dryer or a warm towel wrapped around the bowl). Once it is a slightly warmer temperature, whip it up again with an electric beater / Thermomix.
- If it it is very thin – usually means that the butter/ mixture is too warm and needs cooling down. Putting the bowl in the fridge for 15 minutes or so and then beating it afterwards should fix it perfectly. You can also add a bit more tapioca to thicken it.
Store
- Store in the fridge or freeze in an airtight container. The butter icing will soften when left at room temperature.
- I enjoy these straight from the fridge or freezer. When packing into school lunches, pack against an ice brick.
Notes
Gluten-free
Substitute the spelt with your favourite gluten-free flour and the oats can be replaced by quinoa flakes.Dairy-free or vegan
Replace the butter in the base with coconut oil (this will produce a tougher/ crisper slice). For the icing a cashew cream would be the best choice.Low-fructose
Use brown rice syrup as your sweetener.Let me know how you love this zesty and delicious treat. I’d really appreciate it if you could leave a short comment and 5 stars!
Healthy Chocolate Coconut Slice
This is such a yummy, old-fashioned style Chocolate Slice – it reminds me a lot of the one my nan always made me, only a little healthier. This Healthy Chocolate Coconut Slice is a lovely chocolatey treat to stock your freezer with, so if you have hungry kids at home looking for a snack or need an easy lunchbox filler, you’ll have this on hand ready to go!
Food memories are the best. As a kid I used to bake with my nan every weekend, we even occasionally ‘invented’ recipes. The ones that worked out, she carefully wrote on a note pad and sticky taped it into her recipe notebook. I still have that notebook, though the tape is browned and dried and the binding has seen better days.
Anyway, enough nostalgia…though I do hope that one of my recipes will perhaps form memories and be carried down in your family.
Health benefits
This healthy chocolate coconut slice is made with wholemeal spelt flour, rolled oats, and desiccated coconut, this slice provides fibre and slow-releasing energy. The cacao powder is rich in antioxidants, while the choice of natural sweeteners like honey or rice malt syrup makes it a healthier alternative to refined sugar treats.
Ingredients
This recipe uses spelt flour, oats, cacao powder, and coconut. Butter or coconut oil adds richness, and the bittersweet chocolate icing made with raw cacao powder (or cocoa powder), rice malt syrup or honey, milk and coconut oil brings a decadent touch that can be adjusted to suit your taste.
How to make this healthy chocolate coconut slice
Melt the butter or coconut oil, stir in the sweetener, and mix with the dry ingredients until combined. Press the mixture into a tin lined with baking paper and bake in a fan-forced oven as instructed below. Chill before adding the rich bittersweet chocolate icing made with cacao powder, rice malt syrup or honey, milk and coconut oil and sprinkle with coconut for a beautiful finish. This can also be made in your food processor and we’ve included the Thermomix method too if you have one.
Serving suggestions and how to store
Enjoy this slice as a mid-morning snack or a healthier dessert option. It’s also perfect for school lunchboxes being nut-free and egg-free. Store in an airtight container in the fridge to keep it fresh for up to a week or freeze it for longer storage. It can be packed or eaten from frozen. Refrigerating before slicing ensures clean, crumb-free cuts.
Vary this healthy chocolate coconut slice to suit
For a gluten-free option, swap spelt flour for your favourite gluten-free flour and replace oats with quinoa flakes. Make it dairy-free or vegan by using coconut oil instead of butter. Choose brown rice syrup for a low-fructose version.
Want more great recipes like this one? SUBSCRIBE NOW
For more delicious, easy to make prep-ahead heathy snack recipes, click HERE.

Chocolate Coconut Slice
This Chocolate Coconut Slice is a delicious, very easy to make, low sugar lunchbox treat or snack. Sure to become a favourite with young and old alike!
Servings: 12
Ingredients
- 150 g butter or coconut oil
- 85 g rice malt syrup, honey or maple syrup (¼ cup approx.)
- 30 g cacao powder - unsweetened Dutch process or raw
- 120 g wholemeal spelt flour (1 cup)
- 90 g rolled oats (1 cup)
- 100 g desiccated coconut (1 cup)
Bittersweet Chocolate Icing (see note below)
- 30 g cacao powder - unsweetened Dutch process or raw (¼ cup)
- 2 tbsp coconut oil
- 2 tbsp rice malt syrup or honey
- 1 tbsp milk (of choice)
- 10 g desiccated coconut (2 tbsp)
Instructions
- Preheat your oven to 180°C/350°F (fan-forced).
- In a large pot over medium heat, melt your butter (or coconut oil). If using a Thermomix 90, 1 minute, speed 3.
- Turn off the heat and add the sweetener, mixing to combine. If using a Thermomix 30 seconds, temp 90, speed 4.
- Add all of the other ingredients and mix well until combined. If using a Thermomix reverse speed, 30 seconds.
- Press firmly into a lined tin (approx. 17 x 27cm) and bake for 10-12 minutes. Take care not to overcook this as it can dry out. If your oven runs hot, reduce the temperature to 160°C.
- Once cooled, pop it into the fridge to chill for 30 minutes or more.
Bittersweet Chocolate Icing
- Make the icing by beating all of the ingredients together in a small bowl until smooth and creamy. If using a Thermomix butterfly, 1 minute, speed 3.
- Spread over the chilled slice and sprinkle over a little extra desiccated (or shredded) coconut.
- Chill for 10 more minutes in the freezer, remove from the tin and carefully slice into squares by pressing straight down with a large sharp knife.
Store
- Store in the fridge or freeze in an airtight container.
Note
- The icing above is very rich (for dark chocolate lovers only). You can leave it off, top it with melted chocolate or a chocolate butter cream. This recipe works really well as a super healthy ganache too.
- Refrigerating before slicing makes it much easier to cut without crumbling.
Notes
Gluten-free
Substitute the spelt with your favourite gluten-free flour and the oats can be replaced by quinoa flakes.Dairy-free or vegan
Replace the butter with coconut oil (this will produce a tougher/ crisper slice).Low-fructose
Use brown rice syrup as your sweetener.I'd love to hear how you like this slice. Post a comment below or rate this recipe.
Coconut Caramel Slice
This new healthy Coconut Caramel Slice recipe is sure to become a firm favourite. It makes a decent sized batch so my kids are always happy to have this treat in the freezer. The nut-free version is perfect for school lunches packed from frozen. I’ve designed it to suit many dietary intolerances and it’s sweet,…
Anzac Brownie Slice
This Anzac Brownie Slice is next level good! With lots of Anzac inspired recipes to suit those with dietary intolerance already on the Well Nourished website… there is some seriously tough competition when it comes to designing Anzac inspired recipes.
This Anzac Brownie Slice is a delicious fusion of two classic treats—the hearty, oat-packed texture of Anzac biscuits and the rich, fudgy goodness of brownies. With layers of nutty, sweet, and chocolatey flavours, this slice is sure to be a crowd-pleaser. It’s also highly versatile, with options for gluten-free, dairy-free, and nut-free variations.
My very first recipe from six years ago, my epically popular Healthy Anzac biscuits has been a long time crowd pleaser and is a great nut-free treat. A personal favourite, my Chocolate Macadamia Anzacs are a mouthwatering flavour combo. Then there’s Anzac Creams and ice-blocks...something for everyone.
I have a sneaking suspicion this Anzac Brownie Slice will be another popular recipe to celebrate this important day. Have a great Anzac day. Lest we forget!
Take a look at the variations (below the main recipe) for suggestions to alter the recipe to suit many specific dietary requirements.
For more delicious, festive healthy sweet recipes, click HERE.

Anzac Brownie Slice
This Anzac Brownie Slice is a delicious fusion of two classic treats—the hearty, oat-packed texture of Anzac biscuits and the rich, fudgy goodness of brownies. It's also highly versatile, with options for gluten-free, dairy-free, and nut-free variations.
Servings: 12
Ingredients
Anzac
- 150 g butter or coconut oil -melted
- 115 g rice malt syrup, honey or maple syrup (⅓ cup)
- ¾ tsp bicarbonate of soda
- 180 g nut meal -or wholemeal spelt flour (1½ cups)
- 75 g desiccated coconut (¾ cup)
- 180 g rolled oats (2 cups)
Brownie
- 30 g cacao powder -unsweetened Dutch process or raw (¼ cup)
- 250 g nut butter (1 cup)
- 170 g rice malt syrup, honey or maple syrup (½ cup)
- 40 g nut meal -or wholemeal spelt flour (⅓ cup)
- 1 tsp bicarbonate of soda
- Pinch sea salt
Drizzle
- 100 g dark chocolate -broken into pieces (optional)
Instructions
- Pre-heat your oven to 180°C/350°F (fan-forced). Line a small (approx. 17 x 20cm) slice tin with baking or parchment paper.
- In a medium sized pot, heat the butter or coconut oil over a low heat to melt. Add the sweetener of your choice and mix until combined.
- Mix in the bicarbonate of soda.
- Add the rest of the ingredients and mix well to combine.
Brownie
- In a food processor mix all the ingredients together. You could do it by hand too. Just soften the nut butter enough so it can be mixed with the other ingredients.
- It forms a sticky dough (not a pourable cake batter).
Drizzle (optional)
- Start this once the slice is cooled completely.
- Place the chocolate in a bowl. Sit it over a pot of boiling hot water and stir until the chocolate melts.
Assemble
- Press half the Anzac mixture firmly into the base of the tin (with wet hands or a wet large spoon). Set the other half aside.
- Top with the brownie mixture and press this across to cover the biscuit base (wet hands work well again).
- Finish by pressing the rest of the Anzac mixture on top.
- Place into the oven for 20-30 minutes or until golden brown on top. The longer you cook it, the crisper the slice becomes.
- Allow to cool, refrigerate and then drizzle over the melted chocolate.
- Cut into portions right out of the fridge (you'll get nice neat slices if cut when chilled).
Thermomix
- Pre-heat your oven to 180℃. Line a small (approx. 20 x 30cm) slice tin with baking or parchment paper.
- Melt the butter, temp 90, 1 minute, speed 4 or until melted.
- Add the sweetener and bicarb and mix temp 90, 30 seconds, speed 3.
- Add the rest of the ingredients. Mix 30 seconds, flour symbol until it forms a sticky dough. You may need to scrape the sides to incorporate all the flour.
- Set the Anzac dough aside.
- Without rinsing the bowl, add the brownie ingredients and mix speed 4, 30 seconds or until combined into a sticky dough.
- Assemble as above.
Store
- Store in an airtight container (if it was warm weather, I'd keep it in the fridge)and it can definitely be frozen too.
Notes
Adjust the sweetness
I personally make this with rice malt syrup and I think it's perfectly sweet enough. If using honey or maple syrup, you may choose to slightly reduce the amount (unless you have a sweet tooth).Gluten-free
Choose nut meal or a gluten-free flour. Replace the oats with rolled (flaked) quinoa.Dairy-free and vegan
Choose coconut oil instead of butter. This will make a tougher/ crisper slice (as the coconut oil shrinks and firms up a lot when cooled).Fructose friendly
Choose rice malt as your sweetener.Nut-free
Choose the spelt or a nut-free gluten-free flour and replace the nut butter in the brownie with sunflower seed butter.Coconut-free
Choose butter as your fat and replace the desiccated coconut with more nut meal or flour.Leftover Easter Eggs
If there is such a thing as leftover Easter eggs in your house, you could melt them for the drizzle (if you dare).I hope you love this Anzac inspired brownie slice. Let me know if you have any questions or if you try the recipe, post a comment and rate the recipe!
Choc-Orange Biscuits
There are certain flavour combinations that just work. Dark chocolate paired with orange is certainly one of them! So I present to you, in time for the festive season, my Choc-orange Biscuits.
Baking gifts is good for your health
Christmas is a great time to get your bake on and give the gift of deliciousness by baking something lovely for friends and family! I recently read a news article where psychologists explained the benefits of baking for others. They said that baking for others is an ‘altruistic act and a proactive form of creative expression’ (both of which are psychologically advantageous). Baking’s also a great way to practice mindfulness (due to the attention it requires).
For me, baking is absolutely therapeutic and definitely forces me into mindfulness (more so than meal cooking which doesn’t require the same degree of concentration). It triggers memories of the love my nan had for me as a child, the deliciousness we shared when she baked for me. I hope I can trigger those same memories in my own children one day.
As much as cooking is something I’m obviously passionate about, baking is something I have largely struggled to do well. I think I’m perhaps a little too creative and my free-flowing approach to cooking (combined with a deficit in the patience department) means quite a few fails. Though with each fail I learn a lot about the science behind the bake and I have come a long way as a baker in the past five years or so.
I think it’s why my recipes are well received by many, because they are created by a non-natural baker so they are simple and perfect for those of us challenged in this department. Also, because I have to do my own washing up, I make the instructions simple and the amount of bowls required minimal ha ha!
Health benefits
Made with wholemeal spelt flour, these biscuits provide more fibre and nutrients than those made with refined flours. The orange zest offers a vitamin C boost, while dark chocolate adds antioxidants. By making your own biscuits, you avoid the unnecessary additives and excess sugars often found in store-bought options.
What you need to make these choc-orange biscuits
This healthy cookie recipe uses simple ingredients like butter or coconut oil, orange zest, vanilla extract, spelt flour, and dark chocolate for the coating. You can adjust the sweeteners to your liking and easily swap out ingredients to accommodate dietary preferences, making it versatile for everyone.
How to make
These chocolate orange cookies are as simple as mixing the wet ingredients with the dry ingredients. Begin by mixing the melted fat, sweetener, orange zest, juice, vanilla, and sea salt in a bowl. Add the bicarb and spelt flour to form a cookie dough, then chill it before slicing into biscuits. Bake until golden and, once cooled, dip each biscuit into a melted chocolate mixture for an extra indulgent finish. If you own a Thermomix, we’ve also included Thermomix instructions for this recipe.
Serving suggestions and how to store
These biscuits (or cookies if you are American) are perfect as a snack with a cuppa, or as a sweet treat after a meal. Store them in an airtight container in the fridge or freeze them for later, so you always have a tasty treat on hand.
Vary the choc-orange biscuits to suit your needs
These are perfect for those of you who have egg allergies. For gluten-free, replace the spelt flour with a mix of almond meal, buckwheat, and arrowroot. To make them dairy-free or vegan, simply use dairy-free chocolate. For nut-free, choose coconut oil or butter, and if you’re avoiding fructose, opt for rice malt syrup as your sweetener.
Remember to take a look at the variations (below the main recipe). Here, you’ll find suggestions to alter the recipe to suit your dietary goals.
For more delicious, easy to make, healthy sweet recipe, click HERE.

Choc-orange Biscuits
These choc-orange biscuits are a delicious blend of zesty orange and rich dark chocolate, perfect for anyone craving a classic flavor combination. With a crunchy texture and a luxurious chocolate coating, they make an ideal snack or sweet treat.
Servings: 20
Ingredients
- 50 g butter or coconut oil (¼ cup) melted
- 85 g rice malt syrup, honey or maple syrup (¼ cup)
- 1 orange/s -zest finely grated plus 3 tbsp juice
- 1 tsp vanilla -powder, extract or essence
- Pinch sea salt
- ¼ tsp bicarbonate of soda
- 215 g wholemeal spelt flour (1¾ cups)
Chocolate coating
- 100 g dark chocolate -broken into squares
- 1 tbsp coconut oil
Instructions
- Place the fat, sweetener, zest, orange juice, vanilla and sea salt into a large bowl and beat until well combined. Thermomix melt the butter or coconut oil 1 min, 90, speed 3 then add the sweetener, zest, juice, vanilla and salt and mix 1 min, speed 4.
- Add the bicarbonate of soda and mix well. Thermomix 5 seconds, speed 4.
- Add the spelt flour and mix until combined. Thermomix, lock lid, 30 seconds knead (flour symbol). Scrape the sides of the bowl to incorporate the flour.
- The dough should be firm and hold together without sticking to your hands (like play dough). If it is too wet (sticky) add a little more flour. If too dry, add a tablespoon of juice or water.
- Place the dough onto a piece of baking paper and roll it into a log (approx. 5cm in diameter).
- Place in the fridge for 1-2 hours then slice into 5mm biscuits (in winter you will only need 30 mins in the fridge).
- Preheat the oven to 180℃/350℉ (fan forced) before slicing the dough.
- Place slightly apart on a lined baking tray (they spread ever so slightly) and bake for 10 minutes.
- Allow to cool fully on the tray (they firm as they cool).
Chocolate coating
- Bring a small pot of water to the boil and then turn off the heat. Place a small ceramic, glass or metal bowl over the hot water. Add the chocolate and coconut oil and stir until it is melted.
- I use a small bowl so that the melted chocolate is deep (which makes it easier to get a good half of the biscuit coated).
- Work with your tray of biscuits right next to the melted chocolate. Dunk half the biscuit into the melted chocolate and place back on the tray. Pop in the fridge to set the chocolate.
Time saving tip
- If you can't be bothered with the chocolate coating, press a chocolate button into each biscuit before baking.
Store
- Store in an airtight container in the fridge or freezer.
Notes
Gluten-free
Swap the spelt flour with 130g (1¼ cup) of almond meal plus 95g (¾ cup) buckwheat flour plus 2 tablespoons arrowroot. This dough is firm but sticky so wet your hands to shape it into the log.Dairy-free and vegan
Use a dairy-free chocolate.Fructose-friendly
Choose rice malt syrup as your sweetener and 98% dark chocolate.Nut-free
Choose the coconut oil (or even melted butter) for your fat.Coconut-free
Replace the coconut oil with macadamia oil or melted butter and omit from the chocolate coating.I hope you love this recipe as much as my family does. Remember to post any feedback or questions below, enjoy!
Chocolate Macadamia Anzac Biscuits
This year to mark Anzac day, I thought I’d share this ‘Next-level Anzac’ (thanks Nikki Fisher for the name suggestion). They are still packed full of goodness (with variations to suit those with food intolerance). But there’s something about adding macadamias and a chocolate drizzle that feels very indulgent! I present to you my Chocolate Macadamia Anzac Biscuits – three of my favourite flavours jammed into one delicious bikkie.
I’m obliged to post a warning – stopping at one may be tough!
Health benefits
By using wholemeal spelt flour and rolled oats, these biscuits offer more fibre and nutrients than standard versions. The addition of macadamia nuts provides healthy fats, while using rice malt syrup or honey cuts back on processed sugars. Plus, the homemade chocolate drizzle is free from artificial ingredients found in many store-bought toppings.
Ingredients
This recipe uses a combination of wholesome ingredients including oats, spelt flour, macadamias, and dark chocolate. You can swap in almond meal for a gluten-free version or adjust the sweeteners depending on your preferences, making it as versatile as it is delicious.
How to make chocolate macadamia Anzac biscuits
Start by melting the butter and sweetener of choice in a large pot, then add bicarb and mix well. Stir in the dry ingredients, and roll the mixture into balls and flatten slightly. Bake until golden, and while they cool, melt the chocolate and coconut oil to drizzle on top. For a shortcut, you can place a square of chocolate directly on the biscuits before baking. If you own a Thermomix, we’ve also included Thermomix instructions for this recipe.
Serving suggestions and how to store
Serve these biscuits as an afternoon treat or pack them in lunchboxes for a homemade snack. Store in an airtight container, and they freeze well for up to a month, making them perfect for batch baking.
Vary these chocolate macadamia Anzac biscuits to suit your needs
For gluten-free, swap oats for quinoa flakes and spelt for almond meal. To make them dairy-free, use coconut oil instead of butter, and opt for a dairy-free chocolate drizzle. Vegans can stick with rice malt syrup and choose dairy-free chocolate to enjoy this indulgent biscuit.
Take a look at the variations (below the main recipe) for suggestions to alter the recipe to suit many specific dietary requirements.

Chocolate Macadamia Anzac Biscuits
These chocolate macadamia Anzac biscuits are a twist on the classic Aussie favourite, combining the buttery, chewy goodness of traditional Anzacs with crunchy macadamias and a rich dark chocolate drizzle. Perfect with a cuppa or as a sweet treat, these bikkies will be a hit with the whole family.
Servings: 12 biscuits
Ingredients
- 100 g butter
- 85 g rice malt syrup or honey (¼ cup)
- ½ tsp bicarbonate of soda
- 2 tbsp coconut sugar or rapadura (this is optional if you need extra sweetness)
- 120 g wholemeal spelt flour (1 cup approx.) or almond meal
- 50 g desiccated coconut (½ cup approx.)
- 115 g rolled oats (1¼ cup approx.) see gluten-free below
- 60 g macadamia nuts (½ cup) chopped
Chocolate drizzle
- 50 g dark chocolate -broken into pieces
- 1 tbsp coconut oil
Instructions
- Preheat the oven to 180℃/350℉ (fan-forced)and line a large biscuit tray with baking paper.
- In a large pot, gently heat the butter and honey or rice syrup until melted. Remove from the heat. Add the bicarbonate of soda and mix very well.
- Add the rest of the ingredients to the pot, and mix until well combined. The mixture should feel wet and sticky but presses together.
- With wet hands roll the mixture into approximately golf sized balls and place well apart (they do spread) on a large biscuit tray. If the mixture feels a little dry, add a tablespoon of water to bring it together.
- Flatten very slightly with the back of a wet fork and bake until golden (approximately 10-20 minutes).
- The longer they are baked the crispier they become. So if you like a slightly chewy biscuit remove just as they start to brown. For a crunchy biscuit, leave a little longer. I also find the gluten-free version cooks quicker still.
- Whilst they are baking, melt the chocolate by bringing a small pot of water to the boil. Place the chocolate and coconut oil in a bowl and sit over the hot water, mixing until the chocolate is melted.
- If you're feeling lazy, you can break the chocolate on top of the biscuit before cooking (not as pretty, but yum none the less).
- When they are cooked, cool the bikkies on the tray (they will harden as they cool) and then drizzle over the melted chocolate.
Thermomix Method
- Melt the butter and syrup/honey, 1 minute, temp. 90, speed 3.
- Add the bicarb and mix 10 seconds, speed 3.
- Add the remaining ingredients and mix approx. 20 seconds, reverse, interval speed until combined.
- For the chocolate drizzle, you can grate the chocolate (20 sec, speed 5), add the oil and melt 1 min, temp 50, speed 3.
- Roll and bake as per above method.
Store
- These should be stored in an airtight container and they can also be frozen.
Notes
Gluten and grain-free
Replace the oats with quinoa flakes and spelt flour with almond meal. You may have to adjust the amounts so that the mixture is sticky and moist but able to be rolled into balls.Dairy-free
Replace the butter with coconut oil (but they do loose the classic buttery ANZAC flavour). They will also toughen as they cool (which is nice for a crunchy biscuit). Choose a dairy free chocolate or raw chocolate for the drizzle.Coconut-free
Replace the coconut with a heaped tablespoon of almond meal or more spelt.Fructose friendly
Choose rice malt syrup as your sweetener and omit the rapadura/ coconut sugar. Use 90% dark chocolate for the drizzle (or make your own raw chocolate).Vegan
Chose rice malt syrup as your sweetener and the dairy-free variation.Nut-free
This Anzac Biscuit recipe is divine, nourishing and nut-free. Perfect for the school lunchbox too. My ebook The Well Nourished Lunchbox is 100% nut-free and is full of inspo, click HERE to find out more.I'd love to hear what you think of these - they are my families new favourite treat. Post a comment below and better still 'rate' this recipe so more people decide to make it too.
Rich Chocolate Tarts
I can’t quite believe I’m writing this but it’s that time of year – Christmas is fast approaching so I thought it time to roll out a few festive delights, starting with these delicious, easy to whip-up Rich Chocolate Tarts. Who doesn’t love a rich chocolate tart?!
This is a great make-ahead dessert for Christmas day as you can prepare all the components in advance and then assemble just prior to serving. The buckwheat flour makes for a really simple, biscuity pastry crust. I love to use it in gluten-free baking because it is such a cost effective flour. I hope you love it!
Health benefits
This dessert is packed with wholesome ingredients, including buckwheat flour, a gluten-free alternative rich in fibre and nutrients. The cashew cream provides healthy fats, while cacao is a great source of antioxidants. Sweetened naturally with rice malt syrup or maple syrup, these tarts offer a refined sugar-free option.
Ingredients
This recipe includes ingredients such as raw cashews, coconut water, maple syrup or rice malt syrup, and cacao powder, which come together to create a creamy, smooth filling. The chocolate pastry is made with buckwheat flour, butter, coconut sugar, and cacao powder, resulting in a rich, gluten-free base. Fresh fruit like berries or cherries adds a fresh flavour to balance the richness of the chocolate.
How to make these healthy chocolate tarts
To make these tarts, start by preparing the chocolate cashew cream. Blend the soaked cashews with cacao powder, coconut water, and a natural sweetener until smooth and creamy, then set the mixture aside in a bowl. For the pastry, combine buckwheat flour, butter, coconut sugar, and cacao powder to form a dough. After chilling the dough, roll it out and bake it in tart tins. Once the pastry has cooled, assemble the tarts by filling the shells with the chocolate cashew cream. Finish by garnishing with fruit and shaved dark chocolate (optional).
Serving suggestions and how to store
Serve these tarts chilled, garnished with fresh fruit (my favourites are fresh raspberries, blueberries, strawberries and cherries) and shaved dark chocolate (optional). Store them in an airtight container in the fridge for up to two days. Any leftover pastry dough can be refrigerated or frozen for future use.
Vary rich chocolate tarts to suit your dietary needs
This recipe can be adapted to suit different dietary preferences. For a nut-free version of the chocolate filling, replace the cashew cream with whipped cream, crème fraîche, or coconut yoghurt. For a vegan option, use maple syrup as the sweetener, replace the egg with a chia egg, and substitute the butter in the pastry with coconut oil. If you’re short on time, you can use pre-made chocolate shortcrust pastry and fill it with the chocolate cashew cream, crème fraîche or coconut yoghurt for a quick and easy version.
This adaptable dessert is perfect for a variety of dietary needs, ensuring everyone can enjoy this decadent treat!\
For more easy to make, delicious healthy dessert recipes, click HERE.

Rich Chocolate Tarts
A delicious, yet nourishing dessert that is sure to impress the crowds. Remember to allow soaking time for the cashews.
Servings: 8
Ingredients
Chocolate Cashew Cream
- 125 g raw cashew nuts (approx. 1 cup) soaked 3-4 hours, or overnight
- 60 ml coconut water (¼ cup)
- 85 g rice malt syrup or maple syrup (¼ cup)
- 2-3 tbsp cacao powder (unsweetened Dutch process or raw)
Chocolate Pastry
- 280 g buckwheat flour
- 125 g butter room temperature
- 80-100 g coconut sugar or rapadura (approx. ½ cup)
- 2 tbsp cacao powder (unsweetened Dutch process or raw)
- 1 egg/s
Fruit
- 1 cup/s fruit -of your choice. I love fresh berries or cherries (think Black-forest flavours)
Instructions
Chocolate Cashew cream
- Start with the cashew cream. It can be made a day or so ahead, up to you. Soak the cashews for 3-4 hours or overnight. Drain and rinse.
- To make the chocolate cream, blend the soaked cashews in a powerful food processor or high speed blender until a coarse texture. If using a Thermomix 20 seconds speed 4.
- Add the rest of the ingredients and blend again until a silky smooth cream is formed. If using a Thermomix 30 seconds, speed 4-5 (you may need to scrape the sides once or twice).
- Set it aside until you're ready to serve.
Chocolate Pastry
- Pre-heat your oven to 180℃ (fan forced) and grease one large or four small springform tart tins.
- In a food processor, combine the butter and buckwheat flour until a crumb like texture forms. If using a Thermomix 20 seconds, speed 4.
- Add in the remaining ingredients and mix until the dough forms a disc. If using a Thermomix 30-40 seconds, speed 4. As you mix it it should come together.
- Wrap the dough in baking paper and pop in the fridge for 1 hour.
- Cut the dough in half (you have enough for two large tarts or 8 small tarts - see tip below). Any leftover dough can be refrigerated or frozen until needed.
- Roll the dough to about 5mm thickness. It's important to work quickly, especially in a hot kitchen - as the dough softens, it's harder to work with. Cut the pastry to suit the tin you are using. You may need to bring the pastry back together and re-roll to use it all up. You can mend any tears or thin areas by pushing the dough into the tin with your fingers.
- Any leftover you can cut into shapes to decorate or just enjoy as biscuits.
- Cover the tarts with a sheet of baking paper and weight it to blind bake the shells.
- Cook for just 7 minutes for a small tart, 10 for a larger one. Remove from the oven and cool in the tins for a few minutes, then, when cool enough to handle, carefully push out of the base and cool completely on a wire wrack.
- Keep in an airtight container in the fridge or freezer until ready to serve.
To serve
- Top the shells with the cashew cream and garnish with fruit and shaved dark chocolate (optional, as pictured).
Tip
- Individual tarts are most fool proof as the larger tarts can crack when cutting (unless the pastry is cooked perfectly).
Store
- Store in an airtight container in the fridge.
Notes
Cheats version
Use the Careme Chocolate Shortcrust for the quickest dessert ever! You can even fill the cases with creme fraiche and fresh fruit for an even quicker dessert (if dairy-free is not a concern).Nut-free
Fill the cases with whipped cream or creme fraiche or coconut yoghurt (if dairy and nut-free)Vegan, dairy-free and egg-free options
Choose maple syrup as your sweetener for vegan and replace the egg with chia-egg. Replace the butter in the pastry with coconut oil (this will produce a tougher shell once it cools).I hope you love this dessert. I'd love to hear what you think, feel free to post a comment below.
Anzac Macadamia Creams
These Anzac Macadamia Creams put a deliciously nutty twist on the classic Anzac biscuit. Nostalgic yet fresh, they pair the crunch of golden Anzacs with a smooth, naturally sweetened macadamia cream for an irresistible bite.
I came up with them when I wanted an Anzac-inspired dessert for special guests but didn’t have time for anything fussy. The result was these quick, easy sandwich biscuits – and they certainly didn’t disappoint. Best of all, you can make them ahead of time, so you’re free to enjoy the company (and the compliments) instead of being stuck in the kitchen once the party starts.
Health benefits
Macadamias are rich in healthy fats and provide a creamy texture without needing dairy, while my nourishing Anzac biscuits offer the goodness of oats and seeds. This recipe uses rice malt syrup, honey, or pure maple syrup for wholefood sweetness.
Ingredients
This recipe requires a batch of Anzac biscuits, toasted macadamia nuts, and a touch of vanilla and natural sweetener to create the cream filling. Here’s the recipe for my Nourishing Anzacs – these are nut-free. You can also use these Chocolate, Macadamia Anzacs for an extra decadent dessert.
How to make Macadamia Anzac biscuits
While your Anzac biscuits are baking, prepare the macadamia cream by processing the toasted macadamia nuts until they form a smooth paste, then adding sweetener and vanilla extract. Once the biscuits have cooled, spread or pipe the macadamia cream onto one biscuit and sandwich with another.
Serving suggestions and how to store
Serve these Anzac Macadamia Creams as an afternoon treat or dessert. They’re best stored in the fridge until you’re ready to enjoy them, keeping the cream nice and firm.
Vary these Anzac macadamia creams to suit your needs
Take a look at the variations (below the main recipe) for suggestions to alter the recipe to suit many specific dietary requirements.
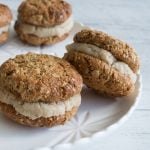
Anzac Macadamia Creams
These are a decadent twist on an Anzac biscuit - a delicious dessert for your Anzac day commemorations.
Servings: 6 biscuits
Ingredients
- 1 batch of Anzac Biscuits *recipes linked above
- 200 g macadamia nuts (1½ cups) toasted
- 1 tbsp rice malt syrup, honey or maple syrup
- ½ tsp vanilla -powder, extract or essence
Instructions
- While the biscuits are cooking, make your macadamia cream. In a food processor or high speed blender, grind your macadamia nuts to a fine crumb. If using a Thermomix 5 secs, speed 5.
- Add the sweetener and vanilla and process until it becomes a paste. If using a Thermomix, mix 5 seconds, speed 6.
- Spread between the cooled Anzacs and sandwich with another on top. You can also pipe the cream on top of each biscuit if you'd prefer.
Store
- Store in the fridge until ready to serve.
Notes
Chocolate cream
Add a tablespoon of cacao to the macadamia cream for a biscuit reminiscent of Kingston Creams.Berry nice
Mix in some smashed berries - yum!I'd love for you to post a comment to let me know how you like these divine bikkies.
Pecan Pie Cookies
I’ve always loved Pecan Pie, but now days, I find it way to sweet; one mouthful and I’m well and truly done. So craving the flavour without the sweetness, I thought I’d come up with a less sugary alternative. These Pecan Pie Cookies are a delicious twist on the classic dessert, combining the rich flavours of pecan pie with the convenience of a cookie. Perfect for satisfying your sweet tooth, these cookies are a hit at gatherings or just for enjoying with your afternoon tea. Plus, they’re easy to whip up and will leave your kitchen smelling heavenly!
PS – I plan to bake a few batches to pop in pretty jars for Christmas presents, they make such a beautiful festive treat.
Health benefits
Take a look at the variations (below the main recipe) for suggestions to alter the recipe to suit your specific dietary requirements.
For more easy to make, heathy sweet treats, click HERE.

Pecan Pie Cookies
All of the flavours of a Pecan Pie in a cookie. It's easy to make, gluten, grain and refined sugar free.
Servings: 12 cookies
Ingredients
Base
- 150 g almond meal (1¼ firmly packed cups)
- 55 g macadamia nut oil (¼ cup)
- 85 g rice malt syrup or honey (¼ cup)
- 1 tsp vanilla -powder, extract or essence
- 1 tbsp water (very important to keep them from spreading)
Filling
- 10-15 pecan nuts (about 2 heaped tbsp), roasted and roughly chopped
- 1 tbsp nut butter (I used cashew nut butter)
- 3 tbsp rice malt syrup or maple syrup
- 1 tsp ground cinnamon
- Pinch ground cloves
- 15 pecan nuts -extra to top each cookie
Instructions
- Preheat your oven to 150℃/ 300℉ (fan-forced). Line a baking tray with safe baking paper (I love 'If You Care' brand).
- In a bowl or food processor, mix the ingredients for the base until well combined. If you have a Thermomix mix 10 seconds, speed 4. You should have a sticky, slightly oily dough that you can roll into balls. If not, add more almond meal, tablespoon by tablespoon.
- With damp hands, roll the dough into small balls (a bit smaller than a ping pong ball), place on your lined baking tray and press the middle with your thumb to make an indented centre.
- Now make the filling by mixing the ingredients together until well combined.
- Place about half a teaspoon onto each cookie, top with a whole pecan nut and bake for 15 minutes or until golden brown.
- If you'd like to caramelise the top, sprinkle with a little coconut sugar before baking.
- Allow to cool (they will firm up as they cool) and store in an airtight container.
Store
- Airtight in the fridge and can be frozen for up to 3 months.
Notes
Fructose friendly and vegan
Choose rice malt syrup as your sweetener.Nut-free
This is not the recipe for you. For 150 pages of nut-free recipes, take a look at my super popular ebook 'The Well Nourished Lunchbox'. Click HERE to find out more and read the rave reviews.I'd love to hear how you enjoy these delicious biscuits. Post a comment or rate this recipe below.
Two Ingredient Coconut Cookies
These two-ingredient cookies are a simple and delicious treat that combines the natural sweetness of ripe bananas with toasted coconut. Perfect for a quick snack or a healthier dessert, they’re easy to whip up with just two pantry staples! Plus, they’re gluten-free and dairy-free, making them suitable for various dietary preferences. Enjoy these cookies as is, or get creative by turning them into yummy ice cream sandwiches!
Health benefits
These cookies are a fantastic source of natural energy, thanks to the fiber in shredded coconut and the natural sugars in bananas. They also provide healthy fats and nutrients, making them a guilt-free snack option that satisfies your sweet tooth.
Ingredients
The only two ingredients you need for these cookies are shredded coconut and a ripe banana. The more ripe the banana the more concentrated its natural sugars are. This makes them especially perfect for baking. Simple, wholesome, and delicious!
How to make Two Ingredient Coconut Cookies
To make these easy cookies, start by preheating your oven to 180°C (350°F) and lining a baking tray with baking paper. Toast the shredded coconut in a pan over medium heat until it’s lightly browned. Then, blend the toasted coconut with the ripe banana until it forms a fine mixture. Shape it into discs and bake until golden, which usually takes about 25 minutes.
Serving suggestions and how to store
These cookies are best enjoyed fresh but can be stored in the fridge for up to 3 days or frozen for a month. If they become soft, simply pop them in the freezer to crisp up!
Vary this to suit your dietary needs
You can also add a pinch of cinnamon or a dash of vanilla extract for extra flavor. If you’re looking for added protein, consider mixing in a scoop of your favourite protein powder!
The lovely Stace, from A Healthy Mum has been so generous to share a fabulous recipe from her ebook ‘A Healthy Lunchbox.’ The simple things in life are often the best. Made with just two ingredients, these cookies are a perfect balance of good fats and natural sugars. Combined, the result is something very delicious.

Two Ingredient Coconut Cookies
Two Ingredients in these super simple cookies - need I say more?
Servings: 6 cookies
Ingredients
- 75 g shredded coconut (¾ cup)
- 1 banana/s -must be ripe
Instructions
- Preheat your oven to 180°C/350℉ (fan forced) and line a baking tray with a sheet of baking paper. Toast the coconut in a pan over a medium heat until it is lightly browned.
- Add the banana to a blender with the toasted coconut. Pulse until the mixture comes together and the coconut is fine.
- Shape the mixture into discs and space apart evenly on the baking tray. If the mixture is runny, spoon it onto the tray. Bake the cookies until golden (approximately 25 minutes).
Serving Suggestion
- These cookies are delicious served as is or for something extra special, use them to make healthy ice cream sandwiches. If they go soft, pop them in the freezer and they will crisp up nicely.
Store
- In the fridge for 3 days or freezer for 1 month
Notes
I'd love to hear how you like these simple snacks - post a comment below.
Healthy Chocolate Cookie (Oreos, Mint Slice or Tiny Teddies)
This Healthy Chocolate Cookie recipe can form the base for a healthy version of an Oreo, Mint Slice or you can even use it to make Tiny Teddies (you’ll just need to source a tiny teddy cookie cutter). It is a great, additive-free option for kids that are accustomed to a sweet treat in their lunch box and it’s very quick and simple to make. They can also be frozen in an airtight container and popped straight into the lunch box. These make great party treats too.
Health benefits
Packed with wholemeal spelt flour and unsweetened cacao powder, these cookies are a source of fibre and antioxidants. Using natural sweeteners like rice malt or maple syrup reduces refined sugar intake, making these cookies a healthier alternative to traditional options.
Ingredients
To create this yummy healthy chocolate cookie recipe you’ll need wholemeal spelt flour, cacao powder, bicarbonate of soda, a pinch of sea salt, vanilla extract, coconut oil or macadamia nut oil, milk and rice malt or maple syrup.
How to make Healthy Chocolate Cookie (Oreos, Mint Slice or Tiny Teddies)
Start by preheating your oven to 150℃/300°F (fan forced). In a mixing bowl, combine the flour, cacao powder (or unsweetened cocoa), bicarbonate of soda, and salt. In a blender, mix the vanilla, oil, milk, and syrup until smooth. Combine the wet and dry ingredients until a cookie dough forms. Roll the dough into a ball, wrap it in baking paper and refrigerate for 30-60 minutes. Once chilled, roll out the dough between two sheets of baking paper, cut into shapes, and bake for 10 minutes. Work quickly with cutting the dough, if it’s warm in your kitchen you may need to return it to the fridge to remove cut shapes onto your baking sheet (tray) to bake. Allow the cookies to cool completely before adding a delicious filling or enjoying them as is. The number of cookies you get form one batch of dough will depend on the size and shape you cut.
Time saving tip
I must admit I was relieved when my kids got older and didn’t want me to cut ‘shapes’ anymore- especially the very tiny teddies (those little cookie cutters give me nightmares ha ha)! So these days I roll the dough into logs and wrap it in baking paper. Then I simply slice cookies and bake – this saves a LOT of time rolling then cutting the dough.
Serving suggestions and how to store
These cookies are perfect on their own or filled with a creamy centre to turn them into a healthy Oreo cookie! Store them in an airtight container in the fridge for freshness, or freeze them for later enjoyment. They can be eaten or packed from frozen in lunchboxes. You can also freeze the uncooked dough to bake fresh. I tend to double this recipe and bake one batch and freeze the dough for another day.
Vary this Healthy Chocolate Cookie recipe to suit
For a gluten or grain-free option, substitute with your favourite gluten-free flour (I like buckwheat flour). To make these cookies dairy-free or vegan, simply use non-dairy milk and choose rice malt or maple syrup as your sweetener. For a nut-free version, stick to coconut oil or melted butter, and if you’re looking to cut out cacao, carob powder works great as an alternative. You can also get creative with fillings, like adding mint essence for a refreshing minty twist!
Take a look at the variations (below the main recipe) for suggestions to alter the recipe to suit many specific dietary requirements.
For more delicious, healthy and easy to make wholefood treats, click HERE.

Healthy Chocolate cookie recipe (aka Oreos, Mint Slice or Tiny Teddies)
These Healthy Chocolate Cookies are a delicious twist on classic treats like Oreos, Mint Slice, or Tiny Teddies. Perfect for satisfying your sweet tooth, these cookies are simple to make and a hit with both kids and adults!
Servings: 20 Biscuits
Ingredients
- 120 g wholemeal spelt flour (1 cup) see gluten-free below
- 30 g cacao powder (¼ cup) unsweetened Dutch process or raw
- ¼ tsp bicarbonate of soda
- Pinch sea salt
- 1 tsp vanilla -powder, extract or essence
- 50 g coconut oil (¼ cup) or macadamia nut oil
- 30 ml milk (of choice) (2 tablespoons)
- 85 g rice malt syrup or maple syrup (¼ cup) the maple syrup will produce a sweeter cookie
Instructions
- Preheat your oven to 150℃/300°F (fan forced).
- In a mixing bowl, combine the flour, cacao powder, bicarbonate of soda and salt.
- In a blender or food processor, mix the vanilla, oil, milk and syrup until well combined. If using a Thermomix, blend 30 seconds, speed 4.
- Add the wet to the dry ingredients and mix together until dough forms. If using a Thermomix mix 30 seconds, speed 4 or until combined.
- Roll into a ball, wrap in cling wrap or baking paper and refrigerate for 30-60 minutes.
- Place the dough between two pieces of baking paper and roll to approximately 2-3 millimetres thick. Cut rounds or shapes with a cookie cutter.
- Alternatively, roll the dough into a log, wrap in baking paper and refrigerate for 30-60 minutes. Then slice to make round cookies (they may not be perfectly round but they will still taste good).
- Place the cookies on a lined or greased baking tray and bake for 10 minutes.
- Leave on the tray until completely cooled and add a filling (see instructions below) or eat as they are. Either way, they are really good!
Store
- Store in an airtight container in the fridge or freezer.
Notes
Gluten or grain-free
Substitute your preferred gluten or grain-free flour.Dairy-free
Choose a non-dairy milk. I love coconut milk.Vegan
Choose rice malt or maple syrup as your sweetener. Choose a non-dairy milk.Low-fructose
Use rice malt syrup as your sweetener.Nut-free
Choose coconut oil as your fat (you can also replace with melted butter if you prefer).Cacao-free
You can sub the cacao with carob powder.Make a cream centre:
Cream centre (aka Oreo) Mix ¼ cup of creamed coconut* (also called coconut butter) - warmed to make it easier to mix, with 1 teaspoon of vanilla essence, 2 tablespoons of the milk of your choice and 2 tablespoons of rice malt syrup or maple syrup until well combined to a creamy paste. A food processor or a bit of muscle is required to combine it. * Creamed coconut (also called coconut butter) is NOT the same as coconut cream. It is a thick paste (like a nut butter). If you have a Thermomix you can make your own by milling desiccated coconut until a creamy butter is formed (much like making nut butter from nuts). Minty (aka Mint slice) Add 1 teaspoon of mint essence to the cream centre recipe for a delicious mint centre. To fill... To begin with, make sure your cookies are cold (or even frozen). Place ½ teaspoon of cream to a cookie and push down another to squash the cream across the base. Store in the fridge or freezer.Is this a recipe you'll try? Love to receive your comments or you can rate this recipe below.
Lemon Macadamia Cookie
This Lemon Macadamia Cookie recipe is a delicious, healthier alternative to any store-bought cookie, perfect for a quick snack or treat. The combination of zesty lemon and rich macadamia nut oil gives these cookies a burst of flavour and a light, chewy texture. They’re easy to make and naturally gluten-free, dairy-free, grain-free, egg-free and low fructose making them a great option for everyone.
This recipe is a personal favourite – they are so quick to make and taste just divine. However a warning is appropriate…you will not stop at one (at least I can’t)!
Health benefits
Well, firstly almonds are a rich source of protein, essential fats, and fibre. They also contain antioxidants and mood elevating amino acids. The macadamia nut oil is a very stable, primarily monounsaturated fat with an impressive fatty acid and mineral profile. It adds a delicious, buttery flavour to the mix too. Lemon zest is a concentrated source of vitamins, minerals, antimicrobial and antioxidant compounds.
Ingredients
The blend of almond flour (meal), macadamia nut oil, vanilla extract and a touch of lemon juice and zest creates a delightful balance of nutty and zesty flavours. You can choose between rice malt syrup, honey, or maple syrup as your sweetener, adjusting it to suit your preferred level of sweetness.
How to make Lemon Macadamia Cookie
Line a baking sheet (tray) with baking paper (parchment paper). Then simply combine all ingredients in a large bowl or food processor, form the cookie dough into balls, flatten and cook until golden brown. These cookies have a super short prep time (just 10 minutes) and are perfect for when you’re craving something homemade but don’t want to spend hours in the kitchen. If you own a Thermomix, we’ve also included Thermomix instructions for this recipe.
Serving suggestions and how to store
These refined sugar free cookies are best enjoyed fresh out of the oven (once cooled a little as they firm up as they cool down) but store beautifully in the fridge or freezer, making them a great make-ahead option. Enjoy them with a cuppa or as a sweet treat in lunchboxes or after school.
Vary Lemon Macadamia Cookies to suit
This Lemon Macadamia Cookie recipe is already gluten-free and dairy-free. For a low-fructose option, use brown rice syrup as your sweetener. Vegans can easily substitute with rice malt or maple syrup to keep the recipe plant-based. Adjust the sweetness to your taste for a cookie everyone can enjoy.
Take a look at the variations (below the main recipe) for suggestions to alter the recipe to suit many specific dietary requirements.
For more delicious, healthy and easy to make wholefood treats, click HERE.

Lemon Macadamia Cookie
This Lemon Macadamia cookie recipe is gluten-free and dairy free and are just so delicious. They are easy to make and also freeze really well too.
Servings: 12 cookies
Ingredients
- 150 g almond meal (1¼ firmly packed cups)
- 55 g macadamia or coconut oil (¼ cups) - melted
- 85 g rice malt syrup, honey or maple syrup (¼ cup approx.)
- 1 tsp vanilla -powder, extract or essence
- 1 lemon/s -finely grated zest of whole lemon plus 1 tbsp juice (very important or they will spread)
- 12 macadamia nuts (optional) to finish
Instructions
- Preheat your oven to 150℃/300°F (fan-forced).
- In a mixing bowl or food processor, combine all of the ingredients above until well combined (if using a Thermomix, mix 5-10 seconds, speed 5).
- If the dough feels too moist or oily, add more almond meal until it is thick and comes together easily.
- Roll tablespoons of the mix with wet hands or just drop blobs onto a tray lined with baking paper.
- Flatten with and top with a macadamia nut.
- Bake for 15 minutes or until just starting to brown lightly on top.
- Allow to cool on the tray (they will firm up as they cool). Enjoy!
Store
- Airtight in the fridge or freezer.
Notes
Low-fructose
Choose brown rice syrup as your sweetener.Vegan
Choose rice malt or maple syrup as your sweetener.Nut-free
Sorry, this is not the recipe for you (but there are plenty of nut-free options on the website). For 150 pages of nut-free recipes, take a look at my super popular ebook 'The Well Nourished Lunchbox'. Click HERE to find out more and read the rave reviews.What do you think of these beauties? I'd love your feedback in the comments below!
Hazelnut Chai Spice Cookies
These Hazelnut Chai Spice Cookies are the perfect blend of warm, cozy spices and nutty goodness. They’re a simple, wholesome treat you can whip up in no time, making them a great snack or treat option. With flavours of cinnamon, cardamom, and ginger, these cookies are ideal for the colder months or whenever you crave something warming.
They are also gluten-free, dairy-free, grain-free, egg-free and low fructose. They only take minutes to make and are the perfect after school snack or weekend treat for the kids.
Health benefits
Made with hazelnut meal and natural sweeteners, these cookies offer a nutrient-dense alternative to traditional treats. The hazelnuts are a rich source of protein, essential fats, and fibre. They also contain antioxidants and many minerals. The coconut oil is so very nourishing. The cinnamon stabilises blood sugar levels for a sustained release of energy. The ginger and cardamon are warming spices that support digestion.
Ingredients
You’ll need hazelnut meal, coconut oil, rice malt syrup or honey, vanilla extract, cinnamon, cardamom, ground ginger, and a bit of tea or water to bring it all together. This mix creates a rich, spiced flavour profile with a chewy texture.
How to make Hazelnut Chai Spice Cookies
In a medium bowl or food processor, combine all the ingredients until well mixed. Roll tablespoons of the mixture into balls and place them on a baking sheet (tray) lined with baking paper (parchment paper). Flatten each one with a fork and sprinkle a little extra cinnamon on top if you like. Bake at 150℃ for around 15 minutes until golden. They firm up as they cool.
Serving suggestions and how to store
These cookies are best enjoyed fresh out of the oven (once cooled) but can be stored in an airtight container in the fridge or freezer. They make a great addition to your afternoon tea or as a sweet treat any time of day.
Vary these Hazelnut Chai Spice Cookies to suit your needs
To make these Hazelnut Chai Spice Cookies low-fructose, opt for brown rice syrup instead of honey. For a vegan option, choose rice malt or maple syrup as your sweetener. You can even throw in some cacao nibs or dark chocolate for a chai-spiced chocolate twist! No hazelnut meal? Almond flour or meal works just as well.
Take a look at the variations (below the main recipe) for suggestions to alter the recipe to suit your specific dietary requirements.
For more delicious, healthy and easy to make wholefood treats, click HERE.

Hazelnut Chai Spice Cookies
The chai and hazelnut flavours in this Hazelnut Chai Spice Cookies are a match made in heaven. They are easy to make and really delicious!
Servings: 12 cookies
Ingredients
- 150 g hazelnut meal (1¼ firmly packed cups)
- 55 g coconut oil (¼ cups) melted if solid
- 85 g rice malt syrup or honey (¼ cup approx.)
- 1 tsp vanilla -powder, extract or essence
- 1 tsp ground cinnamon
- 1 tsp ground cardamom
- ½ tsp ground ginger
- 1 tbsp tea -or water (this is important or they will spread)
Instructions
- Preheat your oven to 150℃/300°F (fan-forced).
- In a mixing bowl or food processor, combine all of the ingredients above until well combined (if you have a Thermomix mix 5-10 seconds, speed 5).
- Roll tablespoons of the mix in your hands and place them onto a tray lined with baking paper (parchment paper).
- Flatten with the back of the fork. Sprinkle a little extra cinnamon on top (optional).
- Bake for 15 minutes or until starting to brown on top.
Store
- In an airtight container in the fridge or freezer.
Notes
Low-fructose
Use the brown rice syrup, not honey.Vegan
Choose rice malt or maple syrup as your sweetener.Choc-Chip Chai
Add cacao nibs or a piece of dark chocolate. SO yum!No hazelnut meal?
You can use almond meal instead.Coconut-free
Replace with macadamia nut oil.I love these cookies, I hope you do to? As always I'd love your feedback. Please post a comment or rate this recipe below.
The Easiest, Most Nourishing Choc Chip Cookie Ever
These Healthy Chocolate Chip Cookies are my idea of the perfect treat. They suits most dietary leanings and take minutes to make, which is always a bonus. I think it’s the ultimate and easiest healthy chocolate-chip cookie recipe ever!
Truth be known, baking is not my forte. Mind you neither was photography until I put my mind to it and found I really enjoyed it…and there lies the issue. I LOVE cooking, but because I prefer to freestyle in the kitchen rather than follow a formula, baking and I sometimes don’t see eye to eye. I baked a lot as a child (with my nan), but not much as a young adult so I was a bit out of practice by the time I had kids. Luckily my kids are very forgiving…I think they are just happy for something with a little sweetness, even if it doesn’t look overly appealing!
Anyway, one rainy Queensland summer, I find myself out of eggs and craving a little deliciousness. With a cakey treat ruled out, I fluked these delights. These beauties (which took a few attempts to perfect) are the best and my kids love them for an after-school snack or weekend treat.
The best thing about this grain-free, healthy cookie recipe is that if you do manage to stop at one or two and wait a while, you will find yourself satisfyingly full. These nourishing choc chip cookies are one of my personal favourites to make for my kids lunchboxes. They are a perfect blend of chewy goodness and the texture is just like a store bought one (only better!). The flavours melt together in your mouth and the little bursts of chocolate really give you that feel good, treat feeling.
PS- they can be frozen (which will save you eating them all in one hit).
Health benefits
Are the cookies healthy? Well, firstly almonds are a rich source of protein, essential fats, and fibre. They also contain antioxidants and mood elevating amino acids. The coconut oil, by now, you will know how I love this. You can find out more about its amazing health benefits here. If you add cacao nibs or dark chocolate, prepare for a magnesium boost and an antioxidant hit that rivals green tea. These cookies really do bring together nutritious ingredients like almond meal and cacao nibs, making them a great option for a more mindful treat.
Ingredients
For these chocolate chip cookies you’ll need almond meal as the base, along with coconut oil, rice malt syrup or honey (or even maple syrup) and a touch of vanilla extract. For that classic choc chip flavour, cacao nibs or dark chocolate chips are the stars of the show. Don’t forget a splash of water to help hold it all together!
How to make Healthy Choc Chip Cookies
The method for these Healthy Chocolate Chip Cookies is so simple where you just fold your dry ingredients into the wet ingredients until fully combined. There is both a traditional method using a large mixing bowl or if you have a Thermomix (or food processor) you can save time and utensils by following along with those instructions. Using baking paper ensures your cookies don’t stick to the sheet pan when cooking and the bake time is so quick, only 15 minutes!
Vary the Healthy Choc Chip Cookies to suit your dietary needs
There are so many variations to suit dietary needs with these healthy chocolate chip cookies. The recipe is already gluten-free as is, but you can also make it dairy-free with the use of cacao nibs and removing the choc chips. As mentioned before, the low fructose option is made by the use of rice malt syrup and cacao nibs. You can replace the coconut oil with macadamia oil for the coconut-free version. It can even be made completely vegan by using rice malt syrup to sweeten and just the cacao nibs! For the almond free version, you simply replace the almond meal with hazelnut meal which will make it into a delicious nutella choc-chip cookie.
Serving suggestions and how to store
These Healthy Choc Chip Cookies are perfect with a cup of tea or as a snack anytime. Store them in an airtight container in the fridge or freezer to keep them fresh—they’ll stay crisp and delicious for days or freeze for up to 3 months.
For more delicious, healthy and easy to make wholefood treats, click HERE.

The easiest, most nourishing choc chip cookie ever
These choc chip cookies are the ultimate combination of easy and nourishing! With just a few simple ingredients, you can whip up a batch of cookies that are not only delicious but packed with wholesome goodness. Perfect for a sweet treat any time of day.
Servings: 10 cookies
Ingredients
- 150 g almond meal (1¼ firmly packed cups)
- 55 g coconut oil (¼ cup) melted if solid
- 50-85 g rice malt syrup or honey (¼ cup approx.) taste the batter and alter the sweetness to taste
- 1 tsp vanilla -powder, extract or essence
- 2 tbsp cacao nibs -or dark chocolate chips, or both
- 1 tbsp water (must be added or they go flat)
Instructions
- Preheat your oven to 150 ℃/300°F (fan-forced). It's preferable to use weight measurements, the recipe will need less adjusting if you do so.
- In a mixing bowl or food processor, combine all of the ingredients above until just combined.
- If using a Thermomix, mix 5 seconds, speed 4.
- Scrape the sides to incorporate the bits around the edge.
- **The mixture should be thick and sticky (like in the video below so if it feels very wet, it's important to add more almond meal).
- Roll tablespoons of the mix in your (wet) hands and place them onto a tray lined with baking paper.
- Flatten slightly with the back of the fork. The cookies above have cacao nibs through them (I put a little piece of Green and Blacks 85% chocolate on top in this pic too).
- Bake for 15 minutes or until starting to brown on top. The longer they cook, the crisper they become.
- Allow to cool fully. They will firm up as they cool.
Store
- Store in an airtight container in the fridge or freezer.
Notes
Dairy-free
Just use cacao nibs and leave out the choc chips.Low-fructose
Use the brown rice syrup and cacao nibs.Coconut-free
Replace the coconut oil with macadamia nut oil.Vegan
Choose rice malt syrup to sweeten and cacao nibs as choc-chips.Almond-free (aka Nutella choc-chip cookie)
Replace the almond meal with hazelnut meal.Nut-free
This is not the recipe for you. This Spelt Chocolate Chip Cookie is incredible and nut-free.For 150 pages of nut-free recipes, take a look at my super popular ebook 'The Well Nourished Lunchbox'. Click HERE to find out more and read the rave reviews.
What do you think of this recipe? Please let me know if you've tried it by leaving a comment and rating below.
Get your kids in the kitchen cooking and with these video instructions, even little ones can follow along.
Nourishing Anzac Biscuit
This healthy Anzac Biscuit recipe is a wholesome twist on the Aussie classic, packed with nutrient-dense ingredients that still offer the familiar, comforting taste. They’re easy to make, perfect for snacks or lunchboxes, and a great way to sneak in extra nutrition without compromising on flavour.
Health benefits
This Nourishing Anzac Biscuit recipe combines wholesome ingredients that offer numerous health benefits. The butter provides healthy fats essential for energy and nutrient absorption. Wholemeal spelt flour adds fibre and essential nutrients, supporting digestive health. Desiccated coconut and mixed seeds, such as sunflower, flax, and pumpkin seeds, offer a rich source of healthy fats, protein, and antioxidants. Rolled oats support the nervous system and provide soluble fibre for sustained energy. Ground cinnamon helps regulate blood sugar levels by improving insulin sensitivity and enhancing glucose metabolism. Together, these ingredients create a balanced, nutrient-dense biscuit that satisfies cravings while supporting overall well-being.
Ingredients
The combination of oats, shredded coconut, butter and your choice of honey, rice malt maple syrup forms the base of these biscuits (instead of refined golden syrup). While additional ingredients like seeds and nuts are included for extra crunch and nourishment. Each ingredient plays a part in making this treat not only tasty but also more nutritious compared to the traditional version.
How to make this healthy Anzac biscuit recipe
Simply mix the dry ingredients in one bowl and the wet ingredients in another. Combine them, roll the dough into small balls, and bake until golden. The biscuits will have a lovely chewy texture with a hint of crunch on the outside, making them the perfect healthy indulgence.
Make sure they’re sweet enough
I recommend that you taste the uncooked batter to see if you think it is sweet enough before baking. If not, add the extra rapadura or brown sugar, dried fruit or even cacao nibs. You want to keep the sugar content as low as possible, but you also want your kids to like them enough to enjoy eating these delicious, nourishing treats.
Time-saving Tip
I use a lot of ground seeds in my baking. One, because my lunchbox treats need to be nut free and secondly because seeds are so amazingly nutritious. For example, pepitas are a rich source of zinc, a mineral that often assists fussy eaters. So instead of supplementing to improve their desire and palate for food, include pepitas where you can. My kids aren’t a fan of their flavour so I grind them. If you plan to use them this way, you can grind a small batch of one or a mixture of seeds to keep in the fridge in an airtight glass container (a jar is good).
Serving suggestions and how to store
Serve these biscuits with a cup of tea or as an on-the-go snack. They’re great in lunchboxes or stored in an airtight container for up to a week. You can also freeze them cooked or freeze the dough and bake fresh batches whenever the craving hits!
This healthy Anzac biscuit recipe is a great postpartum snack
This nourishing Anzac biscuit recipe is especially beneficial for postpartum mums, offering a mix of nutrients that support recovery, energy, and overall well-being. The rolled oats are rich in fibre and slow-releasing carbohydrates, providing sustained energy to help combat postpartum fatigue. Oats are also known to support milk production in breastfeeding mothers. The healthy fats from butter, seeds, and coconut contribute to hormone balance and brain health, which are crucial during the postpartum period. The inclusion of mixed seeds and wholemeal spelt flour adds protein, essential fatty acids, and important minerals like magnesium and zinc, which support tissue repair and immune function. Cinnamon helps regulate blood sugar levels, offering a steady energy supply without sharp spikes. Altogether, these biscuits provide a comforting, nutrient-dense snack that supports the unique needs of new mums.
Vary this healthy Anzac biscuit recipe to suit
Check out the variations below the main recipe for tips on how to adapt this oatmeal cookie to your specific dietary needs. To make these gluten-free, simply swap the oats for certified gluten-free oats. For a nut-free version, omit the nuts and replace them with extra seeds. You can also replace butter with coconut oil to make these dairy-free, keeping them suitable for various dietary preferences.
For more delicious, healthy and easy to make wholefood treats, click HERE.

Nourishing Anzac biscuit
A delicious, quick and super nourishing take on the classic. This is one of the most popular sweet treats here at Well Nourished!
Servings: 15 biscuits
Ingredients
- 100 g butter
- 85 g rice malt syrup or honey (¼ cup)
- 1 tsp bicarbonate of soda
- 30 g coconut sugar or rapadura (¼ cup) this is optional if you need extra sweetness
- 60 g wholemeal spelt flour (½ cup)
- 50 g desiccated coconut (½ cup)
- 115 g rolled oats (1¼ cup) see gluten-free below
- 70 g mixed seeds (½ cup) ground (such as sunflower seeds, flax seeds and pepitas) or use LSA (using LSA means it is no longer nut free) or almond meal
- 30 g sesame seeds (¼ cup)
- 1 tsp ground cinnamon
Optional extras
- 1 tbsp dried fruit
- 1 tsp dulse flakes
- 1-2 tsp ground ginger
- 1 tbsp cacao nibs
Instructions
- Pre-heat the oven to 180℃/350°F (fan forced) and line a large biscuit tray with baking paper.
- In a large pot, gently heat the butter and honey or rice syrup until melted (over a low heat). Remove from the heat. Add the bicarbonate of soda and mix very well.
- Add the rest of the ingredients to the pot, and mix until well combined. The mixture should feel wet and sticky but presses together. If it feels a bit dry, add a tiny bit of water to bring them together.
- With wet hands squeeze the mixture into approximately golf sized balls, press between your palms to flatten slightly and place well apart on the baking tray (they spread).
- Bake until golden (approximately 10-20 minutes).
- The longer they are baked the crispier they become. So if you like a slightly chewy biscuit remove just as they start to brown. For a crunchy biscuit, leave a little longer. I also find the gluten-free version cooks quicker still.
- Cool, undisturbed on the tray (they will harden as they cool).
Thermomix Method
- First, grind your seeds, 10 seconds, speed 8. Set aside.
- Now melt your butter and syrup/honey, 1 minute, temp. 90, speed 3.
- Add the bicarb and mix 10 seconds, speed 3.
- Add the remaining ingredients and mix approx. 20 seconds, reverse, interval speed until combined.
- Roll and bake as per above method.
Store
- Store in an airtight container in the fridge or freezer.