
These elderberry immune gummies are a fun and delicious way to enjoy the benefits of elderberry in a homemade snack. Made with just a handful of real food ingredients, they’re naturally flavoured, easy to prepare and free from the colours, flavours and additives often found in commercial gummies. Keep a batch in the fridge or…
gummies
Pomegranate Gummies
These pomegranate gummies are a simple, nourishing alternative to store-bought lollies and a lovely way to include gelatin in a form that both kids and adults genuinely enjoy. They’re lightly sweet, naturally beautiful in colour and easy to make with just a handful of ingredients. I often recommend recipes like this when families want to…
Top Deck Gummies
I’m a huge fan of gelatinous treats and no better flavour combo than chocolate and coconut. Now I’m not a particularly patient person, so when it comes to using tiny moulds….well, let’s just say it has to be a special occasion! I much prefer the pour and set approach, which is how this little ‘Top-Deck Gummies” combo arose. That’s not to say you can’t get creative and use a cute little mould. You can also use patty pans (pictured below) or silicon moulds. My kids are planning to make these in Easter egg moulds for Easter treats.
So we were in the midst of a QLD storm and without power (which as we have our own water supply, this also means no water) so very inconvenient. The kids (and adults) were house-bound and hungry for chocolate – so the kids and I created this surprisingly yummy treat.
Health benefits
Gelatin is made from the bone and connective tissue of animals that has been dried and turned into a powder. I have written about the benefits of gelatin in this post about bone broth.
The biggest benefit of eating gelatin, in my opinion, is that it is a gut healer, which means better nutrient absorption (so greater nourishment) all round. Also, if your gut is functioning well, then your nervous system is better supported too. Gelatin also reduces inflammation, improves joint integrity and for the vain amongst you – it improves the condition of your skin, hair and nails. In fact, it’s said to be better then botox (and erase wrinkles, stretch marks and cellulite) – now I’ve got your attention!
I like to use THIS grass-fed gelatin to make gummies or jelly.
The benefits of coconut I’ve written about here, and raw cacao here.
Ingredients
Made with canned coconut milk, gelatin, vanilla, and raw cacao powder, these gummies are naturally sweetened with honey, maple syrup, or rice malt syrup. You can easily adjust the sweetness to your liking.
Instructions to make chocolate gummies
Whisk coconut milk, sweetener, and vanilla together while slowly adding the gelatin allowing it to bloom. Divide the remaining coconut milk, mixing one half with cacao and more sweetener. Gently heat and combine everything, then layer the chocolate and coconut in a tray or molds. Chill in the fridge until set.
Serving suggestions and how to store
Store these Top Deck Gummies in an airtight container in the fridge or freezer for a quick, healthy snack. If using silicone moulds, freeze the gummies to make removal easier.
Vary top deck gummies to suit your dietary needs
For a vegan option, try using agar agar instead of gelatin. If you’re avoiding fructose, use rice syrup as your sweetener. You can also swap coconut milk for nut milk or replace the cacao with carob powder for a caffeine-free alternative.
Take a look at the variations (below the main recipe) for suggestions to alter the recipe to suit your specific dietary requirements.
Take a look at this Strawberry Cream Gummy recipe plus more jellies HERE.
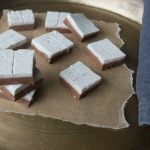
Top Deck Gummies
Top Deck Gummies are a delicious, homemade treat combining rich chocolate and creamy coconut layers. These healthy gummies are simple to make, using only a few wholesome ingredients for a naturally sweet, chewy snack.
Servings: 15 gummies
Ingredients
- 540 ml canned coconut milk (2 x 270ml cans) I like Ayam brand
- 1 tsp vanilla -powder, extract or essence
- 85 g rice malt syrup, honey or maple syrup (¼ cup)
- 5-6 tbsp grass-fed or organic gelatin
- 1 tbsp cacao powder -unsweetened Dutch process or raw
- 1 tbsp rice malt syrup, honey or maple syrup
Instructions
- In a small pot place, one can of coconut milk, vanilla and sweetener and whisk to combine.
- Whilst whisking sprinkle the *gelatin over the coconut milk mixture to combine. It will thicken and bloom as you go. Set aside.
- Divide the remaining can of coconut milk into two jugs. Add the cacao and extra tablespoon of sweetener to one-half of the mixture. Stir to combine.
- Now over a very low heat, gently heat the gelatin mix, taking care not to overheat (it should be just luke warm, no hotter). Stir continually as the gelatin starts to dissolve and become a smooth liquid. It should only reach lukewarm temperature.
- Add half of this warmed gelatin mixture to the cacao mix, stir to combine.
- Mix the remaining coconut milk with the gelatin mixture. You now have your chocolate and coconut layers.
- Pour the chocolate layer into the base of a lined tray (alternatively, you can use individual moulds, mini cupcakes or patty pans -as pictured below). Set in the fridge or freezer (only takes a few minutes).
- Top with the coconut layer and again cool until set.
Store
- Store in an airtight container in the fridge or freezer.
- * Now I prefer the texture of this with 5 tablespoons of gelatin, though my daughter (not at all a jelly/gummy texture fan), much prefers a denser texture so 6 tablespoons are more palatable to her. Have a play, and let me know your preferred texture or follow the liquid to gelatin ratio on your brand of gelatin.
Tip
- If using silicon moulds to set your gummies, freeze them to make removing them from the mould clean and simple.
Notes
Vegan and vegetarian
I haven't recipe tested this but you can substitute the gelatin with agar agar.Fructose-friendly
Choose rice syrup as your sweetener.Coconut free
Replace the coconut milk with nut milk.Cacao-free
Replace the cacao with carob powder.Who else loves this treat? I'd love for you to post a comment or rate this delicious recipe.
