
These elderberry immune gummies are a fun and delicious way to enjoy the benefits of elderberry in a homemade snack. Made with just a handful of real food ingredients, they’re naturally flavoured, easy to prepare and free from the colours, flavours and additives often found in commercial gummies. Keep a batch in the fridge or…
jelly
Pomegranate Gummies
These pomegranate gummies are a simple, nourishing alternative to store-bought lollies and a lovely way to include gelatin in a form that both kids and adults genuinely enjoy. They’re lightly sweet, naturally beautiful in colour and easy to make with just a handful of ingredients. I often recommend recipes like this when families want to…
Lime Coconut Jellies
I’m always experimenting with jelly flavours and these Lime Coconut Jellies came about as I really love the flavour of zesty lime paired with creamy coconut. These low sugar treats are super nourishing and so delicious. The lime coconut flavours are so tropical and fresh and take me to white, pristine beaches on a warm,…
Raspberry and Rosewater Jelly
This Raspberry and Rosewater Jelly is a delicious and nourishing jelly that the kids will love. It’s really quick and easy to make so there’s no need for chemically laden jelly crystals anymore. It was a revolution in my mind as an adult to realise that jelly packets were not needed to make jelly. What…
Blood Orange Jelly
This refreshing home made Blood Orange Jelly (or orange jello depending on where you live in the world) is a delicious and healthy treat, made with fresh orange juice and coconut water. It’s a great option for a light dessert or a snack, and it’s easy to customise for various dietary preferences. I especially love to make this when juicy blood oranges are in season.
My kids number one favourite treat right now is any type of jelly and they’ve rated this, their absolute favourite flavour (for the moment anyway).
Health benefits
Oranges are packed with vitamin C and antioxidants, when oranges and lemons are in season, their nutrient levels are at their best so that’s the time to make this jelly. The addition of coconut water also offers natural electrolytes. The gelatin used here supports gut health, joint function, and skin elasticity, making this not only delicious but also nourishing.
Gelatin is made from the bone and connective tissue of animals that has been dried and turned into a powder. I have written about the benefits of gelatin in this post about bone broth. As I’ve always stated, eating whole food sources of any nutrient is best, so consuming bone broth regularly is the most nutrient dense way to consume gelatin. But for a tasty treat, making a batch of jelly is a delicious way to include additional gelatin in your diet.
I like to use THIS gelatin to make gummies or jelly.
Ingredients
This orange jelly recipe calls for freshly squeezed blood orange juice (or regular orange juice), coconut water, a bit of rice malt syrup or honey for sweetness (optional), lemon juice, and grass-fed or organic gelatin. For a smoother jelly, you can strain the juice, though leaving the pulp adds extra fibre.
How to make this blood orange jelly
Start by warming the coconut water and optional sweetener in a small pot. Sprinkle the gelatin over the liquid gradually, stirring after each addition. Once dissolved, combine the coconut water mixture with the freshly squeezed orange and lemon juices. Pour into molds or a bowl and refrigerate until set.
Serving suggestions and how to store
Serve the jelly chilled, either on its own or with fresh fruit or whipped cream. Store in an airtight container in the fridge to maintain freshness.
Vary this blood orange jelly to suit your needs
To make this blood orange jelly recipe low-fructose, use rice malt syrup as the sweetener. For a coconut-free version, substitute the coconut water with water kefir or kombucha. Vegetarians and vegans can try setting the jelly with agar-agar instead of gelatin, though adjustments may be needed for the best results.
Take a look at the variations (below the main recipe) for suggestions to alter the recipe to suit many specific dietary requirements.
For more delicious, healthy and easy to make wholefood treats, click HERE.

Blood Orange Jelly
A jelly made with fresh fruit and gelatin is a far cry (health wise) from the processed version. Best of all, it really is very easy to make, no more so than my Blood Orange Jelly.
Servings: 4
Ingredients
- 500 ml freshly squeezed blood orange juice (or regular orange juice) (2 cups)
- 120 ml coconut water (½ cup)
- 1-2 tbsp rice malt syrup or honey (optional)
- 1 lemon/s -juice
- 3 tbsp grass-fed or organic gelatin
Instructions
- Place the coconut water and sweetener into a small pot and heat for a minute to lukewarm.
- Sprinkle the gelatin over the liquid, stirring after each tablespoon. For a traditional jelly set use 2 tablespoons, for a firmer, more gummy-lolly-like consistency, add 3 tablespoons.
- If the gelatin doesn't completely dissolve, you can pop your pot back on the heat for a minute (only heat to luke warm), stirring well.
- Juice your oranges and lemons and mix with the coconut water mixture. Personally, I don't strain any bits of pulp, but feel free to if you want a jelly with a really smooth consistency.
- Pour into a bowl or moulds, and set in the fridge.
Store
- Airtight in the fridge.
Notes
Low-fructose
Choose rice malt syrup as your sweetener.Coconut-free
Replace the coconut water with water keffir or kombucha.Vegetarian and vegan
Set with agar-agar (I haven't recipe tested this as yet).Other jelly recipes you might like:
I love to receive your feedback and welcome any questions. Post your comment or questions below.
Lemon Turmeric Jellies
I’m always experimenting with jelly flavours and trying to cram as much nutrition into one small treat as possible. So these Lemon Turmeric Jellies came about after my husband came down with man flu and I went on a mission to keep the rest of us from succumbing.
These lemon turmeric jellies are a refreshing, immune-boosting treat packed with antioxidants and anti-inflammatory benefits. They’re easy to make, with a zesty lemon flavour and a hint of spice from ginger and turmeric.
Health benefits of lemon jellies
The ginger and turmeric root are powerful anti-inflammatory and warming immune supportive herbs in these gut loving lemon gummies. The coconut water is hydrating and the kombucha and kefir are supportive to a healthy gut microflora. While lemon adds a vitamin C boost.
Gelatin is made from the bone and connective tissue of animals that has been dried and turned into a powder. I have written about the benefits of gelatin in this post about bone broth.
The biggest benefit of eating gelatin, in my opinion, is that it is a gut healer, which means better nutrient absorption (so greater nourishment) all round. Also, if your gut is functioning well, then your nervous and immune systems are better supported.
I like to use THIS gelatin to make healthy lemon gummies or lemon jelly.
Ingredients
These gummies are made with simple, natural ingredients like fresh turmeric root (or powder), fresh ginger, fresh lemon juice, raw honey and grass-fed gelatin, these jellies are a healthy, gluten-free snack.
How to make Lemon Turmeric Jellies
Start by simmering the turmeric and ginger in water to release their flavours and goodness, then mix in coconut water, lemon juice, and honey. Add gelatin to set the mixture, and let it chill in the fridge until firm.
Serving suggestions and how to store
Serve these anti-inflammatory jellies as a midday snack or a post-meal treat. Store in an airtight container in the fridge for up to a week or in the freezer for longer.
Vary the lemon jellies to suit your needs
For a low-fructose gummy, use rice malt syrup instead of honey. If you’re not a fan of coconut, swap coconut water for kombucha or water kefir, and you can easily sub fresh turmeric with powdered.
Take a look at the variations (below the main recipe) for suggestions to alter the recipe to suit many specific dietary requirements.
For more delicious, healthy and easy to make wholefood treats, click HERE.
Or for more healthy gummie recipes, click HERE.
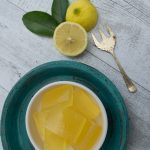
Lemon Jellies
A beautiful, immune supportive treat, these Lemon Jellies have been a hugely popular recipe. They are great for helping to prevent illness, as well as being an easy food to eat if you are feeling under the weather.
Servings: 8
Ingredients
- 250 ml water (1 cup)
- 2 cm ginger root -peeled & sliced
- 1 cm fresh turmeric root -peeled & sliced or ½ tsp ground
- 250 ml coconut water (1 cup) or kombucha or water kefir
- 1-4 tbsp honey - Manuka or raw (amount depends on the level of sweetness you like)
- 1 lemon/s (large) juice (or 2 small)
- 2 - 3 tbsp grass-fed or organic gelatin
*Note about honey - only raw, unheated and unprocessed honey has medicinal properties. A good quality Manuka honey is the very best option.
Instructions
- Place the water, ginger and turmeric root into a small pot and bring to the boil, reducing to a simmer for approx. 5 minutes.
- Take off the heat off and allow to cool for 5 minutes.
- Remove the solids (strain) and stir in the coconut water (kombucha or water kefir) honey, lemon and optional Camu powder. Taste to check that you are happy with the flavour (sour/sweet balance). I should be luke warm before adding your gelatin.
- Now sprinkle the gelatin over the liquid, allow it to sit and bloom (go wrinkly) for a few minutes then whisk to mix through. For a traditional jelly set use 2 tablespoons, for a firmer, more gummy-lolly-like consistency, add 3 tablespoons.
- If the gelatin doesn't completely dissolve, you can pop your pot back on the heat for only 1 minute (only heat to luke warm), stirring well.
- Pour into a lined slice tray or moulds, and set in the fridge.
Thermomix
- Place the water, ginger and turmeric root into the bowl heat 5 mins, varoma, speed 1.
- Add the honey or rice malt syrup, mix 30 seconds speed 3.
- Remove the solids and add the coconut water, kombucha or water kefir, honey (and optional camu camu). Mix 10 seconds, speed 3.
- Now add the gelatin, allow to bloom, mix 1 minute, temp 37, speed 2 or until the gelatin is dissolved.
Store
- Store in an airtight container in the fridge or freezer.
Tip
- If using silicon moulds to set your gummies, freeze them to make removing them from the mould clean and simple.
- If your Jellies don't set, its because the liquid was either too hot or too cold (it needs to be luke warm) or the brand you are using has a different liquid to gelatin ratio. All is not lost, simply add back to the pot, gently heat to luke warm and add more gelatin.
Notes
Low-fructose
Choose rice malt syrup as your sweetener.Coconut-free
Choose the kefir or kombucha instead of the coconut water.Don't like ginger or want to use powdered?
Leave it out or use ½ teaspoon of the ground ginger powder.No fresh turmeric?
Sub with ¼ teaspoon of turmeric powder.Add Camu
You can certainly add a tsp of camu camu powder if you wish for an extra vitamin C boost.I'd love to hear how you liked these delicious little treats. Post a comment or rate this recipe.
Top Deck Gummies
I’m a huge fan of gelatinous treats and no better flavour combo than chocolate and coconut. Now I’m not a particularly patient person, so when it comes to using tiny moulds….well, let’s just say it has to be a special occasion! I much prefer the pour and set approach, which is how this little ‘Top-Deck Gummies” combo arose. That’s not to say you can’t get creative and use a cute little mould. You can also use patty pans (pictured below) or silicon moulds. My kids are planning to make these in Easter egg moulds for Easter treats.
So we were in the midst of a QLD storm and without power (which as we have our own water supply, this also means no water) so very inconvenient. The kids (and adults) were house-bound and hungry for chocolate – so the kids and I created this surprisingly yummy treat.
Health benefits
Gelatin is made from the bone and connective tissue of animals that has been dried and turned into a powder. I have written about the benefits of gelatin in this post about bone broth.
The biggest benefit of eating gelatin, in my opinion, is that it is a gut healer, which means better nutrient absorption (so greater nourishment) all round. Also, if your gut is functioning well, then your nervous system is better supported too. Gelatin also reduces inflammation, improves joint integrity and for the vain amongst you – it improves the condition of your skin, hair and nails. In fact, it’s said to be better then botox (and erase wrinkles, stretch marks and cellulite) – now I’ve got your attention!
I like to use THIS grass-fed gelatin to make gummies or jelly.
The benefits of coconut I’ve written about here, and raw cacao here.
Ingredients
Made with canned coconut milk, gelatin, vanilla, and raw cacao powder, these gummies are naturally sweetened with honey, maple syrup, or rice malt syrup. You can easily adjust the sweetness to your liking.
Instructions to make chocolate gummies
Whisk coconut milk, sweetener, and vanilla together while slowly adding the gelatin allowing it to bloom. Divide the remaining coconut milk, mixing one half with cacao and more sweetener. Gently heat and combine everything, then layer the chocolate and coconut in a tray or molds. Chill in the fridge until set.
Serving suggestions and how to store
Store these Top Deck Gummies in an airtight container in the fridge or freezer for a quick, healthy snack. If using silicone moulds, freeze the gummies to make removal easier.
Vary top deck gummies to suit your dietary needs
For a vegan option, try using agar agar instead of gelatin. If you’re avoiding fructose, use rice syrup as your sweetener. You can also swap coconut milk for nut milk or replace the cacao with carob powder for a caffeine-free alternative.
Take a look at the variations (below the main recipe) for suggestions to alter the recipe to suit your specific dietary requirements.
Take a look at this Strawberry Cream Gummy recipe plus more jellies HERE.
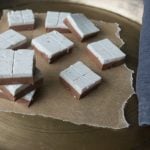
Top Deck Gummies
Top Deck Gummies are a delicious, homemade treat combining rich chocolate and creamy coconut layers. These healthy gummies are simple to make, using only a few wholesome ingredients for a naturally sweet, chewy snack.
Servings: 15 gummies
Ingredients
- 540 ml canned coconut milk (2 x 270ml cans) I like Ayam brand
- 1 tsp vanilla -powder, extract or essence
- 85 g rice malt syrup, honey or maple syrup (¼ cup)
- 5-6 tbsp grass-fed or organic gelatin
- 1 tbsp cacao powder -unsweetened Dutch process or raw
- 1 tbsp rice malt syrup, honey or maple syrup
Instructions
- In a small pot place, one can of coconut milk, vanilla and sweetener and whisk to combine.
- Whilst whisking sprinkle the *gelatin over the coconut milk mixture to combine. It will thicken and bloom as you go. Set aside.
- Divide the remaining can of coconut milk into two jugs. Add the cacao and extra tablespoon of sweetener to one-half of the mixture. Stir to combine.
- Now over a very low heat, gently heat the gelatin mix, taking care not to overheat (it should be just luke warm, no hotter). Stir continually as the gelatin starts to dissolve and become a smooth liquid. It should only reach lukewarm temperature.
- Add half of this warmed gelatin mixture to the cacao mix, stir to combine.
- Mix the remaining coconut milk with the gelatin mixture. You now have your chocolate and coconut layers.
- Pour the chocolate layer into the base of a lined tray (alternatively, you can use individual moulds, mini cupcakes or patty pans -as pictured below). Set in the fridge or freezer (only takes a few minutes).
- Top with the coconut layer and again cool until set.
Store
- Store in an airtight container in the fridge or freezer.
- * Now I prefer the texture of this with 5 tablespoons of gelatin, though my daughter (not at all a jelly/gummy texture fan), much prefers a denser texture so 6 tablespoons are more palatable to her. Have a play, and let me know your preferred texture or follow the liquid to gelatin ratio on your brand of gelatin.
Tip
- If using silicon moulds to set your gummies, freeze them to make removing them from the mould clean and simple.
Notes
Vegan and vegetarian
I haven't recipe tested this but you can substitute the gelatin with agar agar.Fructose-friendly
Choose rice syrup as your sweetener.Coconut free
Replace the coconut milk with nut milk.Cacao-free
Replace the cacao with carob powder.Who else loves this treat? I'd love for you to post a comment or rate this delicious recipe.

Mango and Coconut Parfait (with Salted Pineapple)
This refreshing mango and coconut parfait is the perfect tropical treat. It’s a layered dessert that combines the natural sweetness of mango with creamy coconut, topped with a salty, buttery pineapple for a delicious finish. Simple, yet impressive! It is refined sugar-free, gluten-free, dairy-free and grain-free (complete with a low-fructose option too).
Health benefits
I don’t need to tell you that store bought jelly, is loaded with sugar (or yuk artificial sweeteners), artificial flavours and colours. Basically a chemical cocktail of disease-causing nothing-ness.
Real, homemade jelly is the exact opposite – nourishing, healing and plain good for you. A simple combo of fruit or another whole food and gelatin.
Gelatin is made from the bone and connective tissue of animals that has been dried and turned into a powder. I have written about its benefits of gelatin in this post about bone broth.
The biggest benefit of eating gelatin, in my opinion, is that it is a gut healer, which means better nutrient absorption (so greater nourishment) all round. Also, if your gut is well, then your nervous system is better supported too. It reduces inflammation, improves the joint integrity and for the vain amongst you – it improves the condition of your skin, hair, and nails. In fact, it’s said to be better then botox (and erase wrinkles, stretch marks, and cellulite) – now I’ve got your attention!
I like using THIS GELATIN because gelatin is derived from animals, I like to know I am consuming the best quality product with the least chemical loading.
So now for a delicious way to enjoy gelatin…
Ingredients
The star ingredients of this recipe include ripe mango, creamy coconut milk, and grass-fed gelatin to give the parfait its smooth, jelly-like texture. It’s naturally sweetened with a touch of rice malt syrup or honey, making it both tasty and nourishing.
How to make this mango parfait
Start by puréeing the mango flesh in a high speed blender. Mix the mango puree with gelatin and boiling water to create the first layer. Once set in the fridge, make the coconut layer by warming half the coconut milk with vanilla and sweetener, then mixing with the remaining gelatin. Layer it over the mango and let it chill until ready to serve.
Serving suggestions and how to store the mango coconut parfait
Top your parfait with salted pineapple for an extra burst of flavour, or simply garnish it with toasted coconut flakes, mint leaves, passionfruit, or berries. Store covered in the fridge, and it will keep well for a few days—perfect for prepping ahead!
Vary this to suit your dietary needs
To make this low-fructose, swap out the mango for raspberries and use rice malt syrup as your sweetener. For a vegan option, try using agar-agar in place of gelatin (though it hasn’t been tested with this recipe yet). To make it coconut-free, replace the coconut milk with cream. If you’d like to make it into a slice, set the layers in a lined slice tin instead of glasses.
For more delicious, healthy and easy to make wholefood treats, click HERE.

Mango and Coconut Parfait (with Salted Pineapple)
One of my most favourite desserts, this Mango and Coconut Parfait (with Salted Pineapple) is really very easy to make and such a lovely, light way to finish off a meal.
Servings: 4
Ingredients
Mango layer
- 1 mango/s -peeled and flesh removed
- 1 tbsp grass-fed or organic gelatin - I buy THIS brand
- 250 ml boiling water (1 cup)
Coconut layer
- 270 ml canned coconut milk (I like Ayam brand)
- 1 tbsp grass-fed or organic gelatin
- 1 tsp vanilla -powder, extract or essence
- 2 tbsp rice malt syrup, honey or maple syrup -optional
Instructions
Mango layer
- In a powerful blender or food processor purée the mango until smooth. Sprinkle over the gelatin and mix through.
- Add the boiling water and mix well until the gelatine has dissolved.
- Pour into 4-6 glasses and refrigerate to set.
- Once set make your coconut layer.
Coconut layer
- Place half the coconut milk in a small pot with the vanilla and sweetener and heat, stirring until the sweetener dissolves (only a minute or so) then remove from the heat immediately.
- Sprinkle the gelatin over the unheated half of the coconut milk, mix together until dissolved and then add to the hot coconut milk, mixing until combined and the gelatin is dissolved.
- Allow to cool a little and pour a layer on top of the mango jelly.
- Return to the fridge to set.
- Chill until you are ready to serve.
Serve
- I've served this with salted pineapple (diced about half a cup of pineapple into small cubes and cook over a high heat with a tablespoon of salted butter for a few minutes). If you'd like a more caramelised pineapple, add a tablespoon of sweetener as well as the butter.
- Toasted coconut flakes
- Passionfruit or berries would be lovely too
Store
- Covered in the fridge.