• Skip to primary navigation
  • Skip to main content
  • Skip to primary sidebar
  • Skip to footer

Well Nourished HomepageWell Nourished

Simple recipes, whole foods, inspired health

  • Family Members
    • Recipe Filter
    • Quick Access Shopping List
    • Membership Tutorials
    • How to be Well Nourished
    • About Well Nourished
    • Where to Shop and what to Buy
    • FAQ
  • Family Members
    • Meal Plans
      • G’s Spring Meal Plan
      • G’s Autumn Meal Plan
      • My Weekly Planner
      • Quick Access Shopping List
      • Ingredient Alert
      • Prep Ahead Plans
      • Hosting Event Plans
      • Wellness & Health Plans
    • Recipe Filter
    • Courses & Community
    • Tips for family’s
      • Getting Kids On-board
      • Planning for Picky Eaters
      • New to Meal Planning
      • Meal Planning Tips & Tricks
    • Nourishing Resources
    • Members Offers
    • What’s New This Week
    • Events
    • Membership Tutorials
    • About Well Nourished
    • FAQ
  • Recipes
    • Meals
      • 30 Minute Meals
      • Budget Friendly
      • Chicken & Turkey
      • Fish & Seafood
      • Freezable Meals
      • Make-ahead Meals
      • Meat
      • Pasta and Noodles
      • Pork recipes
      • Slow Cooked
      • Vegetarian
    • Sweet Recipes
      • Baked Sweets
      • Desserts
      • Ice-blocks
      • No-bake Sweets
    • Breakfast
    • Healthy Lunchbox
    • After School Snacks
    • Savoury Snacks
    • Sides & Salads
      • Salads
      • Side Dishes
    • Soups
    • Drinks & Smoothies
    • Dips
    • Holidays & Entertaining
    • Sauces & Dressings
    • Sourdough Baking
    • Fermenting
    • Staples
    • Recipe Roundups
    • Members only
    • Members only
  • Shop
    • Membership and Programs
    • Ebooks
    • Free Stuff
  • Affiliates
  • About
    • About Well Nourished
    • Testimonials
    • Join the Family
    • FAQ
  • Resources
    • Find a Practitioner
    • Find whole food
      • ACT
      • NSW
      • NT
      • SA
      • QLD
      • TAS
      • VIC
      • WA
    • Products and Services I Value
    • Whole foods pantry list
    • Ingredients Glossary
  • Wellness Hub
    • Inflammation
    • Perimenopause & Menopause
    • Healthy Kids
      • Healthy Baby
      • Healthy Toddler
      • Healthy Child
      • Immune support for kids
      • Digestion & Food Allergies
      • Healthy Lunchboxes
    • Budgeting & Planning
    • Digestion & Intolerance
    • Immune Health
    • Food as Medicine
    • Foods to Avoid
    • Healthy Habits
    • Sugar
    • Carbs, Protein, Fats
      • Carbohydrates
      • Fats
      • Protein
    • Healthy Food Choices
    • Healthy Home
    • Stress & Mood Disorders
    • Healthy Mind
    • Maternal health
    • Health Challenges
  • Login
    • Well Nourished Family
    • Courses & Community
    • Affiliate Login
  • My account

quinoaflakes

Healthy Chocolate Caramel Muesli Bar

January 24, 2018 | Healthy Lunchbox, After School Snacks, Baked Sweets

I have a sneaking suspicion that this weeks Chocolate Caramel Muesli Bar is going to be popular. I’ve had a few requests for a healthy caramel slice recipe and though it looks nothing like the sugar laden three layer slice, it is a super delicious, nourishing caramel choc treat.

As a kid I spent every weekend at my nan’s house and we cooked and baked together- a lot! Most of my childhood memories are centred around tending to our chickens and ducks, digging for potatoes (my favourite job as the kids in my favourite Enid Blighton book ‘The Faraway Tree’ used to dig for new potatoes) and long sessions of cooking in her old wood-fired stove, always experimenting, always creating ‘new’ recipes and searching for delicious flavour combo’s.

However as an adult, whilst I’ve always loved cooking meals, it wasn’t until I had kids (and they started school) that I baked again. Once my youngest noticed all the biscuits and crackers her friends had in their lunchbox (and wanted the same) I realised the only thing I could do was to get my bake on again. The rest they say, is history!

A healthy-ish treat

I always try to inject as much nutrition as I can into all of my recipes, including sweet treats. I’ve made this Chocolate Caramel Muesli Bar wheat-free and nut-free so it’s good for a school lunchbox snack. The seeds and wholegrains really help to add protein, fibre, good fats and a bit of sustenance to this sweet treat. The cacao adds antioxidants, and using rice malt syrup or honey as a sweetener helps avoid the refined sugars typically found in store-bought bars. My kids feel like they’ve hit the jackpot with this slice – it’s a new favourite.

Ingredients

The base of this sticky muesli bar recipe is made with pantry staples including butter, oats, spelt flour, mixed seeds, and cacao powder. The caramel layer is a simple mix of rice malt syrup (or your preferred sweetener), coconut milk, and a pinch of sea salt for balance. It’s all-natural, with no preservatives or artificial ingredients.

How to make Healthy Chocolate Caramel Muesli Bar

To make these bars, you’ll start by cooking a simple sweet caramel sauce in a small saucepan while mixing the base ingredients. Press most of the oat mixture into a baking pan lined with baking paper (parchment paper), layer with the gooey caramel, then crumble the remaining oat mix on top. Bake until golden, let it cool, and refrigerate to firm up before slicing into bars.

Serving suggestions and how to store

These bars are perfect as a snack and in the school lunchbox. Store them in an airtight container in the fridge, or freeze for longer storage—they’re great to pack in a lunchbox straight from the freezer.

Vary this healthy chocolate caramel muesli bar to suit your needs

For a gluten-free version, simply swap the spelt flour for gluten-free flour and the oats for quinoa flakes. To make it dairy-free, replace the butter with coconut oil. You can even add nuts like hazelnuts or pecans for a nuttier twist, or use regular cream if you’re not avoiding coconut.

Take a look at the variations (below the main recipe) for suggestions to alter the recipe to suit many dietary requirements.


For more delicious, easy to make healthy bars, slices and sweet treats, click HERE.

Chocolate caramel muesli slice - This Chocolate Caramel Muesli Bar is a delicious, nut-free, whole foods lunchbox treat. It's easy to make and has variations for gluten and dairy free too.
Print Recipe
4.80 from 68 votes

Chocolate Caramel Muesli Bar

This healthy Chocolate Caramel Muesli Bar is a delicious, wholesome treat that satisfies your sweet tooth. Packed with oats, seeds, and a thin layer of caramel, it’s the perfect snack for school lunches or a snack. Plus, it's super easy to make!
Prep Time15 minutes mins
Cook Time20 minutes mins
Total Time35 minutes mins
Course: Snack
Servings: 18 slices
Author: Georgia Harding

Ingredients

Base / crumble

  • 125 g butter -cubed
  • 170 g rice malt syrup, honey or maple syrup (½ cup)
  • ½ tsp bicarbonate of soda
  • 120 g mixed seeds (1 cup approx.) I used sunflower seeds and pepitas
  • 120 g wholemeal spelt flour (1 cup)
  • 200 g rolled oats (2 cups) or quinoa flakes (or a mixture)
  • 30 g cacao powder (4 tbs approx.) unsweetened Dutch process or raw

Caramel

  • 115 g rice malt syrup, honey or maple syrup (â…“ cup)
  • 120 ml canned coconut milk (½ cup) preferably full-fat, I use Ayam brand
  • 1/8 tsp sea salt

Instructions

  • Pre-heat the oven to 180℃ / 350℉ (fan-forced).
  • Begin with the caramel.
  • In a small saucepan mix the sweetener, coconut milk and sea salt and bring to a bubbling simmer. Simmer rapidly (it looks a bit foamy on top) for about 10 + minutes or until the caramel starts to thicken. Remove from the heat and allow to cool (it will further thicken as it cools).
  • Whilst the caramel cooks/cools, make the slice.
  • In a small pot melt the butter and sweetener, mixing to combine. Add the bicarb and stir well.
  • Place the seeds in a food processor and grind into a meal. Add the flour, oats (or quinoa flakes) and cacao and mix until well combined.
  • Add the butter/ sweetener mix and process to combine. The mixture should come together into a coarse dough.
  • Line a small tin (27cm x 18cm) with baking paper. Press â…” of the mixture into the base of the tin and press down very firmly with wet hands. I like to make sure the outer edges sit a little higher than the middle so I get an even coverage without the caramel making its way down the sides. 
  • Top with the caramel. It is not a thick layer as a traditional slice would be, rather a randomly gooey, thin layer. More caramel means a lot of sugar which is why I've kept it minimal. 
  • Crumble the remaining dough over the caramel pressing lightly.
  • Bake for approximately 20 minutes or until just golden brown.
  • Allow to cool in the pan, refrigerate until firm and then cut into slices (chilling it allows for it to be sliced without crumbling).

Thermomix Method

    Caramel

    • Heat the sweetener, coconut milk and sea salt, 10-15 minutes, temp varoma, speed 3 (cap ajar or off so the steam can escape) or until it thickens (this can vary a bit). You can set this aside to cool and use the bowls without washing it. 

    Base

    • Grind your seeds and set aside. No need to rinse the bowl.
    • Melt the butter and sweetener 1 minute, temp 90, speed 3 or until melted and combined. Add the bicarb and mix 5 seconds speed 3. 
    • Add the rest of the base ingredients and the butter/sweetener and mix 15 seconds, speed 4. You may need to scrape the sides a few times to fully combine.
    • Assemble as above.

    Store

    • Airtight in the fridge or freezer. You can pack in school lunch boxes from frozen.

    Notes

    Gluten-free

    Substitute the spelt for gluten-free flour and the oats with quinoa flakes (rolled quinoa). Many fans have reported this is great made with buckwheat flour. 

    Dairy-free

    Substitute the butter with coconut oil.

    Vegan

    Chose rice malt or maple syrup as your sweetener. Substitute the butter with coconut oil.

    Nutty

    The seeds can be substituted with any nuts. I love this with chopped hazelnuts or pecans or walnuts.

    Coconut-free

    Replace the coconut milk in the caramel with regular cream. 
     

    After more healthy lunchbox inspiration?

    My best selling ebook The Well Nourished Lunchbox has you covered and is choc-a-block full of healthy lunchbox inspiration - and not just sweet but heaps of savoury crackers, sandwich-free lunch recipes and so much more. In fact, it's 150 pages of goodness!
    Click HERE to find out more about this fabulous ebook (and read the many, many reviews).


    I'd love to hear how your kids like this slice? I have a feeling it is going to be very popular. Comment and/or rate this recipe below (it really helps my recipes to reach more people so thanks in advance). 

    Healthy Breakfast Tart

    May 10, 2017 | Breakfast, Desserts

    With Mother’s Day approaching I thought I’d share a gorgeous little recipe that my whole family adores – a healthy, yet easy to make Healthy Breakfast Tart. This recipe also features on JamieOliver.com as my spin on the great man’s Mini super-fruit breakfast wraps.

    This healthy breakfast tart is a delicious, wholesome way to start your day. With a crunchy, nutty base and a creamy yoghurt filling, it’s both satisfying and nutritious. Topped with your favourite fresh or stewed fruits, it’s as versatile as it is tasty.

    I know this tart might look a bit complicated and decadent but it really is neither. It’s also extremely versatile and intolerance friendly and you can alter the toppings to suit your tastes or to what ever is in season.

    So Happy Mothers Day to each and every amazing mumma. I hope your family spoil you rotten!

    Health benefits

    Packed with healthy fats from nuts and seeds, this breakfast tart also provides fibre from chia seeds and oats (or quinoa flakes for a gluten-free option). Topping it with Greek or coconut yogurt adds a dose of probiotics for gut health, while fresh fruit offers antioxidants and natural sweetness.

    Ingredients

    This tart recipe couldn’t be easier to make. The granola like base is made from a mix of chia seeds, nuts or seeds, rolled oats (or quinoa flakes), coconut oil, rice malt syrup or honey, vanilla extract and warming spices like cinnamon, cardamom, and ginger. The filling is simply thick Greek or coconut yogurt, topped with fresh or stewed fruit of your choice for a naturally sweet finish.

    How to make this healthy breakfast tart

    To make the crust of this fruit tart, blend chia seeds and nuts or seeds in a food processor until fine. Add oats, coconut oil, sweetener, spices, and a bit of water, then pulse until the mixture forms a dough. Press the dough into a greased springform tart pan and bake for 15 minutes. Let it cool, then top with yogurt and your favourite fresh fruit like berries or kiwi or banana.

    Serving suggestions and how to store

    This tart is best served fresh with a generous topping of fresh fruit (or stewed fruit if you prefer). It’s perfect for breakfast or brunch, and slices neatly for easy serving. You can store leftovers in an airtight container in the fridge for up to two days, but it’s best enjoyed the same day for optimal freshness.

    Vary this healthy breakfast tart to suit your needs

    For a gluten-free or grain-free version, use quinoa flakes instead of oats. To make it dairy-free or vegan, swap the Greek yogurt for coconut yogurt. If you’re avoiding nuts, replace them with seeds like sunflower or pumpkin seeds, and for a coconut-free option, use macadamia nut oil in the base.

    Take a look at the variations (below the main recipe) for suggestions to alter the recipe to suit any specific dietary requirements.


    For more delicious, easy to make, healthy breakfast recipes, click HERE.

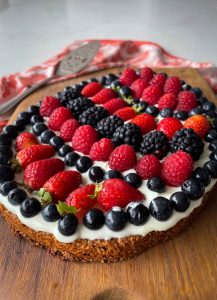
    Healthy Breakfast fruit tart - This Healthy Breakfast Tart is a versatile, nourishing start to the day. It suits grain, gluten, dairy, fructose, egg & nut-free. Thermomix method included.
    Print Recipe
    4.94 from 15 votes

    Healthy Breakfast Tart

    This quick and easy to prepare tart is super nourishing so good enough for breakfast but pretty enough for dessert (or just dessert for breakfast)!
    Prep Time10 minutes mins
    Cook Time15 minutes mins
    Total Time25 minutes mins
    Course: Breakfast, Dessert
    Servings: 4

    Ingredients

    Base

    • 1 tbsp chia seeds
    • 120 g mixed nuts or seeds (¾ cup)
    • 65 g rolled oats (â…” cup) or rolled quinoa flakes
    • 60 g coconut oil (¼ cup) melted if solid
    • 85 g rice malt syrup or honey ¼ cup approx.) taste the batter and alter the sweetness to taste
    • 1 tsp vanilla -paste or powder
    • 1 tsp ground cinnamon
    • 1 tsp ground cardamom
    • ½ tsp ground ginger
    • 1 tbsp water

    Filling

    • natural, Greek or coconut yoghurt
    • Fresh or stewed fruit of your choice

    Instructions

    • Preheat your oven to 180℃/ 350℉. Grease a spring form round or rectangle tin.
    • In a food processor grind the chia to a fine meal. If using a Thermomix, blend 10 seconds, speed 8.
    • Add the nuts and/or seeds and grind to a meal. If using a Thermomix, grind 7-8 seconds, speed 8.
    • Now add the rest of the base ingredients and pulse to just combine and break up the oats. If using a Thermomix, turbo x 3-4 pulses.
    • It should form a dough that sticks together when pressed.
    • Press into your spring form tin with wet finger tips and bake for 15 minutes.
    • Remove from the oven, allow to cool until warm, then remove from the tin.
    • Top with unsweetened Greek or thick-set natural yoghurt and top with fresh fruit (fig, blueberries, strawberries, kiwi-fruit, mint) or even stewed fruit.

    Store

    • Store in an airtight container in the fridge.

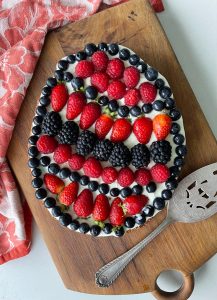
    Easter Inspired Breakfast Tart

    • To make this Easter inspired breakfast tart, I made a mould for the biscuit base from tin foil by folding strips and stapling together then forming into an 'egg' shape.
    • This is the side on view of this cute little Breakfast Tart. It slices beautifully into neat portions too so it's easy to serve.

    Notes

    Gluten and grain-free

    Choose rolled quinoa flakes instead of oats.

    Dairy-free and vegan

    Replace the Greek yoghurt with coconut yoghurt.

    Nut-free

    Choose seeds (mix of sunflower and pumpkin seeds is lovely) and coconut oil.

    Coconut-free

    Choose the macadamia nut oil for the base.

    Tip

    You can prepare the base and store it airtight until ready to serve.


    How yum is this? I'd love to hear what your favourite topping is - post your twists in the comments below.

    Fruit Crumble Muesli Bar

    February 6, 2017 | Healthy Lunchbox, After School Snacks, Baked Sweets

    This Fruit Crumble Muesli Bar is the perfect balance of wholesome ingredients and natural sweetness, making it a go-to snack for busy days or a treat in the kids’ lunchboxes. It’s a versatile recipe that’s easy to adapt with your favorite seasonal fruits, and the base doubles as both a crunchy foundation and a crumbly topping. Plus, it’s super easy to make and packed with nutrients from oats, seeds, and fruit.

    I love to make this slice if I need to use up over ripe fruit. I’m not a fan of using dried fruit (like dates/sultanas etc) in baking as I find it gives me a big sugar rush (followed by brain fog and energy slump) and I’ve also noticed my kids desire for sugar increases if they eat dried fruit. So I prefer to use fresh fruit in my baking and this Fruit Crumble Muesli Bar is one of my families favourite whole food treats.

    Health benefits

    Packed with oats, mixed seeds, and seasonal fruit, these muesli bars provide a great source of fibre, healthy fats, and vitamins. Oats in herbal medicine are known for supporting nervous system health while seeds like sunflower and pepitas are rich in essential fatty acids and minerals. The fruit filling offers a natural sweetness, full of antioxidants and fibre, making this a healthy, nut-free snack.

    Ingredients

    This recipe includes simple, wholesome ingredients like rolled oats, mixed seeds, coconut, and your favourite seasonal fruit. You can easily adapt it with gluten-free or dairy-free substitutions, depending on your dietary needs.

    How to make Fruit Crumble Muesli Bar

    Start by prepping the crumble mixture and pressing two-thirds of it into the base of your lined baking tin. While it bakes for 10 minutes, soften your fruit filling on the stove. Then, layer the fruit over the baked base, top with the remaining crumble, and bake until golden brown. Let it cool before slicing for the perfect, non-crumbly bars.

    If you own a Thermomix, we’ve also included Thermomix instructions for this recipe.

    Serving suggestions and how to store

    These bars are perfect for an on-the-go snack or as a dessert. Store them in an airtight container in the fridge, or freeze them to pack in lunchboxes straight from the freezer. You can also serve them warmed up with a little cream for an indulgent treat.

    Vary fruit crumble muesli bar to suit your needs

    For a gluten-free version, swap the spelt flour for gluten-free flour and use quinoa flakes instead of oats. If you’re dairy-free or vegan, coconut oil makes an excellent substitute for butter, and maple syrup or rice malt syrup works as a sweetener. You can even switch out the seeds for chopped nuts if you want a nutty twist! Take a look at the variations (below the main recipe) for suggestions to alter the recipe to suit many specific dietary requirements.

    My favourite fruits in the fruit crumble muesli bar

    I tend to choose fruits that have seen better days to make this recipe – like over ripe plums, pears, strawberries, raspberries or blueberries. Or floury apples often end up in this bar (I love them combined with rhubarb or berries to make berry crumble bars).


    For more delicious, easy to make healthy snacks and treats, click HERE.

    This delicious Fruit Crumble Muesli Bar is great for school lunches & can be frozen for a hassle free snack. Nut, gluten, dairy-free options.
    Print Recipe
    4.95 from 50 votes

    Fruit Crumble Muesli Bar

    Nut and dried fruit-free, this Fruit Crumble Muesli Bar is a delicious, nourishing edition to any lunchbox. It freezes well also, so it's great to batch-bake.
    Prep Time15 minutes mins
    Cook Time30 minutes mins
    Total Time40 minutes mins
    Course: Dessert, Snack
    Servings: 12

    Ingredients

    Base / crumble

    • 125 g butter or coconut oil -cubed
    • 170 g rice malt syrup, honey or maple syrup (½ cup)
    • ½ tsp bicarbonate of soda
    • 120 g mixed seeds (1 cup approx.) I used sunflower seeds and pepitas
    • 120 g wholemeal spelt flour (1 cup)
    • 200 g rolled oats (2 cups) or quinoa flakes (or a mixture)
    • 50 g desiccated coconut (½ cup)
    • 1 tsp ground cinnamon

    Filling

    • 1 cup/s your choice of seasonal fruit (fresh plum, apricot, nectarine, peach, berries, apple, pear, cherries) -finely diced or sliced
    • 2 tbsp rice malt syrup, honey or maple syrup (optional)
    • 1 tbsp butter
    • 1 tbsp chia seeds

    Instructions

    • Pre-heat the oven to 180℃ / 350℉ (fan-forced).
    • In a small pot melt the butter and sweetener, mixing to combine. Add the bicarb and stir well.
    • I pulse the seeds in a food processor to break them up and make a finer slice (but you don’t have to). Mix the seeds, flour, oats (or quinoa), coconut and cinnamon in a bowl.
    • Add the butter/ sweetener mix and stir to combine.
    • Line a small tin (27cm x 18cm) with baking paper. Press â…” of the mixture into the base of the tin and press down firmly with wet hands and bake for 10 minutes. The remaining â…“ will form the crumble top (so set aside until after the fruit is ready).
    • Whilst this is baking, put all the filling ingredients into the small pot (that you used in the first stage, no need to wash). I’ve used cherries and plums in this photograph as they are in season right now
    • Simmer until the fruit starts to soften, stirring occasionally.
    • Once the base is cooked, top with the fruit mixture and with wet hands, place with the rest of the crumble over the fruit.
    • Bake for approximately 20 minutes or until just golden brown.
    • Allow to cool in the pan, refrigerate until firm and then cut into slices (cooling it allows for it to be sliced without crumbling).

    Thermomix Method

    • Melt the butter and sweetener 1 minute, temp 90, speed 3 or until melted and combined. Add the bicarb and mix 5 seconds speed 3. Set aside.
    • Pulse the seeds, turbo button 3-4 times (check through the lid after each pulse to chop as required). Add the rest of the crumble ingredients and the butter/sweetener and mix 15 seconds, speed 3. You may need to scrape the sides to fully combine.
    • The filling can also be cooked in the TMX, all of the ingredients into the bowl, temp 90, 100, reverse speed 1. The time depends upon the fruit (softer fruit needs less time), approx 3-5 minutes.
    • Assemble as above.

    Store

    • Airtight in the fridge or freezer. You can pack in school lunch boxes from frozen. I also love this heated up with fresh cream – very indulgent!!
    Slice gone 'green' (or flecked green)

    • You may have noticed that your seed containing cakes, slices or cookies turn or fleck 'green'. I can explain...Sunflower seeds contain chlorogenic acid which reacts with the baking powder and bicarb when it's heated and turns various shades of green when cooled. To reduce the ‘shrek-look’ you can reduce the baking powder or bicarb (by about a third) or add 2 tsp lemon juice or vinegar to the wet ingredients. But remember - even if they do turn green, they are completely safe to eat.

    Notes

    Gluten and grain-free

    Substitute the spelt for gluten free flour and the oats with quinoa flakes (rolled quinoa).

    Dairy-free 

    Substitute the butter with coconut oil.

    Vegan

    Choose rice malt or maple syrup as your sweetener. Substitute the butter with coconut oil.

    Nutty

    The seeds can be substituted with any nuts. I love this with chopped almonds and pecans or walnuts.

    Fructose friendly

    Choose rice malt syrup for your sweetener and low fructose fruits for the filling (raspberries, rhubarb is my fave).

    Coconut-free

    Replace the coconut with ¼ cup of ground seeds or nut meal (if nut free isn't important). 

    After more healthy lunchbox inspiration?

    My best selling ebook The Well Nourished Lunchbox has you covered and is choc-a-block full of healthy lunchbox inspiration - and not just sweet but heaps of savoury crackers, sandwich-free lunch recipes and so much more. In fact, it's 150 pages of goodness!
    Click HERE to find out more about this fabulous ebook (and read the many, many reviews).
     

    I think this is one of my favourite snacks - would love to hear how you and your kids like it? Comment and rate this recipe below. 

    Chicken, Bacon and Vegetable Meatloaf

    August 19, 2015 | Make-ahead Meals, Chicken

    This healthy, easy to make Chicken Bacon Vegetable Meatloaf came about when I was was looking to make a tasty no fuss meal that I could bake ahead and reheat later for dinner. I was planning meatballs, but wasn’t in the mood for rolling them, so decided to make this tasty meatloaf. This really nourishing meal was the delicious result. I hope you like it too?

    Health benefits

    Chicken provides lean protein, while the assortment of vegetables adds vitamins, fibre, and antioxidants. Using quinoa instead of breadcrumbs boosts the protein and fibre content, making this dish more nutrient-dense. All round its a healthy, nutritionally balanced meal.

    Ingredients

    This gluten-free chicken vegetable meatloaf recipe combines red onion, garlic, celery, carrot, capsicum, and spinach with chicken mince and smoky bacon. Flavoured with thyme and smoked paprika, the addition of rolled quinoa and eggs helps bind the ingredients together. It comes together to make a simple, healthy mid week meal that the whole family will love.

    How to make this chicken meatloaf recipe

    To make this chicken bacon vegetable meatloaf, start by finely chopping the vegetables and mixing them with the quinoa, egg, herbs, and spices. Mix the chicken mince in and press the mixture into a loaf tin lined with bacon rashers. Bake at 180°C (350°F) for around 30 minutes, then crisp the bacon under a grill.

    Serving suggestions and how to store

    Serve the meatloaf with steamed veggies, mashed sweet potatoes, or a fresh salad. Store leftovers in the fridge in an airtight container for up to 3 days, or freeze the cooked or uncooked loaf for future meals.

    Vary chicken bacon vegetable meatloaf to suit your dietary needs

    For an egg-free version, simply omit the egg—it will still hold together, though slightly less firm. You can also substitute rolled quinoa with fresh breadcrumbs for a more traditional texture.

    For more quick, easy, nourishing and delicious meals, click HERE.

    Chicken Bacon Vegetable Meatloaf - a really quick, easy to make & healthy dinner for the whole family. It's also gluten-free & dairy-free.
    Print Recipe
    4.47 from 15 votes

    Chicken Bacon Vegetable Meatloaf

    This Chicken Bacon Vegetable Meatloaf is a tasty and nutritious spin on classic meatloaf. Packed with hidden veggies, lean chicken mince, and a crispy bacon wrap, it's perfect for family dinners or meal prep.
    Prep Time15 minutes mins
    Cook Time30 minutes mins
    Total Time45 minutes mins
    Course: Main Course
    Servings: 4

    Ingredients

    • 1 red onion/s -peeled, halved
    • 2 clove/s garlic -peeled
    • 1 stick/s celery -roughly chopped
    • 1 carrot/s (large) roughly chopped
    • 1 red capsicum/s (small) roughly chopped
    • 30 g baby spinach (handful approx.)
    • 1 tsp dried thyme (or 2 teaspoons of fresh)
    • 1 tsp smoked paprika
    • 60 g rolled / flaked quinoa (½ cup) or fresh breadcrumbs
    • 1 egg/s
    • Sea salt and freshly ground black pepper -to taste
    • 500 g chicken mince
    • 4 rasher/s bacon

    Instructions

    • Preheat your oven to 180℃/350℉ (fan-forced).
    • In a food processor, chop the onion, garlic, celery, carrot, capsicum and spinach finely. Place in a large mixing bowl.
    • Add the thyme, paprika, rolled quinoa, egg and salt/pepper and mix to combine. Add the chicken mince and squeeze together to combine the ingredients well.
    • Now line a loaf tin with your bacon rashers so they cover the base and sides of the tin.
    • Press the minced mixture in the tin (so it's firmly packed) and bake for approximately 30 minutes or until cooked through.
    • Once cooked, drain the delicious juices from the tin into a little jug and invert the loaf onto a tray. Place it under a moderate grill for 5 minutes or so to crisp the bacon.
    • Slice with a serrated knife and serve with the reserved pan juices.

    Thermomix method

    • Preheat your oven to 180℃.
    • In the Thermomix, chop the onion, garlic, celery, carrot, capsicum and spinach 10 seconds, speed 5.
    • Add the thyme, paprika, rolled quinoa and egg and mix to combine, 10 seconds, speed 2. Add the chicken mince and mix, reverse, 20 seconds, speed 2 (you will need to scrape down the sides to help it combine fully).
    • Now line a loaf tin with your bacon rashers so they cover the base and sides of the tin.
    • Press the minced mixture in the tin and bake for approximately 30 minutes or until cooked through.
    • Once cooked, drain the delicious juices from the pan into a little jug and invert the loaf onto a tray. Place it under a moderate grill for 5 minutes or so to crisp the bacon.
    • Slice with a serrated knife and serve with the reserved pan juices.
    • Note - it can also be steamed in the Varoma for 45 minutes (then bacon crisped as above).

    Serve

    • With steamed vegetables or a big salad.
    • I also love meatloaf with mashed potato or sweet potato or this Magic Mash. To make a simple mashed sweet potato, place washed whole sweet potatoes in the oven to bake alongside the meatloaf. Once they are cooked, simply scoop the flesh out of the skin and mash with a dollop of butter and sea salt.

    Make-ahead

    • Re-heat in a low oven, covered until just hot.

    Store

    • Store in an airtight container in the fridge.
    • Can also be frozen (either raw or after cooking). Fully defrost before cooking/ re-heating.

    Notes

    Egg-free

    Just omit it. It won't be quite as firm, but still delicious.
     

    I love to receive comments and questions about my recipes. It really helps me to shape what I share with you in the future. Share you comment below.

    Primary Sidebar

    Join the community

    Social Media

    Join over 140,000 followers

    Nourish Your Inbox

    Nourish Your Inbox!

    Christmas Meal Planning Ebook

    Sign up today for your FREE:
    • Chocolate Ebook
    • Subscribers Only Special Offers
    • Practical Health & Nutrition Tips
    • New Whole Food Recipes

    WN App

    Join the Family

    Join the Family

    Join The Family

    The Well Nourished Family Membership is your complete solution to your families health and wellbeing. With 1200+ whole food recipes and SO MUCH MORE. Join for a limited time for over 80% OFF!

    JOIN & SAVE 80%

    Upgrade Your Membership – Recipe Only

    Health Programs & Courses – Public

    Health Programs & Courses

    Health Programs & Courses

    Whether you’re looking for effortless meal creation, lunchbox inspiration or strategies to raise adventurous eaters, our expert-led resources will guide you every step of the way.

    Find Out More

    Programs and Courses – FAM only

    Affiliate promo – public

    Become an Affiliate

    Looking to partner with a respected, Australian-run health and wellness brand to expand your reach and your income?

    Find out More

    Featured Lunchbox Ebook – Public

    From the Shop

    See More

    Footer

    Logos

    Well Nourished HomepageWell Nourished

    As featured on

    Footer-social

    Connect with us

    • About Well Nourished
    • Sitemap
    • Contact
    • Privacy Policy
    • Website Terms of Use
    • Affiliates

    © Well Nourished 2026

    A Firstnature site

    Not feeling quite yourself?
    If you're dealing with skin flares, gut issues, fatigue or joint pain, this five-minute quiz will help you understand what's actually driving it.
    TAKE QUIZ

    Rate This Recipe

    Your vote:


    A rating is required
    A name is required
    An email is required