
This really easy to prepare Chinese Five Spice Beef Brisket is a delicious meal with melt in your mouth meat, creamy mash, and a zesty slaw. It’s a satisfying, comforting meal that’s both easy to make and full of flavour. I really love cooking with brisket. It’s a cheap cut that does best when slow…
redmeat
Ramadan and Fatteh (pita with chickpeas and yoghurt)
This week I’m sharing a recipe for a delicious Middle Eastern Fatteh. Food and food culture really fascinates me. I believe the very best thing about traveling or meeting people from different cultures is becoming more informed about their way of life and of course, exploring their traditional food.
Every country or community’s unique cuisine reflects its distinct history, lifestyle, values, and beliefs. I just love how traditional cuisine is passed down from one generation to the next and how it operates as an expression of cultural identity.
So with Ramadan beginning today, I’ve asked my friend Souad to share what Ramadan is, as well as a recipe for Fatteh (pita with chickpeas and yoghurt) – a divine meal that features on her table regularly. Trust me, Fatteh is so delicious and will absolutely become a regular on my own table – my whole family loved it, it’s SO easy to make and definitely proves that the simple things in life, are often he best.
What is Ramadan?
Fasting during the month of ‘Ramadan’ is one of the five pillars of the Islamic faith. Ramadan is in the ninth and most sacred month of the Islamic Lunar Calendar. The fasting of Ramadan is obligatory for every healthy person and takes place from sunrise until sunset. However young children, the elderly, travellers, pregnant women and people in poor health are amongst those that are exempted from fasting.
The foods of fasting and Ramadan
During Ramadan, Muslims fast by waking up very early (known as the ‘Suhoor’) and eating a pre-dawn meal to help sustain their mind and body throughout the day. Suhoor should be nutrient dense, yet not too heavy and contain a combination of high quality protein, fibre-rich food, hydrating vegetables and good sources of fat; in addition they also consume water and or tea (preferably herbal). Food choices do vary from culture to culture. Foods eaten can include dates, eggs, traditional soups with choice of protein, oatmeal, a variety of homemade dairy products (labne, shanglish) with bread, olives, cucumber and tomatoes. Once the sun rises, the fasting Muslim is not allowed to consume any food or water until sunset.
‘Iftar’ time (breaking of the fast) occurs at sunset, where it is customary to break the fast with dates and water as this helps to restore sugar and salt levels and rehydrates the body. Then Muslims pray the ‘Megreb prayer’ and then return to the dinner table to have their meal.
The types of food served vary by region. However mostly, families start with a simple soup, then move onto grazing the table with a variety of dishes ranging from casseroles, rice and legumes, salads and vegetables and of course meat/chicken/seafood. The fasting Muslim can continue to eat and drink until sun rise. It is highly encouraged to be more conscious and wary of what and how much you eat, focusing more on eating small amounts of healthy, wholesome, hearty foods and abstaining from processed and sugary foods, maintaining control and not over indulging. And to importantly, stay hydrated!
More than just fasting…
Throughout this month, a Muslim must do his utmost to refrain from negative behaviour, like swearing, lying etc and increase good behaviours. This is to help the Muslim build spiritual character and personal awareness by increasing charitable deeds, attending congregational prayers and maintaining ties with family, friends and neighbours.
End of fasting…
Ramadan comes to an end at the sighting of the crescent moon which indicates a new month. It is then, Muslims celebrate with a feast called ‘Eid-al-Fitr.’ This lasts for three days and is filled with family and community activities, gifts for the children and plenty of eating.
I really enjoyed putting this post together, thanks so much to Souad for sharing this valuable insight into Ramadan and her recipe for Fatteh, such a fabulous, delicious meal.
Health benefits
This dish combines protein-rich chickpeas and lamb with gut-friendly yoghurt, offering a nutritious balance of macronutrients. The pine nuts and tahini provide healthy fats, while garlic, parsley, and lemon juice contribute immune-boosting properties and antioxidants.
Ingredients
Crispy Lebanese pita bread forms the base, layered with chickpeas, a garlicky yoghurt-tahini sauce, spiced lamb mince, and a garnish of toasted pine nuts and fresh parsley.
How to make this delicious fatteh
Begin by crisping Lebanese bread in the oven to make crispy pita chips. Cook chickpeas until tender, then prepare the garlicky yogurt sauce by whisking together garlic, yoghurt, tahini, lemon juice, and salt. Sauté lamb mince with butter or ghee and optional spices until browned and seasoned. Assemble the dish by layering bread, warm chickpeas, yoghurt sauce, and lamb in a serving dish. Finish with a sprinkle of pine nuts and parsley.
Serving suggestions and how to store fatteh
Serve Fatteh immediately, accompanied by traditional sides like olives, pickled vegetables, sauerkraut, or fresh spring onions. Leftover mince and chickpeas can be stored separately in the fridge or frozen, though the bread will lose its crispness if stored after assembly.
Vary this fatteh to suit your dietary needs
For a dairy-free option, use coconut yoghurt and replace ghee with olive oil. Substitute the Lebanese bread with gluten-free wraps for a gluten-free version. Vegetarians and vegans can swap lamb for finely chopped mushrooms and follow the dairy-free variation. Toasted sunflower seeds are a great alternative to pine nuts for a nut-free option. For a garlic-free version, replace garlic with cumin and smoked paprika in the yoghurt sauce. Add ground cumin or coriander to the lamb mince for a spiced twist.

Fatteh (pita with chickpeas and yoghurt)
This is a traditional Middle Eastern dish with many variations depending on each cultural preference. It's always served in one big serving plate amongst family and friends.
Servings: 4
Ingredients
- 2 Lebanese wrap breads
- 2 cup/s cooked chickpeas -fresh soaked overnight and then boiled until soft or you can use 2 cans
Yoghurt Sauce
- 375 g natural, Greek or coconut yoghurt (1½ cups)
- 3 clove/s garlic -crushed (raw)
- 1 tsp sea salt
- 1 tbsp hulled tahini
- ½ lemon/s -juice
- 2 tbsp water (optional if the yoghurt is very thick)
Mince
- 250 g lamb mince
- 1 tbsp butter, ghee or coconut oil
- Sea salt and freshly ground black pepper -to taste
- ½ tsp ground cumin (optional)
Garnish
- 70 g pine nuts (½ cup) toasted (to serve)
- ¼ bunch/s fresh parsley leaves -chopped for garnish
Instructions
- Preheat the oven to 160℃/320℉.
- Place the Lebanese bread on a tray and bake for 10 mins, turning half way, until browned and crispy. Remove from the oven and set aside. Alternatively, cut the bread into small wedges and fry them on the stove in 1 teaspoon ghee.
- Cook the soaked chickpeas by boiling until soft and cooked through (approx 10 minutes if they are well soaked). Drain them prior to serving, season and set aside. If using a can, drain and rinse them and then heat in a pot with a little water and sea salt until warm.
Yoghurt Sauce
- This sauce is super important to the tastiness of this dish, it adds SO much flavour. Don't scrimp on the garlic.
- Meanwhile, place the yoghurt, raw garlic, salt, tahini, lemon juice in a bowl and whisk together until well combined. If using a Thermomix - chop the garlic, 3 seconds, speed 8. Add the rest of the sauce ingredients and blend, 30 second, speed 5.
- If necessary, add more water (plain or from the chickpea water) slowly to the yoghurt until desired consistency is obtained. You want the yogurt to sit on the chickpeas (unlike in the pic - I over thinned it, Souad tells me it should sit on top of the chickpeas instead of sinking through doh!)
Mince
- In a small fry pan, melt the butter, ghee or coconut oil and cook the minced lamb (plus optional cumin)over a high heat for about cook 3-5mins or until it's cooked through. Season with sea salt and pepper to taste.
Assemble
- Break up the Lebanese bread into small bite size and arrange them in an even layer on the bottom of a deep serving platter bowl (or casserole).
- Top with the warm, drained chickpeas.
- Top the chickpeas with the yogurt sauce and then spread the lamb and ghee evenly over the yogurt.
- Sprinkle with pine nuts and parsley and enjoy immediately.
Serve
- Traditionally, Souad tells me she would serve the Fatteh with various sides including olives, pickled vegetables, sauerkraut and spring onion (though this can vary depending on personal preferences)
Store
- The mince and chickpeas can be stored in an airtight container in the fridge. Obviously the pita will go soggy if stored.
- The mince and chickpeas can be frozen.
Notes
Dairy-free
Replace the yoghurt with coconut yogurt. Can also replace the ghee with olive oil.Gluten-free
Replace the Lebanese bread with a gluten-free wrap.Vegetarian and Vegan
Replace the lamb with finely chopped mushrooms (Thermomix 5 seconds, speed 4). Plus the dairy-free option for vegan.Nut-free
Replace the pine nuts with toasted sunflower seeds.Garlic-Free
I would replace the garlic with a half teaspoon of cumin and smoked paprika (in the yoghurt sauce).Spice it up
I love this with a teaspoon of ground cumin and coriander (ground or fresh) cooked into the mince. I'd like to thank Souad so much for this fabulous insight into Ramadan and the food that features on her table during this sacred month. Souad has three beautiful boys and is passionate about whole foods and raising happy healthy kids. She has contributed so much to the Well Nourished community over the years and I can't wait to meet her in person one day. I'd love to learn more about cultural food experiences so if food is part of a religious or sacred celebration in your culture, I'd love to explore it in future posts. Feel free to email me (via the contact form in the footer of this page) if you'd like to share an insight and/or a recipe. Cheers Georgia xI'd love to hear how you enjoyed this post and recipe - post a comment below and rate the recipe if you love it too.
yogurt sauce flavors layers bowl toast taste pita chips baking toasted pita middle eastern eggplant almonds crumbs
Lamb Shoulder with Mint Chutney
This is the last of the series of recipes I have developed for JamieOliver.com and his series of ’10 recipes to save your life’. Slow cooked Lamb Shoulder with a mint chutney is probably one of my most cooked meals when entertaining a crowd as it can be prepared ahead and requires little time of me in the kitchen once the guests arrive (I hate missing out). This makes it a timely recipe ahead of the festive season and one I know you are just going to love.
The chutney is optional but highly recommended. We make it spicy, but you can always leave out the chilli if spice isn’t your thing. It does seem to loose some of it’s spiciness when combined with the lamb (my kids handle a two chilli chutney fyi).
Health benefits
Lamb is a great source of protein, zinc, and vitamin B12, which supports energy levels and immunity. Unlike store-bought marinades, this homemade version uses fresh herbs and minimal salt, making it a healthier choice. The fresh mint sauce not only adds a burst of flavour but also aids digestion, making this meal as nutritious as it is delicious.
Ingredients
For this recipe, you’ll need a bone-in lamb shoulder, which gives the best flavour and texture. Fresh rosemary, garlic cloves, and lemon infuse the lamb with rich, savoury notes, while the mint chutney adds brightness. The ingredients are simple but deliver big on taste.
How to make this slow-roasted lamb shoulder
To make this dish, you’ll slow-cook the lamb shoulder over lemon halves, which act like a natural rack and infuse the meat with subtle citrus notes. After cooking the lamb for 4 hours, blend up the mint chutney in a food processor. Once the lamb is tender, remove the foil, grill the top for a crispy finish, and serve with the chutney.
Serving suggestions and how to store
Serve this lamb shoulder with a simple side salad or steamed veggies dressed with olive oil, lemon juice, and seasoning. Store any leftover meat in an airtight container in the fridge, and reheat it in the oven, covered, for 15 minutes at 150℃. This lamb is perfect for making ahead for a stress-free gathering.
Vary this to suit your dietary needs
For a garlic-free version, replace garlic with cumin powder and a pinch of chilli flakes in the baste. You can also swap the garlic inserted into the lamb with anchovy fillets, and omit the garlic in the mint chutney.
Take a look at the variations (below the main recipe) for suggestions to alter the recipe to suit your specific dietary requirements.
For moreeasy to make, delicious meal recipes, click HERE.

Lamb shoulder with Mint Chutney
This lamb shoulder with mint chutney is a tender, fall-apart roast that’s easy to prepare and perfect for feeding a crowd. The slow-cooked lamb is infused with garlic and rosemary, while the fresh mint chutney adds a zesty kick. It’s a hearty, delicious meal that pairs beautifully with simple salads or roasted veggies.
Servings: 4
Ingredients
- 1 lamb shoulder (1.5-2kg approx.) bone in (if it has the shank attached, have your butcher cut the tendon at the base so it doesn't pop up when it is cooking and pierce the foil)
- 1 lemon/s -halved and bases trimmed so they can sit flat, flesh side up
- 6 clove/s garlic -peeled and halved (or quartered if large)
- 160 ml water (⅔ cup)
Baste
- 2 tbsp fresh rosemary leaves - chopped finely
- 1 clove/s garlic - peeled and crushed
- 1 tbsp extra virgin olive oil - extra virgin
- 1 tsp sea salt - or to taste
- ground black pepper - to taste
Mint Chutney
- 1 bunch/s fresh mint leaves - large (1 cup firm packed), leaves picked off the stems
- 1 clove/s garlic - crushed
- 1 red chilli/s - whole
- ½ tsp sea salt - or to taste
- 1 lemon/s - juice
- 1 tsp red wine vinegar
Instructions
- Preheat the oven to 250℃/480℉ (fan-forced).
- Prepare the baste by mixing all of the ingredients together in a small bowl.
- Place the lemon halves in a large roasting tray, flesh side up. Sit the lamb on top of the lemons (so the lemon acts like a rack).
- Pierce the flesh of the lamb with a pairing knife 12-14 times. Push the slivers of garlic into the holes.
- Rub the lamb with the marinade and add the water to the bottom of the tray.
- Now cover with foil making sure the edges are sealed well. I use at least 3 pieces of foil and tuck it under the tray so it is firmly sealed. The lamb needs to steam to make it fall apart when it's done. Any gaps in the foil it can dry out so take your time and seal it carefully.
- Put it in the oven and immediately turn it down to 150℃/ 290℉. Cook for 4 hours.
- Whilst that's cooking make the chutney by combining the mint, garlic, chilli and salt in a food processor and processing to a paste. Mix in the lemon juice and vinegar and store in the an airtight container in the fridge until the lamb is ready to serve.
- When the lamb is ready, remove the foil and put it under the grill for 5-10 minutes or until the top is crispy.
- Rest the lamb for a few minutes before serving with the mint chutney and tongs to pull apart the meat.
Make-ahead
- If you want to make this ahead, cook it for the full 4 hours, but don't remove the foil until you are ready to serve.
- Reheat it in a 150℃ oven (still covered) for 15 minutes, then remove the foil and put it under the grill for 5-10 minutes or until the top is crispy.
Store
- Any leftover meat in an airtight container in the fridge.
Notes
Serve
I love this with a big fresh salad or steamed veggies simply dressed with lemon juice, olive oil, salt and pepper. My ebook 'Well Nourished - Sides and Salads' has plenty of fabulous accompaniments to this delicious meal - it's a bargain at $9.95. Check it out HERE.Garlic-free
Replace the garlic in the baste with 1 tsp of cumin powder and a good pinch of chilli flakes. Replace the garlic (that's inserted into the meat) with pieces of anchovy fillets. Omit the garlic in the mint chutney.I'd love to hear how you like this, one of my families all time favourite meals. Post a comment below or rate this recipe.
Indian Spiced Mince and Peas
I love Indian cuisine, especially this Indian Spiced Mince and Peas recipe – I’d go so far to say it is my favourite kind of food. So I was especially thrilled to see a curry on Jamie Oliver’s list of ’10 recipes to save your life’. In case you hadn’t heard, as part of Jamie Oliver’s Food Revolution, I was one of 10 people selected world-wide to put my spin on 10 of Jamie’s favourite staple recipes.
I’ve shared quite a few of my favourite Indian style curries already here on the website (Quick and Easy Dhal, Simple Vegetable Curry and my very popular Chicken and Almond curry) so I thought for this part of the challenge I’d share this really quick, budget friendly family favourite – my Indian Spiced Mince and Peas.
This Indian Spiced Mince and Peas dish is a quick, delicious meal that combines aromatic spices with juicy tomatoes, tender beef mince and sweet peas. It’s perfect for busy weeknights and can easily be served with rice, quinoa, or a low-carb alternative like cauliflower rice.
Health benefits
Beef mince provides a great source of high-quality protein and essential vitamins like B12, which is crucial for energy production and brain function. The spices (turmeric powder, ginger, coriander powder, garam masala) in this dish add anti-inflammatory benefits, while the coriander (cilantro) and peas boost its fibre and vitamin content.
Ingredients
This recipe calls for simple ingredients like beef mince (ground beef), garlic cloves, fresh ginger, onions, tomatoes, and fresh or frozen peas. A variety of spices such as cumin powder, garam masala, and coriander powder add rich, Indian-inspired flavours to the dish. The recipe also provides flexibility with add-ins like vegetables or different grains.
How to make Indian Spiced Mince and Peas
Start by sautéing onions in your choice of fat, then add garlic, ginger, and spices to bloom the flavours. Stir in the beef mince and tomatoes, cooking until the mince is browned. Add peas in the final minute to keep them fresh and vibrant, then garnish with fresh coriander before serving.
Serving suggestions and how to store
Serve with rice, quinoa, or cauliflower rice. It’s also delicious paired with a fresh leafy salad or steamed vegetables, and a dollop of natural yoghurt. A side of nann bread never goes astray too. Store leftovers in an airtight container in the fridge for up to 3 days, or freeze for longer storage.
Vary Indian Spiced Mince and Peas to suit your dietary needs
To make it vegetarian, replace the beef mince with canned brown lentils. For an onion and garlic-free version, use extra ginger to enhance the flavour. You can also add more vegetables to boost the nutritional value.
Take a look at the variations (below the main recipe) for suggestions to alter the recipe to suit any specific dietary requirements.

Indian Spiced Mince with Peas
Dinner won't get any more budget friendly, easier or tastier then my Indian Spiced Mince with Peas. This is one meal sure to go on regular rotation. Gluten, grain and dairy-free.
Servings: 4
Ingredients
- 30 g butter, ghee or coconut oil (2 tbsp)
- 1 onion/s (large) chopped
- 2 clove/s garlic - chopped
- 1 tbsp ginger root - peeled and finely grated
- 2 tsp ground coriander
- ½ tsp ground turmeric
- 1 tsp ground cumin
- 1 tsp garam masala
- 1 tsp sweet paprika
- 1 tsp sea salt - or to taste
- chilli flakes - to taste (optional)
- 500 g beef mince
- 4-5 roma tomatoe/s - roughly chopped
- 150 g peas (1 cup) fresh or frozen
- ¼ bunch/s fresh coriander leaves - to serve
Serve
- Rice, quinoa or cauliflower rice (to serve)
Instructions
- In a large frypan or wok, heat the butter, ghee or coconut oil and sauté the onion over a medium heat for a few minutes to soften.
- Add the garlic, ginger and spices and fry, stirring well for about a minute.
- Now add the mince and tomatoes and stir-fry until the mince is cooked.
- Add the peas and cook for a minute or two. Stir through the coriander and serve immediately.
- Taste and adjust the seasoning if necessary.
Tip
- Other vegetables can be added to the mix when stir frying. Cut them small so they cook quickly with the mince.
Serve
- With rice or cauliflower rice (pictured here).
- I also serve with a leafy salad or steamed vegetables.
- It's lovely with a dollop of natural yoghurt too.
Make-ahead
- Re-heat in a pot or wok over a low heat until just hot.
Store
- Leftovers are great for school lunches (in the thermos) or even wrapped in a fresh spring roll.
- Store in an airtight container in the fridge.
- Can also be frozen.
Notes
Different or more vegetables
Go ahead - it's a great base to add to.Onion and Garlic-free
Replace the onions and garlic with and extra 2cm's of ginger.Vegetarian
Replace the mince with two cans of brown lentils (drained and rinsed). Serve with rice or quinoa to ensure you have a complete protein.I'd love for you to share how you like this delicious, super simple recipe. Post a comment below or rate this recipe.
Middle Eastern Beef Brisket
This Middle Eastern beef brisket is a flavour-packed dish that transforms a budget friendly cut of meat into a tender, aromatic feast. It is really quick to prepare, but does require a lot of time to cook, so plan ahead for this meal.
The basic recipe will leave you with a ‘pulled’ style of meat which you can serve with salad, in a burger, wrap or tortilla, or on a bed of creamy mashed potato. The tahini sauce adds a lovely earthy-citrus hit to balance the richness of the meat. I hope you enjoy this really versatile and very satisfying meal.
Health benefits
Beef brisket is rich in protein and essential nutrients like iron and zinc, which are vital for overall health. The combination of spices not only adds depth of flavour but also provides antioxidant benefits, while tahini adds healthy fats and calcium, making this dish both nutritious and satisfying.
Ingredients
To make this Middle Eastern beef brisket, you’ll need a blend of spices (smoked paprika, cumin, coriander, cinnamon, cardamom, and cloves), a 1 kg beef brisket, chicken stock or bone broth, onion, garlic cloves, and a simple tahini sauce made with hulled tahini, lemon juice, and water.
How to make Middle Eastern Beef Brisket
Preheat your oven to 150°C (300°F) and mix the spices, salt, and pepper in a small bowl. Rub the brisket with the spice blend and place it in a Dutch oven or casserole dish. Add sliced onions, garlic, and pour in the stock until it almost covers the meat. Cover tightly and slow cook for about 4 hours, turning the brisket halfway through. Finish by uncovering and increasing the heat to caramelise the meat for about 20-30 minutes, then drizzle with homemade tahini sauce before serving.
Serving suggestions and how to store
Serve this brisket buffet-style or on a platter, allowing everyone to create their own meals in lettuce cups, tortillas, or over grains (like couscous or rice). Store leftovers in an airtight container in the fridge for up to 3 days, or freeze shredded meat for future meals. Reheat gently in the oven or on the stove with a splash of broth.
Vary Middle Eastern Beef Brisket to suit your dietary needs
This pulled beef recipe is gluten-free, dairy-free, nut-free and grain-free. For those with specific dietary needs, you can easily modify this recipe: omit the onion for fennel, replace garlic with chilli flakes for a kick, or substitute tahini with almond butter for a sesame-free option. Additionally, feel free to adjust the spices according to your flavour preferences!
Take a look at the variations (below the main recipe) for suggestions to alter the recipe to suit many specific dietary requirements.
For more delicious, easy to make slow cooked meals click HERE.
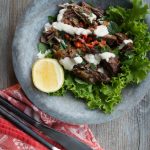
Middle Eastern Beef Brisket
This Middle Eastern Beef Brisket features on my dinner table very regularly. I love it because I can simply prepare it and then let it slow cook in my oven so dinner is done when I'm late home from after school activities.
Servings: 4
Ingredients
- 2 tsp smoked paprika
- 2 tsp ground cumin
- 1 tsp ground coriander
- 1 tsp ground cinnamon
- 1 tsp ground cardamom
- ¼ tsp ground cloves
- Sea salt and freshly ground black pepper - to taste
- 1 kg beef brisket (approx.)
- 370 ml chicken broth or stock (1½ cups) or water
- 1 onion/s - halved and sliced
- 2 clove/s garlic - sliced
Tahini Sauce
- 3 tbsp hulled tahini
- 1 lemon/s (small) juice
- ¼ tsp ground cumin
- Pinch sea salt
- water - to thin sauce
Instructions
- Preheat your oven to 150°C/300°F (fan-forced).
- In a small bowl mix together the spices, salt and pepper.
- Rub the beef with about 1½ tablespoons of the spice blend to coat it and place in a medium sized Dutch oven, casserole dish (with a lid) or roasting pan. Place the remaining spice mix in a small jar for your next brisket.
- Add the garlic, onion and pour over the stock (it should cover or almost cover the meat).
- Cover with a lid or foil wrapped tightly to seal.
- Cook for about 2 hours, turn the meat and cook for another 2 hours (approx. total 4 hours cook time). Remove from the oven and rest with the lid on for 30 minutes.
- It is cooked perfectly when the meat easily pulls apart. If you have a larger or particularly tough cut it may need a slightly longer cook time
- If there is lots of excess liquid int he pot, remove the lid or foil and turn the oven up to 200°C. Pull the meat apart and cook for approximately 20 minutes to caramelise and thicken the sauce (only if required).
- To make your tahini sauce, combine all of the tahini sauce ingredients together. Add the water tablespoon by tablespoon until you have a slightly runny sauce that can be drizzled over the meat.
Slow Cooker
- This can certainly cooked in a slow cooker. However, as the speed and temperature varies between the many brands of slow cookers, base the amount of liquid you add and the cook time on a similar style of recipe in the guide book for your specific slow cooker. The general rule of thumb is to halve the liquid and double the cook time, but understanding your own slow cooker is the best guide.
Serve this buffet style so you can build your own meal. Here are some ways we eat this...
- In a lettuce cup with julienne vegetables
- In a burger, wrap or tortilla with lots of salad/grated veggies
- On a creamy mashed potato or cauliflower puree with steamed green vegetables
- Over rice, quinoa or cous cous.
- Or any way you like really
Make-ahead
- Re-heat (covered) in a low oven until just hot or in a pot with a splash of bone broth.
Store
- Store in an airtight container in the fridge.
- Shredded meat can also be frozen.
Grab Bag Formula Method
- If you've done the **Grab Bag Formula Short Course, this is the method to convert this recipe...
- Place the beef brisket, spices, seasoning, stock, onion and garlic into your Grab Bag. Carefully seal your Grab Bag. I close most of the seal then press out as much air as I can then complete the seal. Place the Grab Bag in the freezer.
- To cook, remove the Grab Bag from the freezer, place on a baking tray and thaw in the fridge overnight.
- Tip the contents of the Grab Bag into a large oven proof dish (with a tight fitting lid) or Dutch oven. It may still be a bit frozen; that’s okay.
- Place the lid on the pot, set your oven to 150°C/300°F (fan-forced) and cook for about 2 hours. Turn the meat and cook for another 2-3 hours (total 4-5 hours cook time). It is cooked when the meat easily falls apart when pulled at. Remove the lid and turn the oven up to 200°C. Pull the meat apart and cook for approximately 30 minutes to caramelise and thicken the sauce.
- ** The Grab Bag Formula Short Course is available to purchase for just AU$46 HERE.ORIf you are a full-access Well Nourished Family member, the course is included in your membership and you can access in the members portal - HERE.
Notes
Onion-free
Replace the onion with a small bulb of finely diced fennel.Garlic-free
Replace the garlic with a pinch of chilli flakes.Sesame-free
Replace the tahini with almond butter.This recipe is a firm family favourite. If you like it as much as we do, add a comment or rate this recipe.
Moroccan Lamb Burgers with a Mint Feta Dressing
These Moroccan lamb burgers with a mint feta dressing bring bold flavours to your table with a delicious blend of spices. Perfect for a casual BBQ or an easy weeknight meal, they’re packed with flavour and can be customised to suit your dietary needs. You can also use this mince mix to make little meatballs to include in the school lunch.
Us Aussies love a burger on a BBQ. So I thought I’d share a recipe that’s easy enough for the kids to get involved and make, and one the whole family will love ahead of this long weekend.
Health benefits
Lamb is a great source of protein, iron, and healthy fats, while the spices provide anti-inflammatory benefits. The fresh mint and yogurt in the dressing add a light, tangy contrast, and you can easily make this recipe dairy-free if needed, keeping it healthy without compromising on taste.
Ingredients
This recipe is loaded with aromatic spices like cumin, coriander, and smoked paprika, along with zesty lemon to brighten the flavours. The mint feta dressing offers a refreshing twist, and there are easy swaps if you’re avoiding dairy.
How to make Moroccan Lamb Burgers
Mix the lamb mince with garlic, spices, and lemon zest to form patties, then cook them on the BBQ or in a pan. Blend together feta, yogurt, and mint for the dressing, adding harissa for extra heat if desired. Serve the burgers on buns or lettuce cups with a generous dollop of mint feta dressing.
Serving suggestions and how to store
Serve these Moroccan lamb burgers in a sourdough bun with salad or go grain-free by using lettuce cups or grilled mushrooms instead. Store leftover patties and dressing separately in airtight containers in the fridge, or freeze the patties for a quick future meal.
Vary Moroccan Lamb Burgers to suit
For a dairy-free option, substitute the feta and yogurt with mayonnaise. You can also skip the garlic and replace it with a pinch of chilli flakes if you prefer. This recipe is easy to adjust, so it fits a variety of dietary preferences without losing its vibrant flavours.
Take a look at the variations (below the main recipe) for suggestions to alter the recipe to suit your specific dietary requirements.

Moroccan Lamb Burgers with a Mint Feta Dressing
My Moroccan Lamb Burgers with a Mint Feta Dressing is a tasty, easy to make burger. Perfect for a fast lunch or dinner.
Servings: 6
Ingredients
Burger ingredients:
- 500 g lamb mince
- 1 clove/s garlic -crushed
- 1 tsp ground cumin
- 1 tsp ground coriander
- 1 tsp garam masala
- 1 tsp smoked paprika
- 1 lemon/s -zest finely grated
- Sea salt and freshly ground black pepper -to taste
Mint feta dressing ingredients:
- 100 g feta cheese -crumbled
- 2 tbsp natural, Greek or coconut yoghurt
- ¼ bunch/s fresh mint leaves -finely chopped
- ½-1 tsp harissa paste (optional)
Serve
- 6 burger buns
- Salad (to serve)
Instructions
For the burger patties:
- In a large mixing bowl or food processor, simply mix all of the burger ingredients together until they are well combined (TMX reverse, speed 2-3, using the spatula to push down).
- Form into burger patties and cook immediately or refrigerate to cook later, either on the BBQ or in a frypan.
For the Mint and Feta dressing:
- Blend the feta, yoghurt, and mint together until well combined (TMX - chop mint 5 sec, speed 6. Add the rest of the ingredients and blend 5 sec, speed 3-4)
- Swirl through the harissa (optional).
Serve
- the lamb patty on a sourdough roll with salad and the mint and feta dressing
- or for gluten and grain free, serve in a lettuce cup or between two grilled field mushrooms
Make-ahead
- Re-heat in a low oven until just hot.
Store
- Store burger patties and dressing in separate airtight containers in the fridge.
- Can also be frozen either the raw patties or cooked. Fully de-frost before cooking/ re-heating.
Notes
Dairy-free
Substitute the feta and yoghurt with homemade or whole-egg mayonnaise.Garlic-free
Replace the garlic with a pinch of chilli flakes.As always, I welcome your feed back and questions.
Homemade Hamburger (and why you need to avoid the rest)
This healthy hamburger recipe is quick, easy, and a family favourite. I usually make my own patties because homemade burgers are a genuinely healthy meal, but only when you skip the takeout. The best part? These come together faster than ordering and picking up takeaway!
After seeing an intact McDonalds hamburger that was five years old and completely free of mould or any kind of decay, I can confirm the longevity of the McDonalds burger is no urban myth. I would never touch a fast food or frozen burger of any kind!
Even Jamie Oliver has been on the fast food giants back recently. In a graphic youtube video, he describes that when producing hamburger mince, “basically, we’re taking a product that would be sold in the cheapest ways for dogs” and after being washed with ammonium hydroxide (which is what forms the bulk of your household disinfectants) ‘is being given to human beings.’ Jamie goes on to ask “why would any sensible human being put meat filled with ammonia in the mouths of their children?”
So I regularly make up healthy homemade hamburgers in batches and freeze them to throw on the BBQ when the need arises. They are truly delicious, healthy and very simple to make.
Health benefits
Homemade hamburgers give you complete control over what goes into your meal, allowing you to use fresh, nutrient-rich ingredients. The inclusion of vegetables like carrots and zucchini not only boosts the flavour but also adds fibre and essential vitamins, making these burgers a more balanced option compared to typical fast food versions. There is nothing that you can buy that compares to these burger patties nutritionally!
Ingredients in this healthy burger recipe
This burger recipe calls for a blend of beef mince, fresh breadcrumbs, herbs like basil or parsley, and a mix of veggies, including red onion, carrots and zucchini, to create a juicy and delicious patty. Simple seasonings like garlic, mustard, oregano, sea salt and black pepper bring everything together, giving you a burger that’s both satisfying and nutritious.
How to make this healthy hamburger recipe
To make healthy burgers, start by preparing your fresh breadcrumbs, grating the vegetables and finely chopping the herbs. Place them into a mixing bowl. Mix everything together with the beef mince, egg, and seasonings until you can form firm patties. Cook them over a medium-high heat on the BBQ grill or in a skillet or pan until they’re perfectly done. Customise your burger with your favourite toppings, sauce and enjoy the homemade goodness!
Serving suggestions and how to store
Serve these homemade burger patties with your favourite accompaniments like your favourite salad, grated carrot, slices of cheddar cheese, avocado, tomato, fresh greens, and grilled onions. Go the extra mile by adding crispy bacon, fried egg, pickles or grilled pineapple. I also recommend to toast the buns on the BBQ for added flavour and texture. Leftover burgers can be stored in an airtight container in the fridge. You can also freeze the burgers either before or after cooking, making them perfect to prep ahead.
Vary this healthy hamburger recipe to suit your dietary needs
Make these burgers gluten-free by using gluten-free breadcrumbs or quinoa flakes. For a grain-free option, try binding the patties with nut meal and wrap in a lettuce cup. If you need an egg-free version, simply omit the egg; the patties might be a bit softer but will still taste great. You can even sub the ground beef for another ground meat like minced / ground turkey or chicken. For a fabulous Veggie burger take a look at THIS RECIPE.
Check out the variations below the main recipe for tips on how to adapt it to your specific dietary needs.
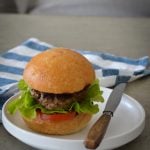
Homemade Hamburger
Looking for a healthier alternative to store-bought hamburgers? This Healthy Homemade Hamburger recipe is packed with fresh veggies, herbs, and quality beef, making it a nutritious and delicious choice. Say goodbye to unnecessary additives and preservatives, and hello to a burger that's as wholesome as it is tasty. These are perfect for picky eaters who love burgers!
Servings: 6
Ingredients
- 500 g beef mince (approx.)
- 25 g fresh bread crumbs (½ cup)
- 1 red onion/s -quartered & grated
- 1 clove/s garlic -crushed
- 2 tbsp fresh basil or parsley -leaves picked
- 1 carrot/s (small) quartered & grated
- 1 zucchini/s (small) quartered & grated
- 1 tbsp dried oregano
- 1 tbsp dijon mustard
- 1 egg/s
- Sea salt and freshly ground black pepper
- 6 burger buns (to serve)
- Salad (to serve)
Instructions
- If you want to make these burgers the good old fashioned way, then just throw all the ingredients into a bowl and mix with your hands, squeezing the mixture until it comes together.
- I personally find it easier and quicker to make them in a food processor or Thermomix.
- Start with processing your bread to make fresh crumbs and set aside. If using a Thermomix 30 seconds, speed 8.
- Now process the onion, garlic, fresh herbs and vegetables and process until finely chopped. If using a Thermomix 10 seconds, speed 5.
- Add back the breadcrumbs plus the mince, egg, oregano, dijon and seasoning and combine on reverse. If using a Thermomix 30 seconds reverse speed 4 (you may need to scrape the sides a few times).
- If the mixture feels very wet, add more breadcrumbs until you are able to form firm patties. This is important for them to hold together.
- Form you patties into the sizes you want (I do some big for adults, some small for the kids), throw on a preheated BBQ or in a pan over a high heat.
- It's important to make sure the bottom is well cooked before flipping them so they hold together. Also don't try to move them about until the bottom half is very well cooked.
Serve
- I always put all of my accompaniments in little bowls on the table and my kids build their own. Personally, I love grated carrot, grated cheese, lettuce or some type of greens, sprouts, grilled onions, grated fresh beetroot, pieces of fresh pineapple for a Hawaiian touch.
Tip
- I also love to chargrill the cut side of my burger buns to crisp them up and add some char flavour.
- I also melt the cheese on the burger patty too (by closing the BBQ hood for the last few minutes).
Store
- Store in an airtight container in the fridge.
- Can also be frozen either the raw patties or cooked. Fully de-frost before cooking/ re-heating.
Notes
Gluten-free
Use gluten-free breadcrumbs or quinoa flakes or chickpea flour to bind.Grain-free
Use quinoa flakes or nut meal to bind them and serve in a lettuce cup with salad, San Choy Bow style.Egg-free
You can certainly leave the egg out, the patty just won't be as firm (but it will still taste great).Double-up
Double the batch to load the freezer with your own fast food.Leftovers?
Great for tomorrow's lunch box. Sometimes I make four patties and roll the rest of the hamburger mince into meatballs.Hope it has inspired you to get in the kitchen or find another fast food alternative. Any comments or question, please leave them below.
Lamb, Bacon and Lentil Pot
This Lamb, Bacon, and Lentil Stew is a hearty, delicious dish perfect for cozy family dinners. With tender lamb shanks, smoky bacon, and a mix of veggies, it’s a delicious, no-fuss, one pot meal that practically cooks itself – ideal for busy nights when you want something comforting and nutritious.
This gluten free, healthy lamb shank recipe is so simple to make, it’s sure to become a family favourite. You don’t really need a whole shank per person here, especially if they are large. I’m all for spending extra money on quality meat, buying less of it (so it’s still affordable) and bulking it out with other good stuff. You know I’m all for variety too, so including the lentils for extra protein is a winner.
You can either throw it in the slow cooker or cook in the oven at a low temperature (like below). The meat just melts in your mouth and the flavour of the lamb with bacon and rosemary is a match made in heaven.
Health benefits
This Lamb Bacon Lentil stew combines protein-rich lamb and lentils with a variety of vegetables, making it a well-rounded meal. The slow-cooked ingredients provide a rich flavour and satisfying texture, perfect for nourishing the whole family. The gut healing chicken broth I’ve raved about here, and by slow cooking the shanks this way, even more, immune boosting, nutritious goodies are added. The onion, garlic, vegetables and rosemary give further immune support too. This lamb shank recipe is a great option for those who don’t tolerate tomatoes but are after a hearty stew.
This recipe has about 38-42 grams of protein per serve.
Ingredients
To make this dish, you’ll need lamb shanks, bacon, brown lentils, carrots, celery, mushrooms, onions, garlic, rosemary, red wine, and chicken stock. Optional extras include zucchini, eggplant, or parsnips for added variety.
How to make Lamb, Bacon and Lentil Stew
Start by browning the lamb shanks in a large ovenproof dish, then add all the remaining ingredients. Season everything well, ensuring the lamb shanks are submerged in liquid. Cover with a lid and cook in a 160℃/320℉ oven for about 3 hours. The slow cooking ensures tender lamb that falls off the bone.
Serving suggestions and how to store
Serve this lamb bacon lentil stew with mashed potatoes to soak up the rich juices plus steamed veggies or a fresh salad. Store any leftovers in an airtight container in the fridge for up to 3 days, or freeze for up to 3 months. Reheat in a low oven until warm.
Vary this to suit your dietary needs
For a vegetarian version, swap the lamb and bacon for extra lentils, mushrooms, and smoked paprika for a smoky flavour. If you’re avoiding legumes, leave out the lentils and add more vegetables like parsnips or sweet potatoes.

Lamb, Bacon and Lentil Stew
This Lamb, Bacon, and Lentil Pot is the ultimate comfort dish, packed with tender lamb shanks, smoky bacon, and hearty lentils. It's a one-pot wonder that's easy to prepare and perfect for those days when you want a wholesome, nourishing meal with minimal effort.
Servings: 4
Ingredients
- 2 onion/s -peeled and sliced
- 2 clove/s garlic -sliced
- 400 g can brown lentils -drained and rinsed or 1 cup cooked brown lentils
- 3 carrot/s -sliced roughly
- 4 rasher/s bacon -diced roughly
- 100 g mushrooms -Swiss brown or button, sliced (1 cup)
- 3 stick/s celery -sliced roughly
- 2 tbsp fresh rosemary leaves -chopped (or 1 tablespoon of dried)
- Sea salt and freshly ground black pepper
- 60 ml red wine (¼ cup)
- 250 ml chicken broth or stock (1 cup)
- 4 lamb shanks -small, or two large ones (depending upon your appetite)
Optional extras
- 1 zucchini/s - or eggplant or parsnip, diced
Instructions
- Preheat your oven to 160℃/320℉ (fan-forced).
- In a large oven proof dish (I like my cast iron pot), place the lamb shanks and brown quickly on the stove top (in a little olive oil or ghee) over a medium high heat. This is not essential and I have to confess, I'm a bit lazy and tend to take the just throw it all in approach.
- Next, add all of the ingredients, season and stir to combine. Make sure the lamb shanks are toward the bottom of the dish and covered with the liquid and other ingredients.
- Place the lid on the pot and cook for 3 hours. I aim for 3 hours, as the longer it cooks the more tender the lamb. I tend to put it in the oven before school pick up and it's ready in time for dinner. It's very forgiving so can easily cook for longer. *
- Sprinkle with finely chopped parsley (good way to hide this very nutritious green) and serve alone or with one of the following...
Slow Cooker
- This can certainly cooked in a slow cooker. However, as the speed and temperature varies between the many brands of slow cookers, base the amount of liquid you add and the cook time on a similar style of recipe in the guide book for your specific slow cooker. The general rule of thumb is to halve the liquid and double the cook time, but understanding your own slow cooker is the best guide.
Serving suggestions
- Steamed and buttered vegetables.
- Mashed potato, sweet potato or pumpkin (soaks up the delicious juices).
- Pureed or mashed cauliflower.
- Green beans, steamed and dressed with lemon juice, zest and EV olive oil.
- A simple bowl of greens or a salad.
Make-ahead
- Re-heat in a low oven until just hot.
Store
- Airtight in the fridge and can also be frozen (remove the bone to freeze).
Grab Bag Formula Method
- If you've done the **Grab Bag Formula Short Course, this is the method to convert this recipe...
- Place all of the ingredients (other than those for serving) into the Grab Bag.
- Carefully seal your Grab Bag. I close most of the seal then press out as much air as I can then complete the seal. Place the Grab Bag in the freezer.
- To cook, remove the Grab Bag from the freezer, place on a baking tray and thaw in the fridge overnight.
- Tip the contents of the Grab Bag into a large oven proof dish (with a tight fitting lid) or Dutch oven. It may still be a bit frozen; that’s okay. Place the lid on the pot, set your oven to 160°C/320°F (fan-forced) and cook for 3½-4 hours. The thicker the lamb shanks the longer it will need to cook.
- ** The Grab Bag Formula Short Course is available to purchase for just AU$46 HERE.ORIf you are a full-access Well Nourished Family member, the course is included in your membership and you can access in the members portal - HERE.