
These mango strawberry ice blocks are a simple, nourishing frozen treat that feel like summer in a mould. They are naturally sweet, have a sherbet-y flavour, are quick to make and a great way to use fresh or frozen fruit while offering a gentle protein boost from kefir or yoghurt. I love these as an…
strawberry
Banana Strawberry Smoothie
This Banana Strawberry Smoothie is a simple but super delicious flavour combination. Banana is the ultimate smoothie companion, giving creaminess, fibre and potassium. Strawberries are sweet and colourful and provide some Vitamin C and manganese. I add in raw cauliflower for a bit of hormone and gut support (trust me, you wouldn’t know it was…
Strawberry Custard Filo Tart
This Strawberry Custard Filo Tart is a delicate tart with a beautiful flavour. It’s quick and easy to make for a fast, tasty dessert. Filo pastry is used that gives the shell of the tart a crisp, flaky finish. The special touch in this tart is the coil of filo pastry throughout the middle -…
Strawberry Pan Pudding
This Strawberry Pan Pudding has become my family’s all time favourite dessert. Every single one of us loves it equally, which rarely happens. It’s a bonus that it’s super easy to make using only basic pantry staples. It’s so wonderful to enjoy good, basic home cooking made with simple ingredients and a whole lot of love!
If you don’t have a pan that can go in the oven, you can use a cake tin for this. In Step 2, melt the butter in your tin in the oven then proceed as normal. I do love a decent oven-proof pan for these types of recipes though!
Another note is that if you increase the number of serves for this recipe, you should use a larger pan if you have one, otherwise the mixture will be deeper in the pan. Adjust the cooking time to suit.
Health benefits
Made with wholemeal spelt flour, this homemade strawberry pudding recipe offers more fibre and nutrients than your average dessert. Strawberries bring antioxidants and vitamin C, while you can control the sweetness with your choice of natural sweetener. It’s also easy to adapt to gluten-free, dairy-free or vegan diets.
Strawberry Pudding Ingredients
You’ll need a handful of pantry basics – butter (or oil), wholemeal spelt flour, baking powder, milk, rapadura sugar and a touch of vanilla extract and salt. You will also need fresh strawberries and your choice of sweetener (I use rice malt syrup, maple syrup or honey).
How to make this easy strawberry pan pudding
Start by melting the butter in your pan until it just bubbles, then mash the strawberries with your chosen sweetener. Mix the wet ingredients with the flour to form a thick batter and pour it into the hot, buttered pan. Top with the strawberries and transfer to the oven to bake until golden and set in the centre, with the fruit bubbling.
Serving suggestions and how to store
This pudding is best served warm straight from the pan, with a dollop of cream, yoghurt or ice cream. Leftovers can be stored in the fridge and gently reheated. It’s also lovely cold the next day with yoghurt for breakfast.
Vary this to suit your dietary needs
For a gluten-free version, use almond meal and buckwheat flour instead of spelt. To make it dairy-free or vegan, substitute the butter with coconut or macadamia oil and choose a plant-based milk. You can also swap the strawberries for other soft fruits like raspberries, plums, or banana, and top with your favourite nuts for crunch.
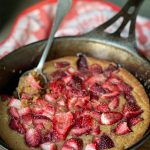
Strawberry Pan Pudding
This Strawberry Pan Pudding has become my family's all time favourite dessert. Super easy to make and uses just basic pantry staples.
Servings: 4
Ingredients
- 115 g butter
- 150 g strawberries (hulled and chopped if large)
- 1 tbsp rice malt syrup, honey or maple syrup
- 75 g rapadura sugar (¼ cup – ⅓ cup) to suit your taste
- 120 ml milk (of choice) (½ cup)
- 1 tsp vanilla essence – or paste
- ½ tsp sea salt
- 1 tsp baking powder
- 130 g wholemeal spelt flour (1 cup)
Instructions
- Preheat the oven to 180º C/350°F (fan forced).
- Place the butter in a medium size non stick or cast iron pan (approx. 22cm) over a low heat to melt.
- In a medium-sized bowl place the strawberries and sweetener and macerate with a potato masher so they are a bit broken up. Set aside.
- In a mixing bowl whisk the rapadura, milk, vanilla, sea salt and baking powder until well combined. Pour in the melted butter and whisk some more.
- Fold in the flour gently until just combined.
- Place the batter back in the pan that you melted the butter in. Top with the strawberries and cook in the oven for 20-25 minutes until golden (the middle should be set and the berries jammy).
- You can slice or spoon out of the pan.
Serve
- As is, or top with double cream, creme fraiche, yoghurt or icecream.
Notes
Gluten-free
Replace the spelt with 3/4 cup almond meal and 1/4 cup buckwheat flour.Dairy-free and vegan
Replace the butter with 100 ml macadamia nut oil or coconut oil. Choose a dairy-free milk.Different fruit
Any fast cooking (soft) fruit will work. Berries of any kind, banana and ripe stone fruit are also an option.Add nuts
I love this topped with macadamia nuts, pecans or flaked almonds.Let me know if this becomes a family favourite recipe too!
Strawberry Cream Gummies
These easy to make Strawberry Cream Gummies are a delicious, gut healing treat that my whole family loves (including Bonnie Blue my 6 month old puppy). She knows what’s good for her!
I regularly make gummies treats for my family to support their gut health and immune system. The limit is your imagination when making different flavoured gummies. If you’re after more ideas, check out my Lemon Turmeric, and Top Deck (chocolate) gummy recipes too.
Health benefits
Gelatin is made from the bone and connective tissue of animals that has been dried and turned into a powder.
The biggest benefit of eating Gelatin, in my opinion, is that it is a gut healer, which means better nutrient absorption (so greater nourishment) all round. Also, if your gut is functioning well, then your nervous system is better supported too. Gelatin also reduces inflammation, improves joint integrity, and for the vain amongst you – it improves the condition of your skin, hair and nails. In fact, it’s said to be better then botox (and erase wrinkles, stretch marks and cellulite) – now I’ve got your attention!
Ingredients
To make these gummies, you’ll need coconut milk as the base, along with maple syrup for a hint of sweetness (optional). Frozen strawberries, once defrosted, provide the flavour. Gelatin, a key ingredient, helps the gummies set and gives them that satisfying, chewy texture.
How to make these strawberry cream gummies
Start by warming the coconut milk and maple syrup in a small pot. Bloom the gelatin in the mixture, stirring until fully dissolved. Blend the strawberries into a smooth pulp, then mix with boiling water, vanilla, and the remaining gelatin. Layer the coconut cream and strawberry mixtures in a tray, swirling them together for a pretty effect. Refrigerate for about 30 minutes to set, then slice and enjoy!
Serving suggestions and how to store
These gummies make a great snack, and they’re perfect for lunchboxes. Keep them in an airtight container in the fridge or freezer for easy access. If you freeze them, they stay firm and can be packed into lunchboxes with an ice brick to keep them cool.
Vary this to suit your dietary needs
For a different twist, swap the strawberries for raspberries for a “raspberries and cream” variation. If you’re looking for a fructose-friendly option, use rice malt syrup instead of maple syrup and choose raspberries instead of strawberries. Adjust the sweetness to your preference by adding more sweetener if desired.

Strawberry Cream Gummies
These easy to make Strawberry Cream Gummies are a delicious, gut healing treat that my whole family loves. Check out the Raspberry Cream Gummy variation too.
Servings: 20 pieces
Ingredients
- 400 ml canned coconut milk
- 2 tbsp maple syrup - optional
- 125 g strawberries (1 cup -heaped) frozen then defrosted berries provide the best flavour
- 250 ml boiling water (1 cup)
- 1 tsp vanilla - essence or paste
- 4 tbsp grass-fed or organic gelatin
Instructions
- In a small pot, heat the coconut milk and maple syrup over a low heat until luke warm (don't over heat it).
- Add 2 tablespoons of the gelatin and allow to bloom, mixing it well to combine. Continue to mix over the very low heat until it dissolves.
- In a food processor or blender, blend the strawberries until it forms a pulp. You can strain off the seeds if you wish, for a really smooth gummy (I personally don't bother).
- Add the boiling water and vanilla, blend again then add the remaining 2 tablespoons of gelatin and process for a minute or so until the gelatin has dissolved.
- Line a slice tray with baking paper. Pour in the coconut cream layer. Then gently pour over the strawberry layer (swirling as you pour creates the pattern on the top).
- Pop into the fridge for about 30 minutes to set.
- Slice and enjoy.
Thermomix
- Heat the coconut milk and maple syrup 3 mins, 60, speed 3. Add 2 tablespoons of the gelatin and mix 1 min, speed 5. Pour into a lined slice tray.
- Rinse the bowl and process the strawberries 1 min speed 8. Add the boiling water, mix 10 seconds speed 4. Add the remaining gelatin and blend 1 minute, speed 5.
- Then gently pour over the strawberry layer (as above). Pop into the fridge for about 30 minutes to set.
Store
- In an airtight container in the fridge or freezer. Can be packed from frozen into the lucnhbox (against an ice brick to keep it chilled).
Tip
- If using silicon moulds to set your gummies, freeze them to make removing them from the mould clean and simple.
Notes
Raspberries and Cream
Replace the strawberries with raspberries.Fructose friendly
Choose raspberries and replace the maple syrup with rice malt syrup.Sweeter
My kids are fine with little or no sweetener. But feel free to adjust the sweetness to suit your taste and add more maple syrup (or rice malt) if you prefer a sweeter gummy.Let me know how your family enjoys this delicious and healing treat. Leave a comment below or rate the recipe.
Strawberry Shortcake Protein Smoothie
This strawberry shortcake protein smoothie has been an absolute lifesaver lately. You see my 10 year old son is growing at a rate of knots. He has size 10 adult mens feet (we call him ‘the hobbit’ lol) and he’s a big, athletic kid. He’s mad for sport and at the moment, he is training sometimes twice a day (athletics and nippers season is in full swing for him). So feeding him nutritionally balanced meals and snacks is especially important for his day to day wellness and his ability to train often and hard.
When I’m creating a meal, I primarily focus on the macronutrients – the balance I’m after is a complete source of protein, plant based carbohydrate (vegetables, fruit, whole grains) and good fats. I believe if they are coming from a variety of whole foods sources, the micronutrients take care of themselves.
Dietary variety really is key to good nutrition as it increases the range of micro-nutrients derived from food, therefore protecting against deficiencies developing. Carbohydrate I find pretty easy to include in meals and snacks, but ensuring a good variety of quality protein and fats, I find a little trickier.
Why is protein SO important?
We all need protein to build new cells and repair tissue. It is especially critical for kids, pregnant women, athletes, those suffering chronic illness or injury, those with dietary restrictions and the elderly. Protein is used extensively by everybody, everyday. Protein is used to make digestive enzymes, to repair the digestive tract, to make antibodies to fight infection, to grow skin, hair, nails, to make blood cells, for strong bones, to build muscle, to make hormones, to stabilise our blood sugar….I could go on forever really.
We cannot store protein, so it’s safe to say, that in order to replace, rebuild and repair, we need to consume protein very regularly.
Protein deficiency is common
In my experience, insufficient dietary protein is surprisingly common, especially amongst fussy kids, pregnant women, athletes, those with food intolerance and the elderly. The one thing that a swing towards processed foods has done, is dramatically reduced the amount of protein many people consume. You see most processed, convenience foods are generally a combination of fat and carbohydrate (breads, breakfast cereals, crackers, muesli bars, pasta and noodles). Anything with a shelf life is generally protein deficient.
It’s a bit of a vicious circle because people who are lacking protein also often reject eating it, craving high energy foods like refined, simple carbohydrate. They may also have also have a poor appetite for ‘meals’ and often just want to snack throughout the day. Poor variety is also another issue, where they may eat protein, but only from one source e.g.; dairy is common. To make matters worse, I’ve also found those deficient in protein are often also deficient in a number of key micronutrients (vitamins and mineral) found in good amounts in, you guessed it, protein rich foods. These micronutrients not only support their health, but help to build a robust appetite for other good foods (like veggies).
Protein supplementation
As you know, I’m a huge advocate of persisting to teach kids to love eating a good variety of whole foods – first and foremost. If you have a picky eater The Raising Well Nourished Kids Podcast is worth a listen to support you to support your young people in developing healthy eating habits and positive relationships with and through food. You can listen on Apple Podcasts, Spotify, YouTube or your favourite podcast App!
However, just as medicine is required occasionally for illness, supplementation is often critical in restoring the appetite and desire for whole foods, especially in picky eaters. Protein supplementation is also often required for people who suffer chronic illness, are athletes or suffering with food intolerance which restricts their protein intake (egg, nut, dairy allergies for example).
It is also very helpful for those mornings that go pear-shaped and a sustaining brekkie is required quickly. As much as I’d like to serve a nutritionally balanced, high protein brekkie each and every morning, some days time is just stretched (like when my kids have a 5am swim squad and we are up at 4.30am) and a protein powder supplement is invaluable.
The vast world of protein powders
Navigating the many types of protein powders available is tricky business. Many brands are derived from feed-lot, grain-fed cows (also often fed GMO’s), highly processed soy proteins and contain franken-sugars, fructose, maltodextrin starches (aggravate blood sugars and the GIT), additives and more yuk ingredients.
Most also contain absolutely no plant fibre, good fats or micronutrients (vitamins and mineral) so nutritionally they are incomplete and not at all reflective of a well rounded, whole food meal. Thankfully, there are a select few which offer balanced nutrition and do what we need them to do – provide a sustaining, nutritious supplement, and here’s the clincher, that actually tastes good. It’s just got to taste good right?
What to look for when choosing protein powders
When choosing a wholefood-based protein powder, there are several key factors to consider to ensure you’re getting a good-quality and effective product:
Ingredients: Look for a protein powder that is derived from wholefood sources, such as 100% grass-fed collagen, pea protein, brown rice protein (preferably non GMO, sprouted and fermented), hemp protein, or a blend of these. If you’re okay with dairy, choose a Whey based protein powder, ensure it is grass-fed and/or organic. Avoid products with additives, artificial flavours, excess sugar or artificial sweeteners.
Nutritional Profile: Assess the nutritional content beyond just protein. Look at the levels of essential amino acids, vitamins, and minerals present in the powder. A good wholefood-based protein powder will offer a range of nutrients beyond just protein.
Allergen Information: Consider any allergies or dietary restrictions. Wholefood-based protein powders are often suitable for those with common allergies (e.g., dairy, soy, gluten), but always check the label for potential allergens.
Taste and Texture: Personal preference matters too. Choose a protein powder that tastes good to you and mixes well with your favourite fruits and fluid (I love making smoothies with coconut water and yoghurt) or add protein powder to recipes like pancakes, overnight oats or chia puddings. Some wholefood-based powders can have a grainier texture, which may be a consideration.
By considering these factors, you can select a wholefood-based protein powder that aligns with your dietary preferences, nutritional needs, and taste preferences, ensuring you get the most out of your protein supplement.
I personally love using this collagen protein—it’s flavourless, so it works beautifully across all kinds of recipes without altering the taste.
Health benefits of this strawberry shortcake protein smoothie
Packed with antioxidants from strawberries, protein from yoghurt and almonds, and added fibre from raw cauliflower, this strawberry shortcake protein smoothie is a nutritious powerhouse. It provides a boost of energy, supports muscle recovery, and helps maintain a healthy gut.
Ingredients
The combination of strawberries, almonds, creamy yoghurt, and a hint of vanilla creates a naturally sweet smoothie that’s satisfying and nourishing. The shortcake-inspired almonds add a delicious crunch, making every sip a treat.
How to make this strawberry shortcake protein smoothie
Start by toasting almonds coated in maple syrup and protein powder for a crunchy shortcake topping. For the syrup, blend strawberries and maple or rice malt syrup. Then, blend the smoothie ingredients—frozen strawberries, cauliflower, coconut water, yoghurt, vanilla extract and plain or vanilla protein powder—until creamy. Assemble by swirling the strawberry syrup in the glass, pouring in the smoothie, and garnishing with the crunchy shortcake topping.
Serving suggestions and how to store
Serve this smoothie immediately with the crunchy almonds piled on top for the best texture. Leftovers can be frozen into popsicle moulds or small containers for a quick, nutritious snack later.
Vary this strawberry shortcake protein smoothie to suit
For a vegan option, use coconut yoghurt and a plant-based protein powder. If you’re short on time, blend all the ingredients together without worrying about the syrup and layering. Want a nut-free option? Swap almonds for sunflower or pumpkin seeds.
For more delicious, easy to make healthy smoothies, click HERE

Strawberry Shortcake Protein Smoothie
This is a delicious, super simple recipe that we often have for breakfast or for an after school, pre-sport snack (I pop it in a thermos to keep it nice and cold)…
Servings: 2
Ingredients
Shortcake
- 35 g raw almonds (¼ cup)
- 1 tbsp maple syrup
- 1 serve/s wholefood protein powder -vanilla or plain flavour
Syrup
- 4-5 fresh strawberries
- 1-2 tbsp rice malt syrup or maple syrup
Smoothie
- 1½ cup/s frozen strawberries
- 2 floret/s cauliflower -raw and roughly chopped
- 60 ml coconut water (¼ cup)
- 250 g natural, Greek or coconut yoghurt (1 cup)
- 2 serve/s wholefood protein powder -vanilla or plain flavour
- 1 tsp vanilla -powder, extract or essence
- 2 fresh strawberries -sliced into flat edged quarters (for garnish)
Instructions
Shortcake
- On a tray line with baking paper place the almonds and drizzle with the syrup. Toss to coat. Sprinkle over the protein powder and toss to coat the nuts.
- Place under a low grill to toast for 5 minutes (watching carefully so they don't burn).
- You can always do a big batch of the nuts for a fabulous, protein rich snack (store in an airtight jar in the fridge but be careful - they are soooo moorish).
Syrup
- In a high powered blender place the strawberries and the syrup. Blend for 10 seconds to make a syrup and pour into the serving glasses. If using a Thermomix speed 8, 10 seconds.
Smoothie
- Without washing the blender, add the frozen strawberries, cauliflower, coconut water, yoghurt, vanilla and protein powder. Blend well until smooth and creamy. If using a Thermomix speed 9, 30 secs.
- Tilt the serving glass so the syrup coats the sides. Place the cut strawberries on the sides of the glass and carefully pour in the creamy smoothie touching the sides three times to create the streaky finish.
Serve
- With the roughly chopped nuts piled on top.
Store
- Leftovers can be frozen into little cups or ice-block moulds for a fast, healthy snack another day.
Notes
Shortcut
If you aren't bothered about how it looks, just add all of the ingredients for both the syrup and smoothie into the blender at once.Vegan
Choose the vegan protein blend and coconut yoghurt.Make ice-blocks
My kids love this blend frozen into ice-blocks. These are super convenient for a nutritious snack on the go.Enjoy (I know you will :)). Post your comments and any questions in the comments below.
Detox Ice Blocks
At this time of year, I’m trying my hardest to wean myself and my kids off the sweet stuff (it’s been a very indulgent festive season) while really refocusing on including as many veggies in our diet as possible. One of my favourite ways to do this is with these detox ice blocks – a simple, refreshing treat that feels indulgent but is actually packed with goodness. Right now my main aim is to load as much nourishment into our meals and snacks as possible, leaving little room (or desire) for anything else. The plan is to have us all back on track in time for school to start again in a couple of weeks (read more here about why kids fall into the trap of craving processed foods).
The weather these past few weeks in QLD has been really hot and the kids have been asking for ice blocks after big mornings in the sun nipper/swim training. So I thought I’d whip something up that’s not only delicious, but helps them refuel and rehydrate. I freeze these in my low tox stainless steel iceblock moulds.
The nutrient dense veggies are well hidden behind the sweetness of the fruit. I personally don’t add in the extra sweetener, but taste the mixture prior to freezing and decide if you think you need to add it.
Health benefits
Beetroot is an anti-inflammatory, antioxidant, detoxifying and extremely nutrient rich vegetable. Research suggests it improves stamina and sports performance (this fact alone appeals to my sport loving kids). Zucchini (also know as courgette), is extremely low in calories and loaded with fibre. It is also a great source of potassium.
PS – I’ve written before about using smoothies to include extra vegetables in your diet (and therefore more nourishment), read more HERE if you’d like more inspiration for ‘hiding veggies’.
Ingredients
The key ingredients in this refreshing treat include beetroot, strawberries or raspberries, banana, zucchini, and coconut water. You can customise it by adding a protein powder for an extra boost, swapping the coconut water with nut milk, or using full-fat natural yoghurt for a creamier texture. This versatile recipe can also be made without banana by using mango instead.
How to make Detox Ice Blocks
To make these healthy treats, simply blend the beetroot, berries, banana, zucchini, and coconut water in a high-speed blender until smooth. Pour the mixture into ice block molds and freeze until set. If you’re using a Thermomix, blend on speed 9 for about 60 seconds, scraping the sides as needed.
Serving suggestions and how to store
Once set, these ice blocks make a delicious and hydrating snack or treat. Store any leftovers in the freezer, and enjoy them whenever you need a refreshing detox boost. You can also make a batch ahead of time for a week’s worth of healthy snacks.
Vary Detox Ice Blocks to suit your dietary needs
This detox ice block recipe is easy to adjust for various dietary needs. For a coconut-free version, simply swap the coconut water for nut milk. If you’re looking for a creamy version, replace the coconut water with full-fat natural yogurt or coconut yogurt. You can also replace the banana with mango for a different twist, or add a scoop of clean protein powder for an extra protein boost.black pepper, lemon juice digestion immunity vitamin c flavor ice cube tray ice cubes compounds favourite way fresh

Detox Ice Blocks
These simple ice blocks include two veggies in this delicious, nourishing treat.
Servings: 6
Ingredients
- 1 small beetroot -raw, peeled & quartered
- 250 g strawberries or raspberries (2 cups) fresh or frozen
- 1 banana/s
- ½ small zucchini/s -quartered
- 250 ml coconut water (1 cup)
- 85 g rice malt syrup, honey or maple syrup (¼ cup) optional
Instructions
- In a high powered blender, blend all of the ingredients until smooth. If using a Thermomix, 60 seconds, increasing slowly to speed 9 (scrape the sides).
- Divide between ice block moulds and freeze until set firm.
Notes
Coconut-free
Replace the coconut water with a nut milk.Make it creamy
Replace the coconut water with full-fat natural yoghurt or coconut yoghurt.No banana
Replace the banana with mango.Add Protein
I often add a scoop of a wholefoods protein powder. GoodnessMe have a fabulous selection of clean protein powders, you can take a look HERE.TIPS
- I've set these ice blocks in brilliant (and low-tox) stainless steel ice block moulds which you can shop for HERE.
- This recipe also makes a delicious smoothie (just add a cup of ice prior to blending it).
I hope your family loves this recipe. Post any questions or comments below.
Haloumi Asparagus Strawberry Salad
This haloumi asparagus strawberry salad is a fresh and delicious combination of savoury and sweet, perfect for a light lunch or side dish. The creamy, salty haloumi pairs beautifully with the crisp veggies and juicy strawberries, all tied together with a tangy lemon-balsamic dressing. It’s a simple, vibrant salad that’s sure to impress!
I love creating healthy, delicious salads. Gone are the days of iceberg lettuce, tomato and cucumber salads! So with the season of summer BBQ’s in mind, I thought I’d share this divine, colourful flavour combo.
Health benefits
Lots of plant-based goodness here! The Spinach is loaded with fibre, antioxidants and to many vitamins and minerals to list. The basil contains many essential vitamins, minerals and antioxidant flavonoids, two of which have been shown to protect cells and DNA from radiation. Asparagus contains anti-inflammatory and detoxifying compounds and as a rich source of chromium, is perfect for helping sugar cravings. The haloumi adds calcium, protein and deliciousness!
Ingredients
The salad is made with baby spinach, fresh basil, snow peas, asparagus, and sweet strawberries, topped with slices of grilled haloumi. The dressing is a zesty mix of lemon juice, balsamic vinegar, and lemon-infused olive oil, seasoned simply with sea salt and black pepper.
How to make this simple, delicious salad
Start by grilling the asparagus in a bit of olive oil until just tender, then set aside. Next, grill the haloumi until golden and crispy on both sides. On a serving platter, layer the baby spinach, basil leaves, snow peas, strawberries, and asparagus. Top with the grilled haloumi slices. To finish, shake or whisk together the lemon juice, balsamic vinegar, and olive oil for the dressing, then drizzle it over the salad just before serving.
Serving suggestions and how to store
This gluten-free, grain-free salad is best served immediately after dressing, making it a great option for a fresh lunch or dinner side. It pairs wonderfully with grilled meats or seafood, and the colours make it a standout dish at any gathering. Leftovers can be stored in the fridge for a day, but it’s best enjoyed fresh for optimal taste and texture.
Vary this to suit your dietary needs
To make this salad dairy-free, simply swap the haloumi for grilled firm tofu. You can also add other veggies like roasted capsicum (bell peppers) or swap spinach for rocket if you prefer. For extra crunch, sprinkle some toasted nuts or seeds on top.
For lots more sides and salad inspo, take a look at my hugely popular ebook ˜Well Nourished Sides and Salads’– where vegetables become the hero of the dish! It’s great value at just $9.95, click HERE to take a look.
For more sensational, healthy salad recipes, click HERE.

Haloumi Asparagus Strawberry Salad
This delicious Haloumi Asparagus Strawberry Salad is sure to impress - such a cracking combination of flavours.
Servings: 4
Ingredients
- 120 g baby spinach -washed
- ¼ bunch/s fresh basil leaves -washed and picked off the stems
- 10-15 snow peas -trimmed
- 1 bunch/s asparagus -halved
- 1 punnet strawberries -hulled and sliced
- 180 g haloumi -sliced thinly
Dressing
- 1 lemon/s -zest and 1 tbsp juice
- 1 tbsp aged balsamic vinegar
- 60 ml lemon-infused olive oil (¼ cup) can sub regular extra virgin olive oil
- Sea salt and freshly ground black pepper -to taste
Instructions
- In a frypan or a griddle, cook your asparagus over a low heat in a little olive oil. Once just cooked (take care not to overcook), set aside to cool.
- Now cook your haloumi on both sides until golden and crisp.
- On a large serving plate or platter arrange your baby spinach, strawberries, snow peas and asparagus and top with the grilled haloumi.
- To make the dressing, simply combine all ingredients together in jar or jug and shake/mix well.
- Dress just prior to serving.
Notes
Dairy-free
Replace the haloumi with firm tofu.I'd love to hear how you like this recipe. Post a comment and rate this recipe below.
Raw Strawberry Cheesecake (vegan)
Valentines Day is upon us, so I thought I’d share this easy to prepare low-fructose, gluten free raw vegan strawberry cheesecake. Nothing says I love you like chocolate and strawberries…or this delicious, healthy dessert.
This vegan Raw Strawberry Cheesecake is a no-bake dessert that’s not only delicious but also super easy to whip up. With a nutty, chocolatey base and a creamy strawberry filling, it’s the perfect summer treat. Whether you’re hosting guests or treating yourself, this cheesecake is sure to impress. It’s also dairy-free, gluten-free and grain-free and suitable for vegan and paleo diets.
A treat that is also nourishing!
Yep, this is so healthy, you serve it up to your loved one for breakfast! The base is a combination of nuts and flaxseed for healthy oils, minerals and fibre. The cacao contributes antioxidant rich chocolate flavour and the coconut products are antimicrobial, anti-inflammatory and healing to the digestive system. The filling is a dairy free combination of cashew nuts (more essential minerals, protein, fats and fibre), highly nutritious coconut water and antioxidant-rich strawberries.
Ingredients
Hazelnut meal, flaxseed, cacao powder, desiccated coconut, coconut oil, rice malt syrup (or honey or maple syrup) for the crust. Raw cashews, fresh strawberries, chia seeds, vanilla extract, and coconut water form the cheesecake filling ingredients. This all comes together to create a luscious, refined-sugar-free raw dessert that tastes amazing.
How to make this vegan cheesecake
Start by preparing the base, mixing together your hazelnut meal, flaxseed, cacao, and coconut with coconut oil and sweetener until it forms a sticky dough. For the filling, blend soaked cashews, strawberries, chia seeds and coconut water in a blender or food processor until it has a smooth, creamy texture. Layer the chocolate base in glasses, top with the creamy strawberry mixture, and chill until set! If you own a Thermomix, we’ve also included Thermomix instructions for this recipe.
Serving suggestions and how to store
Serve this raw cheesecake chilled, garnished with fresh strawberries or even some shaved dark chocolate for an extra indulgence. To make it extra decadent you could whip up some coconut cream to serve too. Store any leftovers in an airtight container in the fridge for up to 3 days.
Vary this raw strawberry cheesecake to suit
Substitute hazelnut meal with almond meal or swap cashews for macadamias for a different twist. If you’re vegan, stick to using maple syrup or rice malt syrup as your sweetener for a completely plant-based dessert. Check out the variations below the main recipe for tips on how to adapt it to your specific dietary needs.
For more delicious, healthy and easy to make wholefood treats, click HERE.

Raw Strawberry Cheesecake
This Raw, vegan Strawberry Cheesecake is a simple, healthy dessert that is sure to become a crowd pleaser.
Servings: 4 small serves
Ingredients
Base
- 80 g hazelnut meal (½ cup)
- 15 g flaxseed (2 tablespoons) ground
- 15 g cacao powder (2 tablespoons)
- 15 g desiccated coconut (2 tablespoons)
- 30 g coconut oil (2 tablespoons)
- 65 g rice malt syrup, honey or maple syrup (3 tablespoons)
Strawberry cream filling
- 150 g raw cashew nuts (1 cup) raw and soaked for 2-3 hours in water and drained
- 150 g fresh hulled strawberries (the more flavoursome the strawberries, the better this will be)
- 1 tbsp chia seeds -preferably white
- 1 tbsp rice malt syrup, honey or maple syrup
- 1 tsp vanilla -powder, extract or essence
- 3 tbsp coconut water
Instructions
For the base
- In a bowl or food processor, combine your hazelnut meal, flaxseed meal, raw cacao and coconut. If using a Thermomix, 30 seconds speed 6.
- Add the coconut oil and rice malt syrup and mix until well combined and the mixture holds together when pressed. If using a Thermomix, 20 seconds, speed 4.
For the filling
- Process the soaked (drained) cashews until smooth and creamy. If using a Thermomix, 1 minute speed 6 (scraping the sides).
- Add the strawberries and process again. If using a Thermomix, 10 seconds speed 6.
- Add the chia, vanilla, and coconut water and process until smooth. If using a Thermomix, 10 seconds speed 6.
- Assemble in a small glass by pressing the chocolate base into the glass and top with the strawberry cream.
- Chill until set, garnish with heart shaped strawberry halves and serve immediately.
Store
- Store in an airtight container in the fridge.
Notes
Another nut combo
You can sub the hazelnut meal for almond meal and macadamia nuts can sub the cashew nutsVegan
Choose rice malt or maple syrup as your sweetener.I love to receive feedback on all of my recipes and posts. You can leave your comment below...
Strawberry Chia Pudding
This Strawberry Chia Pudding recipe is a super simple, healthy, and delicious treat that’s perfect for breakfast, dessert or even an afternoon snack. Made with fresh strawberries, creamy coconut milk, and chia seeds, this recipe comes together in minutes and thickens beautifully in the fridge for a satisfying, naturally sweet pudding. It’s also the perfect no-prep, make ahead brekkie for those days where you need to get going quickly.
Health benefits
The strawberries are a delicious berry with a great antioxidant profile. The coconut milk contains fats which support the immune system, brain, and digestion. Read more about the health benefits of coconut here. The chia seeds are a fibre rich, high protein source of omega-3s and are responsible for the gelatinous consistency. This gluten-free, vegan pudding will keep you full and energised!
More Chia Pudding recipes HERE.

Strawberry Chia Pudding
This zesty, delicious strawberry chia pudding has such lovely balance of flavours and it's so simple to make.
Servings: 4
Ingredients
- 400 g fresh strawberries (approx.) hulled
- 400 ml canned coconut milk
- 85 g rice malt syrup, honey or maple syrup (¼ cup) or more or less to taste
- 1 tsp vanilla -powder, essence or paste
- 100 g chia seeds (½ cup)
- 1 lime/s -zest
Instructions
- Throw it all in a blender and blend on a very high speed until well mixed. Thermomix 30 seconds, speed 6.
- Refrigerate for 4-24 hours. The longer it is refrigerated, the thicker it becomes.
- If you find it has become too thick, mix through a little more coconut milk or water to thin it out.
- Serve in a glass garnished with fresh strawberries.
Tip
- Some kids (or even adults), don't like the 'tapioca-like' texture of the chia seed. If this is the case just process it for longer or until it smoothes out.
Store
- Store in an airtight container in the fridge.