
These cranberry ginger chocolate cookies are the perfect balance of sweet, spicy and indulgent. Studded with tart cranberries, warming ginger and little bursts of chocolate, they have a wonderful chewy texture when lightly baked or can be baked longer for a crispier biscuit. Made with wholesome ingredients like almond meal and oats, they feel a…
ginger
Jamu (Turmeric Ginger drink)
Jamu is a traditional Indonesian turmeric and ginger drink packed with natural goodness. This golden elixir is not only refreshing but also incredibly nourishing, making it a fantastic choice for both hot and cold beverages. Its roots are in Indonesian culture for centuries and is used to maintain good health and to treat many ailments….
Gingernut Biscuit
This gingernut biscuit recipe came from a need to fulfil my love of ginger biscuits, but without breaking the bank. I purchased a pack of gluten-free and vegan gingernuts as a rare treat but based on the biscuit’s popularity with my children I knew I’d have to have a go at replicating these for the…
Ginger Pear Pan Pudding
This Ginger Pear Pan Pudding is a delicious, quick and easy to make dessert that my ginger loving family adores. Ginger and pear is a perfect match of sweetness and spice, and I do love a scoop of creaminess on top! This is a perfect winter warmer dessert that looks so pretty too! Health benefits…
Simple Sticky Ginger Chicken
This simple Simple Sticky Ginger Chicken is a really easy to make meal that my whole family loves. The warming spices are fabulous for supporting your immune system and reducing inflammation which is always handy in this modern day world. Health benefits Ginger and turmeric give this dish an anti-inflammatory boost. Chicken thighs provide high-quality…
Gingerbread Loaf with Caramel Drizzle
This healthy Gingerbread Loaf with Caramel Drizzle is a low-sugar, wholegrain version of the classic, making it a perfect treat for any occasion. The recipe is versatile, offering options to cater to different dietary preferences. If you love ginger, you’ll love this loaf and whilst it’s sweet, it’s not sickly sweet. Health benefits This loaf…
Pear and Ginger Yoghurt Cake
This healthy yoghurt cake has long been a go-to cake of mine. It’s a deliciously light and moist treat, made with wholesome ingredients like wholemeal spelt flour, yoghurt and ripe pear. It’s a super versatile recipe that can be easily adapted with other fruits and for various dietary needs, making it perfect for anyone looking for a healthier, homemade cake option.
Seeing as the weather has cooled off a bit, I thought I’d make it with winter fruit and warming ginger. When I made this one to photograph, my daughter said it tastes like a ‘real tea cake’ – ha ha! Compliments are hard to come by from teenagers so I’ll take it as a win.
If you’re not a fan of pear and ginger, don’t despair, it is very easily adapted to other flavours.
Health benefits
The use of full-fat yoghurt provides a good source of calcium and probiotics, supporting gut health. Wholemeal spelt flour adds fibre, aiding digestion, while the ginger and lemon zest provide anti-inflammatory benefits. The pear adds natural sweetness and fibre, making this cake a nutritious choice for a dessert or snack.
Ingredients
This cake is made with melted butter or macadamia nut oil, full-fat yoghurt (or greek yogurt), rice malt syrup or honey as a natural sweetener, and wholemeal spelt flour. Ginger root and lemon zest enhance the flavour, while ripe pear adds a fruity touch. The cake is finished with a sprinkle of coconut sugar or rapadura for a delightful crunch.
How to make this healthy yoghurt cake recipe
Start by preheating your oven and preparing a round cake pan. In a large mixing bowl, whisk or beat together the butter (or macadamia oil), yoghurt, sweetener, eggs, lemon zest, and ginger. Then, gently mix in the dry ingredients: baking powder, bicarbonate of soda, sea salt, and spelt flour. Pour the batter into the tin, arrange the pear slices on top, sprinkle with coconut sugar, and bake for around 40 minutes. The cake is ready when a skewer or toothpick inserted into the centre comes out clean. Remove the cake from the pan once you can handle it and let the cake cool on a wire rack.
You can also make this into muffins, just reduce the cook time to 25-30 minutes. If you don’t have a round cake pan you could use a loaf pan or square pan too. If you own a Thermomix, we’ve also included Thermomix instructions for this recipe.
Serving suggestions and how to store
Serve this yoghurt cake with a dollop of double cream or crème fraîche for added richness. Store any leftovers in an airtight container for a few days at room temperature or freeze the cake for later enjoyment.
Vary this healthy yoghurt cake to suit your dietary needs
For a dairy-free version, substitute the butter with macadamia nut oil and the yoghurt with coconut yoghurt. If you’re avoiding nuts, use olive oil instead. To make it fructose-friendly, use rice malt syrup and swap the pear for berries, skipping the sugar topping. Gluten-free variations haven’t been tested with this recipe, but try experimenting with your favourite gluten-free flour blend (almond flour with a tablespoon of arrowroot or tapioca starch would be my go-to). You can also make this cake egg-free by using chia egg or aquafaba as substitutes.
Other flavour options
This cake recipe is highly adaptable:
- Lemon Yogurt Cake: Double the lemon zest and add thin slices of lemon on top before baking. You could also add a lemon glaze.
- Orange Yoghurt Cake: Use orange zest and top with sliced orange, optionally sprinkling poppy seeds on top.
- Raspberry Yoghurt Cake: Top with fresh or frozen raspberries (or any fresh berries will work too).
- Apple Tea Cake: Add cinnamon to the batter and top with sliced apple and cinnamon sugar.
- Spiced Nectarine Cake: Reduce the ginger and add cinnamon, topping with sliced nectarine for a summery twist.
Take a look at the variations below for all the details as well as suggestions to alter the recipe to suit your specific dietary requirements.
For more delicious, easy to make and healthy cake recipes and sweet treats, click HERE.

Pear and Ginger Healthy Yoghurt Cake
This simple, healthy yoghurt cake is an adaptable basic cake that I know you'll keep coming back to.
Servings: 12
Ingredients
- 100 g butter or macadamia nut oil -melted
- 250 g natural, Greek or coconut yoghurt (1½ cups)
- 170 g rice malt syrup or honey (½ cup)
- 3 egg/s
- 1 lemon/s -zest
- 3 tbsp ginger root -finely grated or 2 tsp ground
- 2 tsp baking powder
- 1 tsp bicarbonate of soda
- ½ tsp sea salt
- 300 g wholemeal spelt flour (2½ cups)
- 1 ripe pear -cored and thinly sliced
- 2 tbsp coconut sugar or rapadura
Instructions
- Pre-heat your oven to 170℃/340℉ (fan-forced). Grease and line a spring form pan/ tin with baking paper. I used a 22cm cake tin.
- In a mixing bowl or food processor, beat the butter, yoghurt, sweetener of your choice, eggs, zest and ginger until well combined.
- Add the baking powder, bicarbonate of soda and sea salt and blend again for a few seconds to just combine.
- Now gently fold in the spelt flour and mix until the flour is just combined. The more you mix this, the heavier the cake will become, so less is certainly best.
- Pour the batter into the prepared cake tin, top with the pear, sprinkle over the sugar and bake for 40 minutes or until the cake is firm in the middle (a skewer inserted into the middle will come out clean).
- Release the springform tin and allow to cool on a wire rack.
Thermomix
- Melt your butter 90, 1 min, speed 3. Add the yoghurt, sweetener of your choice, eggs, zest and ginger and blend 1 minute, speed 4.
- Add the baking powder, bicarbonate of soda and sea salt mix 5 seconds speed 4.
- Add the spelt flour and mix 5 seconds, lock the lid, on the flour symbol. Scrape down the sides and fold any uncombined flour as much as you can by hand. You really don't want to over process it, less is best.
- Pour the batter into the prepared cake tin, top with the pear, sprinkle over the sugar and bake for 40 minutes or until the cake is firm in the middle (a skewer inserted into the middle will come out clean).
- Release the springform tin and allow to cool on a wire rack.
Serve
- This is so yum served with double cream, or creme fraiche.
Store
- In an airtight container for a few days.
- It can also be frozen (also in an airtight container).
Notes
Dairy-free
Replace the butter with macadamia nut oil and the yoghurt with coconut yoghurt. If you need it to be nut-free you can use coconut oil, but it will effect the taste and texture (the cake will toughen as it cools). Another option is olive oil.Fructose friendly
Choose rice malt syrup as your sweetener and replace the pear with berries and omit the sugar on top. Take a look at the flavour combo's below.Gluten-free
I haven't tested this with a gluten-free flour as yet. But this Basic Easy Healthy Cake recipe is my all time favourite gluten-free cake (but not nut-free). Another great gluten and nut-free cake is my Vanilla Bean Cupcakes (this recipe also makes one large cake).White spelt
You can certainly replace the wholemeal spelt with white spelt flour - this will produce a lighter, less dense cake batter.Egg-free
I also haven't tested this but suspect it will work well with chia egg or aquafaba.Another flavour
So for all of these - omit the ginger and pear.- Lemon Yoghurt Cake - double the lemon zest and place very thinly sliced pieces of lemon on top (before baking). This is lovely with the ginger too (your call).
- Orange Yoghurt Cake - add the zest of one orange and place very thinly sliced pieces of orange on top (before baking). This is lovely with poppy seeds sprinkled on top too.
- Raspberry Yoghurt cake - top with fresh or defrosted raspberries.
- Apple Tea Cake - add a tablespoon of cinnamon to the cake batter. Thinly slice one apple and arrange on top. Mix a teaspoon of cinnamon in with the sugar and sprinkle on top.
- Spiced Nectarine Cake - I reduced the ginger to 1 tbsp and added 1 tsp of cinnamon to the batter. Top with a sliced nectarine (I used one large nectarine).
I'd love to hear how you enjoy this cake - please post any questions or feedback in the comments below or rate this recipe.
Self Saucing Ginger Puddings
I love food traditions! However try as I will, I really struggle with eating Christmas pudding. I love a good dessert on special occasions, but the pud leaves me zapped of energy, unable to focus and mentally flat. Not the nicest way to end Christmas festivities! So this week I thought I’d share how I offset a spike in blood sugar with this protein rich dessert whilst still enjoying these decadent Self Saucing Ginger Puddings.
What causes ‘that’ feeling after dessert
So why does Christmas Pudding (and many other high sugar desserts) leave most people feeling rotten? When you eat a really sweet dessert (highly refined carbohydrate), your body responds by producing a large amount of insulin to remove the glucose from your bloodstream, directing it into muscle, fat, liver and various cells to be metabolised (so your body can use it for fuel).
Once this sudden influx of insulin has done it’s job, your blood sugar drops suddenly and at this point you will be left feeling flat and lacking energy. Soon after, you’ll possibly feel hungry again or crave more sweet stuff so the cycle is repeated leaving you physically and emotionally labile. One minute you’re up, next you’ll come crashing down.
Note- I’m not talking in terms of diabetes here, rather an otherwise healthy persons response to high sugar foods.
How to have your dessert, minus the mood and energy swings
So if you enjoy a little sweet treat every now and again (it’s Christmas after all), your best bet is to design it so that the amount of insulin released is more gradual. A lower-sugar dessert made with high-fibre whole foods (as opposed to highly refined carbohydrate), a complete protein and good fats is a great place to start. This combination of food groups helps to temper the breakdown of carbohydrate and conversion to glucose so you don’t feel the highs and lows previously described.
I add a wholefoods protein powder to my desserts as it provides fibre, a complete source of protein and good fats to both nourish and help my blood sugars remain stable, whilst I, enjoy a delicious dessert (without an energy crash, mood swings and brain fog).
The vast world of protein powders
Navigating the many types of protein powders available is tricky business. Many brands are derived from feed-lot, grain-fed cows (also often fed GMO’s), highly processed soy proteins and contain franken-sugars, fructose, maltodextrin starches (aggravate blood sugars and the GIT), additives and more yuk ingredients.
Most also contain absolutely no plant fibre, good fats or micronutrients (vitamins and mineral) so nutritionally they are incomplete and not at all reflective of a well rounded, whole food meal. Thankfully, there are a select few which offer balanced nutrition and do what we need them to do – provide a sustaining, nutritious supplement, and here’s the clincher, that actually tastes good. It’s just got to taste good right?
What to look for when choosing protein powders
When choosing a wholefood-based protein powder, there are several key factors to consider to ensure you’re getting a good-quality and effective product:
Ingredients: Look for a protein powder that is derived from wholefood sources, such as pea protein, brown rice protein (preferably non GMO, sprouted and fermented), hemp protein, or a blend of these. If you’re okay with dairy, choose a Whey based protein powder, ensure it is grass-fed and/or organic. Avoid products with additives, artificial flavours, excess sugar or artificial sweeteners.
Nutritional Profile: Assess the nutritional content beyond just protein. Look at the levels of essential amino acids, vitamins, and minerals present in the powder. A good wholefood-based protein powder will offer a range of nutrients beyond just protein.
Allergen Information: Consider any allergies or dietary restrictions. Wholefood-based protein powders are often suitable for those with common allergies (e.g., dairy, soy, gluten), but always check the label for potential allergens.
Taste and Texture: Personal preference matters too. Choose a protein powder that tastes good to you and mixes well with your favourite fruits and fluid (I love making smoothies with coconut water and yoghurt) or add protein powder to recipes like pancakes, overnight oats or chia puddings. Some wholefood-based powders can have a grainier texture, which may be a consideration.
By considering these factors, you can select a wholefood-based protein powder that aligns with your dietary preferences, nutritional needs, and taste preferences, ensuring you get the most out of your protein supplement.
GoodnessMe have a fabulous selection of clean protein powders, you can take a look HERE.
Ingredients
This recipe uses butter or macadamia nut oil, milk (regular or plant-based), an egg, coconut sugar, fresh ginger, cinnamon, wholefood protein powder, wholemeal spelt flour, baking powder, and sea salt. For the self-saucing syrup, you’ll need rice malt syrup, honey, or maple syrup combined with hot water.
How to make these self saucing ginger pudding
To prepare these ginger self saucing puddings, start by blending the butter, milk, egg, coconut sugar, ground ginger, and cinnamon until frothy. Add in the rest of the dry ingredients including the protein powder, flour, baking powder, and salt, mixing until just combined. Pour the batter into greased ramekins and place them on a baking tray or sit them in a baking dish. Prepare the syrup by mixing your choice of sweetener with boiling water and pour it over the batter mixture. Bake at 180℃ (fan-forced) for 20-25 minutes, until the tops are golden and crisp, with a sticky sauce at the base. If you own a Thermomix, we’ve also included Thermomix instructions for this recipe.
Serving suggestions and how to store
Serve these self saucing ginger puddings hot out of the oven, ideally with a dollop of double cream or coconut cream and fresh berries for added flavour and colour. Leftovers (if any!) can be stored in the fridge and gently reheated, though they’re best enjoyed fresh when the sauce is still warm and gooey.
Vary these self saucing ginger puddings to suit
For gluten-free self saucing puddings, swap the spelt flour with a gluten-free flour blend. To make it dairy-free, replace the butter with macadamia nut oil, use a plant-based milk, and opt for a vegan protein powder. If you’d like to skip the protein powder, try ground nuts or seeds as a tasty alternative.
For more delicious, easy to make healthy dessert recipes, click HERE.

Self Saucing Ginger Puddings
Whilst this Self Saucing Ginger Pudding is satisfyingly sweet, because it contains a nice balance of complex carbohydrate, plenty of protein and healthy fats, it won't leave you feeling low like many desserts - Christmas Pudding I'm looking at you!!
Servings: 4
Ingredients
- 80 g butter or macadamia nut oil -melted
- 120 ml milk (of choice) (½ cup)
- 1 egg/s -beaten
- 50 g coconut sugar or rapadura (⅓ cup approx.)
- 2 tbsp ginger root -finely grated fresh
- 1 tsp ground cinnamon
- 60 g wholefood protein powder - vanilla or a neutral flavour
- 65 g wholemeal spelt flour (see gluten and grain-free below)
- Pinch sea salt
- 2 tsp baking powder
Syrup
- 85 g rice malt syrup, honey or maple syrup
- 180 ml hot water (¾ cup)
Instructions
- Preheat your oven to 180℃/350℉ (fan forced). Grease 4 ramekins.
- In a blender or food processor, mix together the butter, milk, egg, coconut sugar, ginger and cinnamon until well combined and frothy.
- Add the wholefood protein powder, flour, sea salt and baking powder.
- Mix until just combined (don't over mix or the pudding will become heavy).
- Divide the batter between the four ramekins (approx. 1½ cup capacity) and place on a small baking tray (makes it easier to pop in the oven and catches any overflow).
- In a small jug make the syrup by combining the sweetener and hot water. Mix to combine and carefully pour over the batter (over a spoon).
- Place in the oven and bake for 20-25 minutes or until the puddings are golden and crisp on top. The sauce will be absorbed into the middle and base of the ramekin (forming a lovely sticky syrup).
Thermomix method
- Preheat your oven to 180℃/ 360°F (fan-forced). Grease 4 ramekins.
- Melt the butter, temp 90, 1 min, speed 4. Add the butter, milk, egg, coconut sugar and cinnamon. Blend speed 1 min, speed 4.
- Add the wholefood protein powder, flour, sea salt and baking powder. Mix 3 seconds, speed 2 (you may need to scrape the sides with the spatula to fold the last of the lour through the batter). Don't over mix of the pudding will become heavy.
- Divide the batter between the four ramekins and place on a small baking tray (makes it easier to pop in the oven).
- In a small jug make the syrup by combining the sweetener and hot water. Mix to combine and carefully pour over the batter.
- Place in the oven and bake for 20-25 minutes or until the puddings are golden and crisp on top. The sauce will be absorbed into the middle and base of the ramekin (forming a lovely sticky syrup).
Serve
- Enjoy hot out of the oven with double cream and berries.
Notes
Gluten-free
Substitute the spelt with your favourite gluten-free flour mix.Dairy-free
Replace the butter with macadamia nut oil, choose a dairy-free milk and a vegan wholefood protein powder.No protein powder
Replace with ground nuts (nut meal) or ground seeds.I'd love to hear how you like this delicious pudding? It's my families new favourite dessert! Post a comment or a question below.
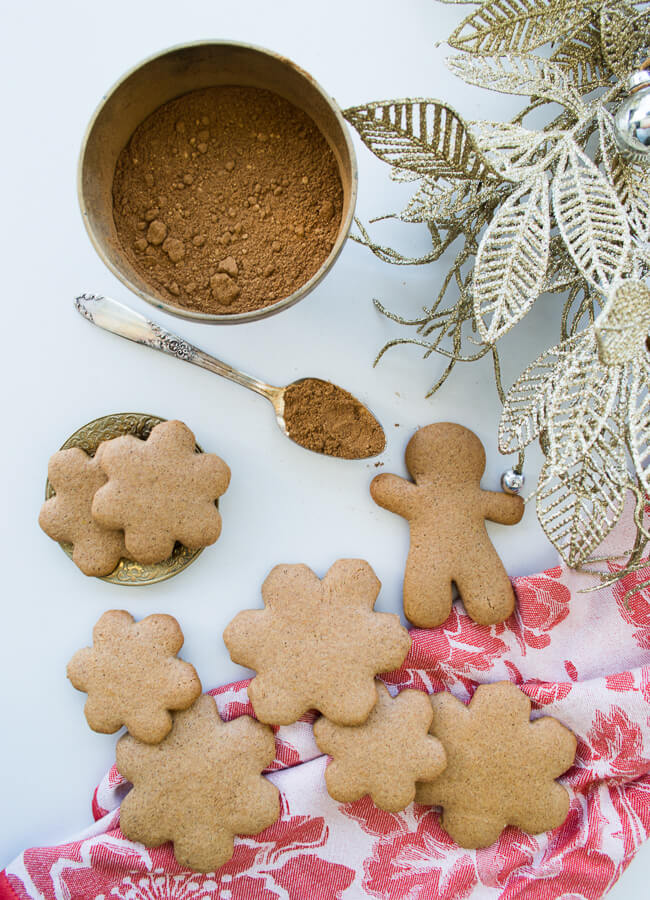
Healthy Gingerbread (and a lovely spice mix to gift)
This healthy gingerbread recipe is a delicious way to bring festive flavours into your home, without the excess sugar and refined ingredients often found in store-bought gingerbread. As well as healthy gingerbread cookies, it makes fabulous gingerbread men and gingerbread houses too. And even though it’s perfect for Christmas, with its nourishing spice blend, you can also enjoy it all year long.
Whilst I was developing the perfect spice blend, I ended up with quite a lot of it. Because there’s only so many gingerbread biscuits a family can eat, I started experimenting with other ways to enjoy this nourishing, healing blend and came up with quite a few yummy drinks and eats.
As usual, I just don’t know where to stop when it comes to sharing yumminess, so, I thought I’d share it all! I think the spice mix would make a lovely gift – especially as it is very hardy and has a very long shelf life.
How would you use it I hear you ask? Here are a few ideas:
- Add it to hot chocolate (or even your latte)
- Add it to my delicious basic cake mix (think spiced tea cake)
- Sprinkle it over baked sweet potato (with a dollop of butter)
- Add it to your favourite pancake batter (it could replace the spices in this Carrot Cake Pancake recipe)
- Mix it with maple syrup and drizzle it over yoghurt
- Add it to my No-bake Muesli Bar (replace the cinnamon)
- Or add it to your favourite chocolate bliss ball recipe
- Add it to your banana smoothie – a flavour match made in heaven!
Really, the possibilities are endless!
Health benefits
Gingerbread spices like cinnamon, ginger, and turmeric aren’t just tasty, they also offer a range of health benefits. Cinnamon helps stabilise blood sugar, ginger supports digestion, and turmeric provides anti-inflammatory properties. By making your gingerbread at home, you’re avoiding the vegetable oils and high sugar content typically found in commercial versions, giving your body a healthier treat.
Ingredients
The spice mix includes cinnamon, ginger, nutmeg, and clove – ingredients that not only add flavour but also provide nourishment. Combined with wholemeal spelt flour and a natural sweetener like maple syrup, these biscuits are wholesome and delicious without the need for processed ingredients. You can adjust the spice blend to suit your taste, making the gingerbread flavour as ginger-y or mild as you prefer.
How to make healthy gingerbread
Making these spelt gingerbread biscuits is simple. Start by combining your dry ingredients, including the spice mix, flour, and bicarbonate of soda. Then mix the melted butter, milk, and maple syrup before adding the wet ingredients to the dry ingredients to form a dough. Once the cookie dough has chilled, roll it out and use cookie cutters for festive shapes. After baking, allow the biscuits to cool completely before enjoying – they firm up as they cool, making them the perfect texture.
If you own a Thermomix, we’ve also included Thermomix instructions for this recipe.
Serving suggestions and how to store
Enjoy these gingerbread biscuits with a hot cup of tea or even use them as edible gifts during the festive season. Feel free to frost them to make them extra celebratory. Store them in an airtight container in the fridge, or freeze them to enjoy later. They also make great treats for lunchboxes if you’re looking for a healthy snack option.
Vary this healthy gingerbread to suit your dietary needs
To make these gingerbread biscuits gluten-free, swap the spelt flour for almond meal and arrowroot, or use your preferred gluten-free flour. For a vegan option, use coconut oil instead of butter and choose a non-dairy milk. If you’re looking to reduce fructose, replace the maple syrup with rice malt syrup for a low-fructose version that’s just as tasty. They are egg-free so perfect for those with egg allergies.
Take a look at the variations (below the main recipe) for suggestions to alter the recipe to suit any specific dietary requirements.
For a healthy Gingerbread Loaf recipe, click HERE.
Or for Gingerbread granola, click HERE.

Healthy Gingerbread (and a lovely spice mix to gift)
This Gingerbread recipe is versatile and delicious. Make it into biscuits, gingerbread boys or girls, or any shape you like really.
Servings: 20 biscuits
Ingredients
Spice mix
- 2 tbsp ground cinnamon
- 2 tbsp ground ginger
- 1 tbsp mixed spice
- 1 tsp ground nutmeg
- 1 tsp ground clove
- ¼ tsp ground turmeric
- ground black pepper -to taste
Gingerbread biscuit
- 180 g wholemeal spelt flour (1½ cup) gluten-free variation below
- 1-2 tbsp spice mix -how much you add depends on how ginger-y you like your biscuits
- ¼ tsp bicarbonate of soda
- Pinch sea salt
- 50 g butter - melted (¼ cup)
- 30 ml milk (of choice) (2 tablespoons)
- 85 g maple syrup (¼ cup)
Instructions
- Preheat your oven to 150°C/300°F (fan forced).
- In a mixing bowl, combine the flour, spice mix, bicarbonate of soda and salt.
- In a blender or food processor, mix melted butter, milk and maple syrup until well combined.
- Add the wet to the dry ingredients and mix together until dough forms. If the mixture seems a little wet, add a little more flour, or dry add more milk (it should be like playdough and not stick to your fingers).
- Roll into a ball, wrap in baking paper and refrigerate for 30-60 minutes.
- If you aren't bothered with shapes, roll the dough into a log, chill and then cut the log into slices (to form round biscuits).
- Or to cut shapes, place the dough between two pieces of baking paper and roll to approximately 2-3 millimetres thick. If your kitchen is warm, work quickly as soft dough is hard to shape.
- Cut shapes with a cookie cutter, place on a lined or greased baking tray and bake for 10 minutes or until golden (gluten-free may need a bit longer).
- Leave on the tray until completely cooled. They firm as they cool.
Thermomix method
- Melt butter 1 minute, temp 90 speed 3.
- Add the milk and maple syrup and mix 30 sec, speed 4.
- Add the dry ingredients and mix 30 sec, speed 4 until a thick dough forms.
- Continue as above.
Store
- Store in an airtight container in the fridge or freezer.
Notes
Gluten and grain-free
Substitute spelt flour with 180g almond meal plus 2 tablespoons arrowroot powder. Or, for a firmer gluten-free cookie use half buckwheat/almond meal. Alternatively replace the spelt with your favourite gluten-free or paleo flour.Dairy-free and vegan
Choose a non-dairy milk and replace the butter with coconut oil (it will produce a tougher biscuit once cooled).Low-fructose
Replace the maple syrup with rice malt syrup as your sweetener.I'd love to hear how you like this versatile recipe? Also if you can add to my list of ways to use the spice mix, that would be wonderful. Post a comment below or rate this recipe.
Beetroot Coconut Ginger Soup
My whole family have all come to love this Beetroot Coconut Ginger Soup – not only is it a delicious combination of flavours, it’s incredibly nourishing and truly food as medicine!
I find the human palate an amazing thing – some people just eat anything that’s put in front of them and others are a little more discerning (sounds so much more classy than ‘fussy’). You might be surprised that I actually fit into the second category here. With age, I’ve certainly broadened my culinary horizons – largely due to my ‘eat anything at all’ husband, no matter how unusual. Also, as we have travelled a fair bit, so I’ve had to venture outside of my comfort zone and try new and sometimes unrecognisable things (and mostly I’ve been pleasantly surprised).
My son is just like his father – if he eats a prawn, he crunches the head and all. Recently, he couldn’t understand why he couldn’t eat the head off a sardine (yuk)! My daughter, on the other hand, is like me, a little more cautious.Which brings me to this soup, because she can really be quite picky with cooked beetroot (raw and fermented is fine though). However, this Beetroot, Coconut and Ginger soup has such a beautiful, velvety flavour that has been enough for her to accept it in its cooked form.
So before you flick away from this recipe thinking the kids or hubby will never eat this, I’d really encourage you to consider giving it a go.
Health Benefits
Beetroot is a rich source of fibre and many valuable and protective nutrients. It is a unique source of betaine, a nutrient that is known to help protect against inflammation, support liver detoxification, improve vascular risk factors, enhance (sports) performance and is likely to help prevent numerous chronic diseases. Coupled with the anti-inflammatory herbs ginger and turmeric and immune supporting coconut, this is one nutrition packed soup.
Ingredients
This healthy beet soup recipe uses simple, whole ingredients like fresh beetroot, carrots, apple, and ginger. Combined with stock and coconut milk, the ingredients come together to create a rich, delicious soup.
How to make beetroot soup
Start by sautéing the onion, garlic and ginger in a large saucepan until soft, then add the turmeric, beetroot, carrot, and apple along with your chosen stock. Simmer everything over a medium heat until tender, then blend with coconut milk until smooth.
Serving suggestions and how to store
Serve this gluten-free, healthy beetroot soup with a generous drizzle of coconut milk, fresh parsley, and lemon wedges. It pairs beautifully with a slice of crusty sourdough bread. Store any leftovers in the fridge for up to 3 days or freeze for up to 3 months.
Vary beetroot coconut ginger soup suit your dietary needs
For a dairy-free option, use ghee or olive oil instead of butter. To make it vegetarian or vegan, opt for vegetable stock and olive oil for sautéing. If you’re avoiding onions and garlic, try fennel and a pinch of chili flakes for a fresh twist.
For more delicious, easy to make, nourishing soups, click HERE.

Beetroot, Coconut and Ginger soup
This beetroot, coconut, and ginger soup is a vibrant, delicious soup that’s as nutritious as it is delicious. The combination of earthy beets, creamy coconut milk, and a zingy hit of ginger makes it a warming soup with a hint of sweetness and spice.
Servings: 4
Ingredients
- 2 tbsp butter, ghee or olive oil
- 2 onion/s -peeled & roughly diced
- 3 clove/s garlic -peeled & chopped
- 2 tbsp ginger root - peeled & finely grated
- 3 beetroot (medium)
- 1 tsp fresh turmeric root -grated (½ teaspoon if using dry)
- 2 carrot/s - diced
- 1 green apple - peeled & diced
- 720 ml chicken broth or stock (3 cups) or vegetable stock
- Sea salt and freshly ground black pepper - to taste
- 270 ml canned coconut milk
- ¼ bunch/s flat leaf parsley - chopped, to serve
- 1 lemon/s - wedges, to serve
Instructions
- In a medium sized pot, heat your butter, ghee or olive oil over a low heat and add the onion, garlic and ginger. Sauté gently for 10 minutes (do not brown).
- Peel and cut the beetroot into roughly the same sized pieces.
- Add to the pot with the turmeric, carrot, apple, stock and season well. Bring to the boil and then reduce to a slow simmer for about 15 minutes or until the beetroot is tender (when a fork can poke it easily).
- Allow to cool a little and place in a high-speed blender or food processor with the coconut milk (reserving ¼ can to serve). Blend (puree) until smooth and creamy. Taste and adjust the seasoning if necessary.
- If you have particularly earthy beets, you can add a teaspoon or two of sweetener (maple syrup or rice malt syrup) to counterbalance it.
- Garnish with parsley and the reserved coconut milk and serve with a wedge of lemon (this really compliments this flavour of the soup).
Themomix method
- Place your ginger and garlic in the TMX and chop 5 seconds, speed 5.
- Add the onions and chop 5 seconds, speed 5.
- Add the butter, ghee or olive oil and saute 3 minutes, 100, speed 1.
- Add the turmeric, beetroot and carrot, apple and chop further, 5 seconds, speed 4.
- Add the stock, seasoning and cook 15 minutes, temp 100, speed 2.
- Remove the lid and allow to cool for a few minutes. Add the coconut milk (reserving ¼ can to serve) and puree 20 seconds, speed 7.
- Taste and adjust the seasoning if necessary. If you have particularly earthy beets, you can add a teaspoon or two of sweetener (coconut syrup or rice malt syrup) to counterbalance it
- Garnish with parsley and the reserved coconut milk and serve with a wedge of lemon (this really compliments this flavour of the soup).
Make-ahead
- Re-heat in a pot over a low heat until just hot.
Store
- Store in an airtight container in the fridge or freezer.
Notes
Dairy-free
Use ghee or olive oil to sauté.Vegetarian and vegan
Choose ghee or olive oil to sauté and vegetable stock.Onion and garlic free
Replace the onion with a bulb of fennel, diced, and a pinch of chilli flakes.Love to hear your feedback on this slightly unusual soup. Post a comment below.
Immune Tea – a Simple Remedy to Prevent and Treat Colds and Flu
There’s something soothing about a warm cup of tea when you’re feeling run down. But not any old tea will do. With people dropping left right and centre at the moment with cold symptoms, sore throat, flu symptoms, and all manner of dreaded bugs, I thought I’d share this immune boosting tea recipe – a remedy I rely on to keep myself and my family well.
I also personally use this remedy to treat symptoms of upper respiratory infection. I’ve found in my family it really helps relieve symptoms and shorten the duration of cold symptoms (and severity of the infection). This immune tea is my take on the infamous hot lemon and honey drink my mum used to make me as a child, only packing much more of a medicinal punch.
Health benefits of this immune boosting tea recipe
- The turmeric is a powerful antioxidant, anti-inflammatory, antibacterial and antiviral. This, combined with the anti-inflammatory effects of ginger, means that both are wonderful for treating the congestion associated with respiratory infections.
- Honey has been used for centuries to reduce inflammation, promote healing and reduce infection. But not all honey is created equal. Processed honey has no medicinal qualities. Real, raw honey possesses these properties, with some types of honey more potent than others. Manuka honey is a type of honey which is potently antibiotic and is receiving much attention in the medical community for its medicinal qualities. It or another raw medicinal honey would be your best choice here.
- Lemon obviously donates a little hit of vitamin C. But it is the zest that impresses the most. Lemon zest is very nutrient dense, an amazing antioxidant and is very anti-bacterial too. It is also very good for stimulating digestion and breaking down mucous. Where ever a recipe calls for lemon juice, always incorporate the zest too.
Ingredients
You’ll need boiling water, ginger (either tea bags or fresh), turmeric (ground or fresh), raw or manuka honey, and a lemon for both zest and juice. If you want to take it up a notch, you can even add a splash of coconut oil for extra richness.
How to make Immune Tea
Simply pour boiling water over the ginger and turmeric, let it steep for a few minutes, then stir in the lemon juice and zest. Finish it off with honey to taste, and your immune tea is ready to enjoy! It’s perfect for a cozy night in or to fill up a thermos for sipping throughout the day if your fighting infection.
Serving suggestions and how to store
This tea is best enjoyed warm, either fresh out of the pot or in a thermos to keep it hot. If you have leftovers, you can store it in the fridge and reheat when needed. It also doubles nicely as can be used as a base for iced tea in warmer weather!
Vary this to suit your dietary needs
To make it vegan, swap the honey for maple syrup or rice malt syrup. For a more potent brew, simmer the ginger and turmeric root for a few extra minutes, or add a tablespoon of coconut oil for an extra immune boost.

Immune Tea
This immune-supportive tea is my go-to when I’m feeling run down or just want to stay ahead of the cold and flu season. It's easy to whip up, full of warming spices, and can be sipped throughout the day. Plus, you can customize it to suit your taste and boost its benefits!
Servings: 2
Ingredients
- 500 ml boiling hot water (2 cups)
- 2 organic ginger tea bags (or a 2 cm slice of fresh ginger root, diced or grated)
- ½ tsp ground turmeric (or a 2 cm fresh piece of root, diced or grated)
- 2 tsp manuka or raw honey -more or less to taste
- 1 lemon/s -juice and zest
Instructions
- Pour the boiling water over the ginger, turmeric, and optional coconut oil.
- Let it sit for a few minutes before adding the zest and juice.
- Add the honey then simply sip yourself well.
- This makes 2 cups or one thermos of immune tea.
Notes
Supercharge it
Simmering the ginger and turmeric root in the water for 5-10 minutes will make a more potent brew.Boost it
Add a tablespoon of extra virgin coconut oil to the tea.Vegan
To make it vegan, replace the honey with maple syrup or rice malt syrup.Do you have any homemade remedies you swear by to prevent or treat colds and flu? I'd love you to share by commenting below.

Download your FREE Immune Health Plan ebook – A practical guide filled with simple tips to help support your immune system so you and your family stay fighting fit this winter.