
This chicken vegetable pot pie is a delicious, family-friendly meal made with oven baked chicken, vegetables and a slightly creamy sauce, all topped with golden, flaky puff pastry. It’s a simple whole food take on a classic, using minimal steps by roasting the filling first, then finishing it under pastry. Perfect for cooler nights or…
pie
Miso Braised Beef Pie
This Miso Braised Beef Pie is a hearty, nourishing stew that brings comfort food and deep flavour together beautifully. The beef is slow-cooked until melt-in-your-mouth tender in a savoury miso and tamari broth, then topped with a creamy garlic mash and baked until golden. Health benefits This dish is brimming with nutrient-dense ingredients. Slow-cooked brisket…
Beef Mushroom Pie
This slow cooked delicious Beef Mushroom Pie recipe is budget friendly and takes minimal effort to create for the delicious taste! Country bakeries are known for their pastries so now you can use your kitchen to make award-winning pies at a fraction of the price! These pies are full of veggies, tender beef and ……
Maltese Tuna Pumpkin Pie
This Maltese Tuna Pumpkin Pie was a recipe request by a Well Nourished Family member. After a fair bit of research and trials of various flavour combinations, this delicious pie was born. Traditionally, there seemed to be two ways to make the filling, one more chunky (which is what I went with as it requires…
Lamb Pilaf (Lamb Shoulder Three Ways)
We’ve got quite a few two- and three-in-one recipes here now including this Lamb Pilaf. These recipes allow you to cook three family meals (for 4) in the most budget and time efficient way. For example, the lamb shoulder I used for this meal cost just $36 and it’s been stretched between 3 substantial, nutritionally…
Moroccan Lamb Vegetable Pie (Lamb Shoulder Three Ways)
We’ve got quite a few two- and three-in-one recipes here now, including this Moroccan Lamb Vegetable Pie. These recipes allow you to cook three family meals (for 4) in the most budget and time efficient way. For example, the lamb shoulder I used for this meal cost just $36 and it’s been stretched between 3…
Greek Nachos (Lamb Shoulder Three Ways)
We’ve got quite a few two- and three-in-one recipes here now, including this delicious Greek Nachos recipe. These recipes allow you to cook three family meals (for 4) in the most budget and time efficient way. For example, the lamb shoulder I used for this meal cost just $36 and it’s been stretched between 3…
Mushroom Lentil Pies
These Mushroom Lentil Pies are a delicious protein rich, plant based pie. Despite being meat free, the combination of lentils and mushrooms gives it a distinctly meaty flavour. I love making these in individual ramekins, however one large pie works perfectly well too with no difference in cook time. Health benefits This recipe offers a…
Lemony Sweet Potato Tart
This delicious Lemony Sweet Potato Tart is my take on a pumpkin pie my Nan used to make. I still love pumpkin pie but sometimes it’s the sweet potatoes that are on special or in season! I’ve made it dairy-free with a hint of spice and sweetness, but not too sweet. It’s so easy to…
Steak and Vegetable Pie
This Steak and Vegetable Pie is a really quick to prepare and makes for an easy, super delicious meal. The pie filling slow cooks in one pot. Try to make this ahead of dinner time to allow the pie filling to cool off. If you’re ever missing any of the vegetables on the ingredient list,…
Chicken Pasta Bake and Curry Chicken Pie
As requested by members, I was asked to come up with recipes where you start with a few core ingredients to make a couple of different meals. So from this tray bake I’ve created a Chicken Pesto Pasta Bake and a Curry Chicken Pie. I usually enjoy the Pasta Bake the day of cooking then…
Aussie Meat Pie
This Aussie Meat Pie is based on one my dear nan and I used to make when I was a kid. The iconic meat pie of Australia is a flavoursome mix of beef mince and gravy in a beautiful crisp pastry. Placed in a paper bag with a squirt of tomato sauce, it is a quick take-away lunch common to petrol stations and corner stores. Truth be told, the commercial meat pies are probably more mystery meat and fillers, so this is a recipe that you can sink your teeth into and enjoy every single bite.
Nan always used shortcrust for her pies (no fancy puff pastry in those days) so I’ve done the same here. Her recipe didn’t contain any veggies, but of course I have taken the liberty of adding them here. Feel free to add more, less, or change the veggies about if you like. You can make these pies as individual ones or one large family pie. The possibilities are endless!
I know you’ll love the flavours in my take of the classic Aussie meat pie.
Health benefits
This homemade Aussie Meat Pie offers superior health benefits compared to supermarket or take away options. It’s made with real, fresh ingredients and uses wholemeal spelt flour, which is rich in fibre vitamins, and minerals. The pie is packed with fresh beef, providing high-quality protein, while carrots and spinach add essential nutrients and fibre. Unlike supermarket pies, which often contain processed ingredients, preservatives, and unhealthy fats like vegetable or seed oils, this homemade version uses healthier fats like olive oil or butter. Store-bought pies typically rely on refined flours, excess salt, and low-quality meats, which can negatively affect your health. So making your own pie ensures you’re eating a more nutrient-dense, wholesome meal.
Ingredients
The filling combines beef mince (ground beef), onions, garlic, mustard and a variety of delicious condiments like Worcestershire sauce, tomato paste, and balsamic vinegar. The homemade wholemeal spelt pastry adds a deliciously flaky and wholesome touch. The addition of baby spinach and carrot boosts the nutritional content of this comforting dish.
How to make Aussie Meat Pies
Start by sautéing the onions and garlic before adding the beef mince and thyme. Stir in the condiments and stock, then let the meat pie filling simmer until thickened. Meanwhile, prepare the pastry by processing flour and butter, then kneading until smooth. Roll out the pastry, line your pie dish, fill with the meat mixture, and top with the pastry lid. Bake until golden and crispy.
Serving suggestions and how to store
Serve these Aussie Meat Pies with a side of salad, steamed vegetables or mashed potatoes for a complete meal. To store, place leftovers in an airtight container in the fridge or freezer. Reheat in the oven until just warmed through to retain the crispness of the pastry.
Vary this Aussie meat pie to suit your dietary needs
For a vegetarian version, swap the mince for brown lentils and mushrooms. If you prefer a puff pastry top, you can halve the homemade pastry recipe and use puff pastry for the lid. Garlic-free and gluten-free variations are also included, ensuring this recipe can suit a wide range of dietary needs.
Take a look at the variations (below the main recipe) for suggestions to alter the recipe to suit your specific dietary requirements.
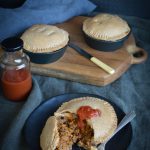
Aussie Meat Pie
This Aussie Meat Pie is based on one my dear Nan and I used to make when I was a kid. She always used shortcrust for her pies (no fancy puff pastry in those days) so I've done the same here.
Servings: 4
Ingredients
- 2 tbsp extra virgin olive oil
- 2 red onion/s – diced
- 4 clove/s garlic – minced
- 500 g beef mince
- 1 tsp dried thyme
- 1 tbsp dijon mustard
- 2 tbsp Worcestershire sauce
- 2 tbsp tomato paste
- 1 tsp balsamic vinegar
- 1 tbsp white miso paste – optional or Vegemite
- 200 ml stock or broth – beef or chicken is fine
- 1 tbsp true arrowroot flour – or cornflour – mixed to dissolve with 1 – 2 tbsp more broth or water
- 1 carrot/s – grated
- 30 g baby spinach – finely chopped, approx (1 cup)
Pastry
- 450 g wholemeal spelt flour
- 180 g butter
- 3 tbsp water
Instructions
Meat filling
- In a medium sized fry pan, soften the onion in the olive oil over a medium high heat for 2-3 minutes.
- Add the garlic, beef mince and thyme and fry, stirring until the beef has browned and any liquid has mostly reduced.
- Add the mustard, Worcestershire sauce, tomato paste, balsamic vinegar and optional miso. Then add the stock (or broth), arrowroot slurry and carrot.
- Simmer for 10 minutes or until the pie filling has a nice ‘pie’ consistency.
- Turn off the heat and mix in the spinach. It doesn’t matter if it wilts completely as it will when you cook the pie.
- While the sauce is simmering, make the pastry.
Pastry
- Note – If using your Thermomix, start with the pastry (wrap and rest in the fridge) then use it to chop the onion, garlic, carrots and spinach.
- In a food processor add the flour and butter and process until it comes together in a coarse crumb (you can also do this by hand by rubbing the butter into the flour mix). Thermomix 10 seconds, speed 6.
- Add the water and process until the dough starts to come together, then gently knead it for a minute (to just bring it together, don’t overwork it). Thermomix 10 seconds, speed 6, then 30 seconds, wheat symbol (to knead).
- Add extra water if necessary teaspoon by teaspoon until it is the proper consistency (see the note about consistency below).
Pie Construction
- If you are baking your pies in the oven, preheat oven to 180°C/350°F (fan forced). Grease and / or line your pie dishes (single serve or large) with parchment paper. I make long strips and place in the base like a cross. I like to sit my individual pie dishes on a tray so that they are easy to get in and out of the oven.
- Roll out the pastry – see note below.
- Use the pie dish of choice to cut circles on the pastry for the bases and lids. Place the base pastry in the dish, fill with the meat and place lid on top, pressing down edges with a fork or spoon to seal the edges. Prick the centre of the pie.
- Bake in the oven for approximately 20 minutes or until golden.
- If you have a pie maker, preheat it while using the cutter to cut the bases and lids for your pies. Working quickly, place the pastry bases in the pie maker. Fill with the pie filling just over the top, then place lids on. Close the pie maker lid and cook until pastry is golden.
Serve
- With salad, vegetables and mash.
Make-ahead
- Re-heat in a low oven until just hot.
Store
- Store in an airtight container in the fridge or freezer.
Notes
Vegetarian
Replace the mince with 1 can brown lentils (drained and rinsed), 200 g mushrooms (finely chopped or pulsed in a food processor) and vegetable stock.Garlic-free
Omit or replace with garlic oil if tolerated.For Dairy and Gluten-free
Click HERE to use this pastry casing instead.Flaky top
If you’d prefer a puff pastry top, have the pastry amount and top with an all-butter puff pastry instead.A note about pastry consistency
As all whole flours are slightly different in their consistency/texture, you will need to judge how much water is needed yourself for all types of pastry. The consistency you are after is that the dough should easily come together in a firm, slightly sticky ball (but not stick to your hands or the bowl). If it cracks as you roll it, it needs more water. If your kitchen is hot (during summer) you will need to work quickly to assemble.A note about rolling pastry
Personally, I find the cleanest and most foolproof way to roll pastry is to roll it between two pieces of parchment or baking paper. Remove the top piece of paper and invert the pastry into the pan before peeling off the bottom layer.Baking note
Always bake pastry items like pies and quiche on the bottom shelf of the oven (makes for a crisper pastry).Enjoy this delicious Aussie Meat Pie inspired by my Nan.
Healthy Easy Fish Pie
This fresh, light and nourishing Healthy Easy Fish Pie is the perfect pie for this time of the year. It’s also super simple to make, just the way I like it! The title is a little deceptive, as it’s not just fish in there! This pie adds a heap of vegetables to add nutrition and…
Chicken Shiitake Mushroom Pie
This Chicken Shiitake Mushroom Pie is one of my family’s new favourites. Whenever we have a roast chicken for dinner, I throw in an extra chook and use the meat for school lunches and to make this simple pie for dinner one night. The combination of protein with vegetables, shiitake and warming spices makes it…
Breakfast Hash Pie
This Breakfast Hash Pie came about when my son was wanting me to make hash browns and I couldn’t be bothered frying them individually. So, I came up with this ‘lazy’ version of a brekkie hash.
We also have many mornings we have less than 20 minutes to eat and get out the door. So make ahead brekkie’s are an essential part of my ‘eating well’ routine. The best thing about my Breakfast Hash Pie, is I can make it the night before, portion and re-heat the next morning when we are short on time.
Why everyone needs a proper brekkie
In my many years consulting as a naturopath and assessing patients diets, the one meal where many people struggled (nutritionally), was breakfast. I found that so many people were searching for more energy, productivity and better general health; spending large sums of money on supplements and searching for the ‘magic bullet,’ but also neglecting the one meal that could improve both their short and long-term health.
Those patients that took my advice and changed their ways reported at follow-up consults that since eating a nourishing breakfast, they snacked less and found it easier to make healthier food choices right throughout the day. They had better concentration, a happier mood and more energy to exercise. They also had the motivation to prepare a healthy dinner in the evening.
In my professional opinion, if you want to improve your overall health and wellbeing, start the day right with a nourishing breakfast. If you’re after more make ahead breakfast inspiration you can’t go past my ebook ‘Rise and Shine – A Well Nourished Breakfast’ – 25 delicious, easy and versatile recipes that each take 5-10 minutes to make – yes, in the real world! Find out more HERE.
Health benefits of this breakfast pie
Packed with protein from eggs and bacon (approx. 26g per serve), this breakfast pie will keep you full and satisfied. The potatoes or sweet potatoes provide a good source of energy and fibre (approx. 6g per serve) while the spinach adds a boost of vitamins and antioxidants. You can even load it up with extra veggies for an extra nutrient hit.
Ingredients
This breakfast hash pie is made with simple ingredients like potatoes, large eggs, bacon, spinach, and cheddar cheese. The base of grated potatoes gives it a hearty texture, while the eggs hold everything together, creating a deliciously fluffy filling. You can also switch up the ingredients based on what you have on hand.
Instructions to make a healthy brekkie pie
To make this breakfast pie, start by grating the potatoes and stir them together with the diced onion in your pie dish (or a baking dish). Spread the mixture into a greased baking dish, then whisk together the eggs, salt, and pepper, and pour the egg mixture over the potato mixture. Top with slices bacon, spinach, and shredded cheddar cheese, then bake in a preheated oven until golden and set. It’s that easy!
Serving suggestions and how to store
Serve this breakfast hash pie with a simple green salad and a dollop of tomato chutney for a well-rounded meal. Leftovers can be stored in the refrigerator in an airtight container for a few days or frozen for longer storage. Simply reheat in a low oven when ready to eat.
Vary this to suit your dietary needs
For a dairy-free version, swap the cheese with a mix of ground macadamia nuts, nutritional yeast, and sea salt, and grease the dish with olive oil. If you’re vegetarian, skip the bacon and add strips of red capsicum and smoked paprika for a smoky flavor. You can also bulk it up with more veggies like broccoli, zucchini, or grated carrot for an extra boost.
Take a look at the variations (below the main recipe) for suggestions to alter the recipe to suit your specific dietary requirements (including vegetarian) and to bump up the veggies too.

Breakfast Hash Pie
This breakfast hash pie is a hearty and filling meal that combines grated potato, eggs, bacon, and spinach into a delicious and savoury bake. It’s perfect for a family breakfast or brunch, and with minimal prep, it’s a great option for busy mornings. Plus, it can be made ahead and easily reheated for an even quicker meal.
Servings: 4
Ingredients
- 3 potato/s (large) or sweet potatoes, peeled and grated
- 1 tbsp butter or olive oil -for greasing dish
- 1 red onion/s (small) finely diced
- 10 egg/s
- ½ tsp sea salt - or to taste
- ground black pepper -to taste
- 4 rasher/s bacon -short cut
- 30 g baby spinach -approx. (1 cup) or English spinach
- 125 g mature cheddar cheese (1 cup) grated
Serve
- Salad (to serve)
Instructions
- Preheat your oven to 200ºC /390ºF (fan-forced).
- Grate the potato and wring it in a clean cloth to remove the moisture.
- Grease a baking dish (26 x 18cm approx.) with butter or olive oil and place the grated potato and red onion in it, tossing to roughly combine.
- In a jug or blender beat the eggs and seasoning.
- Pour over the potato onion mix to cover.
- Place the bacon on top, followed by the baby spinach and cheese.
- Bake in the oven for 30-40 minutes or until the egg is set.
- Slice and serve.
Thermomix method
- Preheat your oven to 200ºC /390ºF (fan-forced).
- Grease your baking dish.
- Grate the cheese, 20 seconds, speed 6. Set aside.
- Now roughly chop and then grate the potato, taking care not to over process it. 3 seconds, speed 8. Check the consistency and wring well (you can use the steamer basket for this).
- Chop the onion, 3 seconds, speed 6.
- Add the potato and onion to the baking dish and toss to mix.
- Blend the eggs and seasoning 20 second, speed 4.
- Assemble from point 5 in the regular method.
Serve
- Serve with a leafy green salad and a nice tomato chutney.
Make-ahead
- Re-heat in a low oven until just hot.
Store
- Store leftovers in an airtight container in the fridge. Can also be frozen.
Notes
Dairy-free
Replace the cheese with ¼ cup macadamia nuts ground up with ¼ cup nutritional yeast and a good pinch sea salt. Grease dish with olive oil.Vegetarian
Simply omit the bacon. I like layering strips of red capsicum and a sprinkle of smoked paprika...it adds a lovely 'smokey' flavour.Add more veggies
You can also add in florets of broccoli or grated carrot or zucchini (wring out the moisture) in with the egg/ potato layer.Onion-free
Replace the onion with a small bulb of finely diced fennel.Lunchbox slice
Leftovers are great in the lunchbox.I'd love to hear how you enjoy this brekkie pie...post a comment and rate the recipe below.
Sticky Pecan and Hazelnut Tart
This Sticky Pecan and Hazelnut Tart is a rich and delicious dessert that balances the nutty flavors of roasted pecans and hazelnuts with a warmly spiced filling. Perfect for special occasions or as a treat, it’s a crowd-pleaser that pairs wonderfully with cream or coconut cream.
This amazingly delicious dessert is thanks to Alexx Stuart from Low Tox Lifes ebook ‘Celebrate – Your Comprehensive Guide to Low Tox Entertaining.’ It’s a standout recipe and I’m so thrilled that Alexx has been generous enough to allow me to share it with you today. My hubby and kids are even more thankful to Alexx, they devoured it, loved it and have requested more!
Health Benefits
This tart incorporates nutrient-dense nuts like pecans and hazelnuts, which are high in heart-healthy fats, antioxidants, and essential minerals such as magnesium and zinc. Using alternative flours like tapioca, almond, and buckwheat makes it suitable for those avoiding gluten, while the coconut oil offers a plant-based option for dairy-free diets.
Ingredients
The tart has a nutty filling made with coconut cream, rice malt syrup (or other natural sweeteners), and warm spices like cinnamon, nutmeg, and cloves. The gluten-free pastry combines tapioca, almond, coconut, and buckwheat flours for a light, delicious base.
How to make this sticky pecan and hazelnut tart
Begin by preparing the pastry. Combine the flours in a food processor, then pulse with chilled butter until crumbly. Gradually mix in a whisked egg, vanilla, cinnamon, and sweetener until the dough forms clumps. Chill the dough for 30 minutes before pressing it into a greased and floured tart tin. Blind bake the pastry, weighted with beans or rice, to achieve a crisp base.
Roast the nuts while the pastry rests, ensuring a rich depth of flavour. For the filling, gently warm the syrup, butter, coconut cream, and spices until combined. Slowly whisk the mixture into beaten egg yolks to create a smooth custard. Arrange the hazelnuts and pecans in the pre-baked pastry shell, layering the custard filling to coat the nuts evenly. Bake the tart until golden and caramelised.
Serving suggestions and how to store
Serve the tart warm or at room temperature with a dollop of double cream or coconut cream. Store leftovers in an airtight container in the fridge to maintain freshness.
Vary this sticky pecan and hazelnut tart to suit your needs
To make this tart dairy-free, opt for coconut oil or ghee instead of butter and pair with coconut cream for serving. For a fructose-friendly version, use rice malt syrup as the sweetener and skip the optional coconut sugar topping. The versatile pastry dough can also double as a shortbread biscuit base, baked and enjoyed with a cup of tea.
For more delicious, healthy dessert recipes, click HERE.

Sticky Pecan and Hazelnut Tart
This gluten free, fructose free, casein and lactose free beauty is an adaptation of that classic, uber sweet sticky pecan tart that we’ve all surely enjoyed in the past? Being gluten free isn’t an affliction and there’s no way we’re missing out on the smell of pastry in an oven or the caramelisation of nuts bubbling away in a tart like this. No siree!
Ingredients
- 170 g pecan nuts (1 cup)
- 120 g hazelnuts (1½ cups)
- 6 whole egg yolks
- 120 g coconut oil -or ghee or butter if not intolerant
- 100 g coconut cream
- 170 g rice malt syrup (1 cup) or honey or maple syrup
- Pinch ground cloves
- Pinch ground nutmeg
- 1 tsp ground cinnamon
For the Pastry
- 120 g tapioca flour (1¼ cup)
- 30 g almond meal (⅓ cup)
- 20 g coconut flour (2 heaped tsp)
- 45g g buckwheat flour (½ cup) plus a little more for dusting your hands when pressing out the pastry into the tart shell
- 140g butter (chilled), sliced into cubes (ghee is the best dairy-free)
- 1 egg/s whole egg whisked with the vanilla in it
- 1 tsp ground cinnamon
- 1 vanilla -or 2 tsp vanilla extract
- 2 tbsp rice malt syrup - fructose free OR maple syrup OR honey
Instructions
For the Pastry
- Pop all your flours in your food processor or thermomix and pulse to combine and aerate.
- Add your super chilled butter and blitz until crumble and combined.
- Whisk your egg, vanilla, cinnamon and syrup together.
- Add about ⅔ of this mixture slowly over 3-4 seconds into the processor. Has it gone to clumps? You’re done. Has it not? Add a tiny bit more.
- Save the leftovers of this mixture for a batch of French toast!
- Spatula out onto unbleached parchment paper and shape into a ball and pop in fridge for 30 minutes to make it more workable.
- Preheat oven to 180℃ / 350℉ fan forced OR 200℃ / 400℉ non fan forced oven.
- While the pastry is resting, pop all the nuts onto a baking tray and roast for 8 minutes in the oven (watch they don’t burn!). If you’re using activated nuts, no need to do this step, but if they’re plain, raw nuts, this is crucial. Take out and let cool as you work on other things.
- Now, line your quiche / tart tin with coconut oil or butter and then dust with buckwheat flour and shake o excess. This will help you when it comes to dislodging the tart later on!
- Plop your pastry blob into the tin and dust your hands with buckwheat to avoid sticking and start working the pastry to all the corners evenly to about ½ cm thick all round. Any excess – make a couple of short bread cookies out of it while you’re blind baking the base!
- Now, place parchment on top and weigh it down with raw beans, rice grains or pastry weights and blind bake in the oven for 10 minutes with the weights in, and a further 5 minutes without – this will mean your base isn’t soggy for the finished product later.
- Now, take the pastry shell out when you’ve just noticed a little bit of light golden action around the edges – This will mean you won’t have burnt ones later.
For the Filling
- Warm the syrup / honey, butter / ghee / coconut oil, cream and spices until all well combined.
- Whisk egg yolks and pour very slowly your liquid mix (step 1) into the yolks, while continuing to whisk to avoid the yolk cooking.
- Place the hazelnuts into the pastry shell, naked (pop them in a tea towel and shake until most of the skins fall away).
- Then pour your liquid over the top, leaving back 100ml liquid to go over the pecans afterwards.
- Now, layer your pecans over the top in whatever pretty pattern you fancy.
- Now drizzle the rest of the mixture over the pecans (keep a little back if it’s going to overflow. We don’t want that, and everyone’s quiche / tart tins are going to vary a little here)
- OPTIONAL: Sprinkle a little coconut sugar over the top of your tart. Not necessary, but will create a nice crust over the top. So.. why wouldn’t you?
- Now bake everything together in the oven for 30 minutes until well caramelised and pastry is a deep golden brown.
- Remove from the oven and cool.
- Then, to dislodge safely without ruining the corner bits of the tart slide the knife to the corners of the underside of the base (if you have a removable base) and apply a little pressure up, and do that to all 4 corners before pressing from the centre.
- Serve with double cream or coconut cream. Heaven.
Store
- In an airtight container or covered in the fridge.
Notes
Make biscuits
This pastry doubles as a delicious shortbread biscuit – just roll little balls once chilled and press down onto parchment paper with a fork to flatten and bake for 15-20 minutes on 200C / 400F or until golden. Delicious with a cup of tea!Dairy-free
Choose the dairy-free options.Fructose friendly
Choose rice malt as your sweetener and omit the coconut sugar.I'd love to hear how you enjoy this decadent dessert. Post a comment below or even better rate this recipe!
Vegetarian Shepherd’s Pie
This vegetarian shepherd’s pie is a hearty dish that’s perfect for family dinners or meal prepping. It’s packed with lentils, veggies, and delicious herbs, giving you a satisfying and nutritious plant-based meal. Plus, it’s easy to make and offers a variety of topping options for a crispy, golden finish.
I was a vegetarian for a good chunk of my life. This was a staple meal for me back then and still features regularly now, 20+ years on. It is a cost effective, easy to prepare vegetarian meal and one of my go-to meals when time and supplies are low. It’s comfort food at its best!
Health benefits
Loaded with fibre-rich lentils, a rainbow of veggies, and immune-boosting garlic and rosemary, this vegetarian shepherd’s pie is a nutritious powerhouse. The lentils provide plant-based protein, and the mix of veggies ensures you’re getting plenty of vitamins and minerals, all while being gut-friendly and easy to digest.
Ingredients
This vegetarian shepherd’s pie recipe uses common pantry staples like onion, garlic cloves, carrots, zucchini, celery, mushrooms, lentils, diced tomatoes and vegetable broth or stock. The rosemary, smoked paprika and Worcestershire sauce add a warm, earthy flavour that ties everything together, while the potato topping gives it that classic shepherd’s pie texture.
How to make Vegetarian Shepherd’s Pie
Sauté your onion and garlic, then add the veggies, lentils, tomatoes, and seasonings. Stir and let it all simmer until the flavours meld together, then thicken the mixture with a simple cornflour slurry. Pour the lentil mixture into a baking dish (or casserole dish), top with diced potatoes (or mashed potato if you prefer), and bake until the potatoes are fork tender and golden. Easy and delicious! If you own a Thermomix, we’ve also included Thermomix instructions for this recipe.
Serving suggestions and how to store
Serve this gluten-free vegetarian shepherd’s pie with a fresh, leafy green salad on the side for extra crunch and nutrients. Leftovers store well in the fridge in an airtight container, and it will also freeze beautifully for easy weeknight freezer meals down the line.
Vary this vegetarian shepherd’s pie to suit
You can switch up the topping with mashed potato topping or sweet potato or cauliflower mash for a twist, or make it dairy-free (vegan shepherd’s pie) by omitting the cheese. If you want a bit more protein, bacon pairs wonderfully with the lentils. You can even sneak in more veggies by grating them, which is a great trick for fussy eaters!
Take a look at the variations below for all the details as well as suggestions to alter the recipe to suit your specific dietary requirements.

Vegetarian Shepherd's Pie
A delicious, warming vegetarian dish, this Vegetarian Shepherd's Pie is one of my all time favourite meatless Monday meals.
Servings: 4
Ingredients
- 1 onion/s (large) finely diced
- 2 clove/s garlic -finely diced
- 2 carrot/s -diced
- 1 zucchini/s -diced
- 2 stick/s celery -sliced
- 130 g mushrooms (approx. 1 cup) diced
- 2 cup/s cooked brown lentils (or 2 cans, drained and rinsed)
- 425 g diced tinned tomatoes
- 250 ml vegetable stock (1 cup)
- 1 tbsp fresh rosemary leaves -roughly chopped
- ½ tsp smoked paprika
- 1 tbsp Worcestershire sauce
- Sea salt and freshly ground black pepper
- 2 tbsp hot water
- 1 tbsp cornflour
- 5-6 potato/s -peeled and diced into 1-2cm cubes
- 20 g parmesan cheese -grated (optional) (¼ cup)
- 30 g sunflower and/or pumpkin seeds (optional)
Instructions
- Preheat your oven to 200°C/395°F.
- In a medium sized pot, sauté your onion and garlic in a little oil for a few minutes until opaque.
- Add the carrots, zucchini, celery, mushrooms, lentils, tomatoes, stock, rosemary, smoked paprika, Worcestershire sauce and seasoning.
- Bring to a simmer for 10-15 minutes.
- Meanwhile, mix the water and cornflour until combined and add to the pot to thicken for a few more minutes.
- Pour into an oven proof dish and top with the diced potato (and optional cheese and seeds). Stud with any extra rosemary sprigs if you like.
- Bake for 20-30 minutes or until the potato is golden and cooked through.
Thermomix method
- Preheat your oven to 200℃.
- Chop your onions and garlic, 3 seconds, speed 5. Scrape down the sides and cook 5 minutes, temp 100, speed 1 in a little olive oil.
- Add the carrots, zucchini, celery, and process 10 seconds, speed 4.
- Now add the sliced mushrooms (I don't like to process them, but you can if you prefer), lentils, tomatoes, stock, rosemary, paprika and seasoning. Cook 10 minutes, temp 100, reverse speed 1.
- Add the cornflour/water mixture and cook 5 minutes, temp 100, reverse speed 1. Pour into an oven proof dish and top with the diced potato (and optional cheese and seeds). Stud with any extra rosemary sprigs if you like.
- Bake for 20-30 minutes or until the potato is golden and cooked through.
- Note - you can top with traditional mashed potato if you like. I'm a lazy, time-poor cook and always looking for shortcuts in the kitchen (and ways to reduce washing up)! This is one saves time and washing, but I don't think alters the taste too much - in fact, I love the crispy baked spuds on top.
Make-ahead
- Re-heat in a low oven until just hot.
Serve
- With a leafy green salad.
Store
- Store in an airtight container in the fridge.
- Can also be frozen.
Cook the Lentils
- To cook the lentils, soak in water and a tablespoon of natural yoghurt or apple cider vinegar to produce easily digestible legumes. Soaked lentils can then be cooked by simmering for 15 minutes or until tender but not sloppy. Un-soaked lentils should be rinsed and cooked for 30-45 minutes. 1 cup of raw lentils yields approximately 2 cups cooked.
Notes
Different pie top
You can also top the pie with sweet potato, cauliflower pieces or cauliflower mash.Dairy-free and vegan
Omit the cheese.Onion-free
Replace the onion with a small bulb of fennel, finely diced.Garlic-free
Replace the garlic with a teaspoon of cumin powder and a pinch of chilli flakes.Gut repair
If you aren’t vegetarian and looking to include bone broth in your diet, substitute the vegetable stock with bone broth.Add bacon
I think brown lentils and bacon is a match made in heaven. So if you please, add 4 rashers of nitrate free bacon with the onion.Fussy eater tip
Grate the vegetables so they sit behind the lentil/tomatoes.Like this recipe? Let me know what you think, it really helps me to shape the content I produce here at Well Nourished. Post a comment or question below, thanks.
Healthy Apple Pie – rustic style (with gluten, grain, dairy & egg free versions)
As the cooler months roll in and apple season is at its peak, there’s no better time to whip up a comforting, healthy apple pie. My husband, who rarely indulges in sweets, has a soft spot for this rustic-style apple tart. It’s a simpler, fuss-free version that skips the complicated pastry work but still delivers the perfect amount of sweetness and that classic flavour. You can make one big pie (less fiddly) or lots of individual ones.
Health benefits
Store-bought apple pie often comes with a hidden list of not-so-healthy ingredients. These pies are typically loaded with refined sugars, unhealthy fats like hydrogenated vegetable oils and preservatives to keep them shelf-stable. The crust is often made with white flour, lacking the fibre and nutrients found in whole grains, while the filling can be packed with high-fructose corn syrup and artificial flavours. All these additives can make store-bought pies a far cry from this nourishing, homemade version where you control what goes in!
This low sugar, rustic apple pie is a wholesome blend of whole, natural ingredients, offering a comforting dessert that’s better for you without sacrificing taste. By choosing spelt flour and natural sweeteners, you’re giving yourself a treat that’s as nourishing as it is delicious.
Ingredients
The key ingredients for this pie include a wholesome spelt shortcrust pastry made from wholemeal spelt flour, butter, coconut sugar, and a touch of vanilla. The filling is all about the apples—Granny Smith apples are my favourite type of apples—paired with a hint of cinnamon and natural sweeteners like rice malt syrup, honey, or maple syrup. For those with dietary restrictions, there’s a gluten, grain, dairy, and egg-free pie crust option too.
How to make this Healthy Apple Pie
Making this apple galette is a breeze, there’s less than 20 minutes of prep time. Start by preparing the spelt or gluten-free pastry, then with a rolling pin, roll it out between parchment paper. Slice your apples thinly and mix with a simple cinnamon glaze. Arrange the apples on the pastry, fold in the edges, brush with glaze, and bake on a baking sheet until golden brown. It’s that easy!
Serving suggestions and how to store
This rustic apple pie is perfect warm out of the oven, perhaps with a dollop of cream or a scoop of vanilla ice cream. Leftovers (if there are any!) can be stored in an airtight container in the refrigerator, ready to be reheated for a dessert later on.
Vary this healthy apple pie to suit
For those following a low-fructose diet, skip the sugar in the pastry and opt for stevia instead, while replacing the apples with berries or rhubarb for a delicious twist. You can also mix in some berries or rhubarb with the apples for a bit of extra flavour. Whether you need gluten-free, dairy-free, or egg-free options, this pie can easily be adapted to suit your needs.
Check out the variations below the main recipe for tips on how to adapt it to your specific dietary needs.
For more delicious, healthy and easy to make wholefood treats, click HERE.

Healthy Apple Pie - rustic style (with gluten, grain, dairy & egg free versions)
This recipe gives you two pastry options to suit your dietary requirements. It's super simple to make and my hubbies favourite dessert.
Servings: 1 pie
Ingredients
Spelt shortcrust pastry
- 300 g wholemeal spelt flour
- 160 g butter chilled and diced
- 3 tbsp coconut sugar or rapadura
- 1 egg/s -yolk
- 1 tsp vanilla -powder, extract or essence
- 1-2 tbsp chilled water
- OR
Gluten, grain, dairy and egg free pastry
- 2 tsp chia seeds (ground is best, but can be unground)
- Pinch xanthan gum (optional but does help to bind it more strongly)
- 70 ml hot water
- 200 g almond meal
- 70 g true arrowroot flour (starch)
- 3 tbsp coconut sugar or rapadura
- ½ tsp bicarbonate of soda
- Pinch sea salt
Filling
- 6 large Granny Smith apple/s -peeled
- 2 tsp ground cinnamon
- 2 tbsp rice malt syrup, honey or maple syrup
- 2 tbsp hot water
Instructions
- Preheat your oven to 180℃/350°F (fan forced).
Spelt Pastry
- In a food processor mix the flour and sugar until combined. TMX 10 secs, speed 2.
- Add the butter and process until it comes together in a coarse crumb (you can also do this by hand by rubbing the butter into the flour mix). TMX 10 seconds, speed 4.
- Add the egg yolk, vanilla and 1 tablespoon of water.
- Process until the dough starts to come together, then gently knead it for a minute. TMX 10 seconds speed 4 then 30 seconds on the knead setting.
- Add extra water if necessary teaspoon by teaspoon until it is the proper consistency (see the note about consistency below). TMX knead an extra 10 seconds.
- Form a disc and wrap the dough in parchment (baking) paper and rest in the fridge for at least 30 minutes whilst preparing your apple.
Gluten, grain, dairy and egg free pastry
- In a small bowl, place the chia, xanthan and hot water and mix until well combined. Rest until a gel is formed (approx 10 minutes).
- In a food processor or bowl mix the almond meal, arrowroot, sugar, bicarb and salt until very well combined. TMX 10 secs, speed 2.
- Add the chia gel and process until it forms a ball. TMX 10 seconds speed 4
- Add extra water if necessary, teaspoon by teaspoon until it is the proper consistency (see the note about consistency below).
- Form a disc and roll as instructed below.
- * Note this gluten free pastry will not brown the way the spelt will. Cooking it until it is brown will result in a really hard, not so nice pastry! Glaze it also with the cinnamon glaze to add a lovely bit of colour.
A note about pastry consistency
- As all whole flours are slightly different in their consistency/texture, you will need to judge how much water is needed yourself for both types of pastry. The consistency you are after is that the dough should easily come together in a firm, slightly sticky ball (but not stick to your hands or the bowl).
For the filling
- Take your peeled apples and cut them in half lengthways and remove the core.
- Lay them flat side down and cut into 3-5mm slices (they need to be very thin, especially for a gluten free pie as the pastry can not be overcooked or it will toughen).
- In a small bowl mix the cinnamon, sweetener and hot water until combined to form a glaze.
To assemble
- Flatten the disc of (either) pastry between two sheets of parchment (baking) paper.
- Roll into one large (rough) circle, about 3mm thick and peel off the top sheet of parchment paper. Place the parchment paper and rolled out pastry onto a baking tray.
- Fan out the sliced apple and arrange to cover the centre of the pastry about an inch or so from the outer edge.
- Fold in the edges roughly.
- Brush with half of the cinnamon glaze.
- Bake for about 20 minutes.
- Remove from the oven and brush over the remaining glaze.
- Return to the oven for about another 5 minutes (maximum for gluten free, remember it will not brown). For the spelt version, you can continue to cook until the apple has softened and the pastry is golden brown.
Store
- Store in an airtight container in the fridge.