
I’ve had a few requests for some tasty nibbles or hors d’oeuvres ahead of Christmas and these Maple Bacon Dates fit the bill nicely. They are a delicious blend of sweet and salty flavours and a real mix of textures too. Based on the classic Devils on Horseback with a few twists. Health benefits Dates…
wheatfree
Lemon Manuka Cheesecake
This scrumptious, easy to make Lemon Manuka Cheesecake is an incredible dessert that won’t leave you with a sugar hangover. It feels like an indulgent dessert, but it’s really quite nourishing.
It’s no secret I’m a huge fan of Barnes Naturals Manuka honey. Other than being immune supportive, the taste of this Aussie made Manuka has a smooth flavour and is absolutely delicious – it was the obvious choice for this decadent dessert. I used 100+MGO Manuka but you can use any strength you prefer.
This silky, creamy and zesty Lemon Manuka Cheesecake suits a range of dietary preferences including dairy-free, gluten-free, grain-free and egg-free. It’s sure to become your new favourite dessert!
Health benefits
Cashews provide healthy fats, plant-based protein and minerals like magnesium and zinc, while coconut oil offers stable fats that support satiety. Using Manuka honey adds not just sweetness but also its naturally occurring bioactive compounds, and fresh lemon brings vitamin C and digestive support, helping balance the richness of the cheesecake.
Ingredients
This manuka honey lemon cheesecake recipe is made with raw cashews blended with coconut milk, coconut oil, fresh lemon zest and lemon juice, Manuka honey and vanilla for the filling, and a simple base of shredded coconut, almond meal, coconut oil and Manuka honey, finished with toasted macadamias and an optional drizzle of extra honey to serve.
How to make this Lemon Manuka Cheesecake
After soaking the cashews to ensure a silky-smooth texture, the firm cheesecake base ingredients are pressed into a lined tin and chilled. The filling is blended until completely smooth, then the cheesecake batter mixture is poured over the base and set in the fridge until firm, creating a creamy, cheesecake-like texture without any baking.
Serving suggestions and how to store
Serve chilled, topped with toasted macadamia nuts, a drizzle of Manuka honey and edible flowers or fresh berries for a beautiful finish. This cheesecake is ideal for making ahead and keeps well stored airtight in the fridge, or it can be frozen and thawed slightly before serving.
Vary this Lemon Manuka Cheesecake to suit your dietary needs
You can easily change the flavour by swapping the lemon for orange or lime for a different citrus profile. For a nut-free base, sunflower seed meal works well in place of almond meal, and the sweetness can be adjusted to taste depending on how tangy you like your cheesecake.

Lemon Manuka Cheesecake
This silky, creamy and zesty Lemon Manuka Cheesecake suits a range of dietary preferences including dairy-free, gluten-free, grain-free and egg-free. I
Servings: 10
Ingredients
Filling
- 400 g raw cashew nuts (3 cups), approx
- 150 ml canned coconut milk (⅔ cup)
- 70 g coconut oil (⅓ cup)
- 1 lemon/s – zest and approx. ⅓ cup juice
- 110 g Barnes Naturals manuka honey (⅓ cup)
- 1 tsp vanilla
Base
- 80 g shredded coconut (1 cup)
- 100 g almond meal (1 cup)
- 3 tbsp coconut oil
- 2 tbsp Barnes Naturals manuka honey
Serve
- 60 g macadamia nuts (½ cup)
- 1-2 tbsp Barnes Naturals manuka honey – to drizzle (optional)
- Edible flowers – or fresh berries to decorate (optional)
Instructions
- Start with soaking the cashew nuts. Place them in a large bowl, cover with boiling water and soak for 30-60 minutes.
- Line the base of a spring form cake tin (I used a 22cm tin). I slightly grease the tin with coconut oil then press the baking paper into the base.
- Combine all of the ingredients for the base in a bowl or food processor and mix (or pulse) to combine. Press into the base of the tin and set aside in the fridge.
- Once the cashews have soaked, place all of your filling ingredients into a high speed blender or food processor. I used a vitamix. Blend on high until the filling is smooth and silky and has no lumps or grit. It should be the consistency of a smooth cream cheese. You may need to scrape the sides of your blender or processor a few times.
- Taste and adjust the sweet/ sour flavour by adding more honey or lemon to your taste.
- Pour over the base and place in the fridge for 2-3 hours to set. Once set, remove from the tin and place on a serving plate.
- While the cheesecake is in the fridge, toast your macadamia nuts in a pre-heated oven at 120°C for 8-10 minutes and allow to cool fully.
Serve
- Before serving, top the cheesecake with the macadamia nuts and drizzle with more manuka. Decorate with flowers or fresh berries. Enjoy immediately.
Store
- This can be made ahead.
- Store in an airtight container in the fridge or freezer.
Notes
Different flavour
Orange or lime make a wonderful citrus variation!What did you think of this delicious Lemon Manuka Cheesecake, let me know in the comments below…
Christmas Pudding (gluten and dairy-free)
As requested to add to the festive recipes, this gluten-free and dairy-free Christmas Pudding is a real show stopper. It has all of the flavours of Christmas packed into a moist, juicy pudding. Like any Christmas pudding, there is soaking and slowly cooking, but it’s very easy to make! The result is a dense, fruity pudding that is so iconic on a festive dinner table!
I’ve pushed the sugar down, however the sugar and brandy are what preserves the pudding so I could only go so low. Having said that, this pudding probably won’t keep for months as high sugar pudding do (due to the lower sugar, and the addition of fresh carrot and apple). I make mine about 2 weeks ahead.
Whether you’re celebrating a holiday or just want a comforting dessert, this pudding is sure to impress.
Health benefits
This pudding offers natural sweetness from dried fruits and a boost of fibre from the grated apple and carrot. Almond meal and macadamia nuts add healthy fats and protein, while ginger and spices provide anti-inflammatory benefits.
Ingredients
The recipe combines a variety of dried fruits, citrus zest and juice, warming spices, and almond meal (ground almonds) to create a rich and moist pudding. Optional variations make it adaptable for nut-free diets or different flours.
How to make this gluten-free Christmas Pudding
Soak the dried fruits with citrus zest, lemon and orange juice, and brandy for 24–48 hours for a deep, rich flavour. Mix the soaked fruits with coconut sugar, grated apple and carrot, and combine with the dry ingredients. Transfer the pudding batter to a pudding tin, cover securely, and steam gently for 5 hours. Serve warm with cream, ice cream, custard or brandy sauce for a truly festive treat.
Serving suggestions and how to store
Serve this Christmas pudding with your favourite accompaniments—cream, ice cream, custard or a classic brandy sauce. Wrap leftovers in baking paper and foil, and store in the fridge for up to two weeks, or freeze for up to three months.
Vary the Christmas pudding to suit your dietary needs
For a nut-free plum pudding, substitute almond meal and tapioca with white spelt flour and omit the macadamias. This recipe can also be customised by swapping dried fruits (like raisins) or using maple syrup if you don’t like molasses. I’m personally not a fan of peel in puddings, but feel free to add it if you like.
Try our Christmas Cake or Cherry Chocolate Pudding
Have you tried our Christmas Cake? It’s sensational too. The new Cherry Chocolate Christmas Pudding is a real hit too!
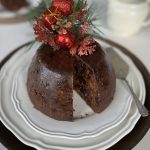
Christmas Pudding (gluten and dairy-free)
As requested to add to the festive recipes, this gluten and dairy-free Christmas Pudding is a real show stopper. It has all of the flavours of Christmas packed into a moist, juicy pudding.
Servings: 8
Ingredients
- 100 g currants
- 100 g sultanas
- 100 g dried cranberries
- 1 tsp mixed spice
- 1 tsp ground cinnamon
- ½ lemon/s – juice and zest
- ½ orange/s – juice and zest
- 100 ml brandy – or cognac
- 180 g coconut sugar or rapadura
- 1 Granny Smith apple/s – peeled and grated
- 1 carrot/s – grated
- 250 g almond meal
- 100 g macadamia nuts – finely chopped
- 100 g crystalised ginger – finely chopped
- 50 g tapioca flour
- 1 tsp baking powder
- ¼ tsp sea salt
- 2 egg/s
- 50 ml olive oil
- 1 tbsp organic molasses
Serve
- cream – or ice-cream
- Brandy Sauce
Instructions
- In a large bowl, combine all the dried fruit, citrus zests and juices, the spices and alcohol. Cover and leave to soak for 24 to 48 hours.
- Next, mix in the coconut sugar, grated apple and carrot with a wooden spoon in a medium mixing bowl until well combined.
- In another medium mixing bowl, combine the almond meal, macadamia nuts, ginger, tapioca flour and baking powder with a pinch of salt. Mix well then combine with the coconut sugar/grated fruit mix.
- In a jug, beat the eggs, olive oil and molasses then mix into the soaked fruit mixture. Add to the almond meal/apple mixture and stir until everything is well combined into a thick batter.
- Cut a disc of baking paper for the base and top of the pudding. I just draw around the base and top of the pudding tin onto the paper then cut.
- Generously grease a 2 litre pudding basin and place the smaller cut disc of baking paper to line the bottom of the basin and press down into it. Spoon the pudding mixture in, the basin should be about two thirds full. Place the second disc of baking paper on top of the pudding mix.
- If you have a pudding tin with a lid, securely fit the lid.
- If you don’t have a lid for your pudding tin, cover the top of the basin with a large sheet of pleated baking paper and a large sheet of pleated foil, tying tightly with a string to keep in firmly place. Click HERE for a simple demonstration of covering and making a handle to lift the pudding.
- Once you’ve covered the basin well, place it in a large deep lidded pot big enough to comfortably hold the pudding. Then pour boiling water into the pan (not over the pudding basin, just down the side) so it comes about halfway up the pudding tin. Put the lid onto the saucepan or pot and heat over a low-medium heat so that it simmers gently for 5 hours, checking the water level every hour or two topping up with boiled water when it drops below quarter way. It’s important not to let it simmer dry.
- Once the pudding has steamed, remove from pot of boiling water and allow to rest for 15 minutes or so.
- Once cool enough to handle, remove the pudding from the the pan by removing the lid (or foil) and placing a serving plate on top, then flip to invert it.
Serve
- With cream, ice cream or brandy creme.
Store
- Wrap in baking paper and then tightly in foil. Store in the fridge for up to two weeks or until ready to serve. Or you can freeze it for up to 3 months (airtight).
Reheat
- You can place it back into the pudding tin, cover and re-steam it for 30 mins.
- Or place (wrapped tightly) in the oven 150°C/300°F (fan-forced) for an hour. If you have a steam oven you can definitely reheat it there too.
Notes
Nut-free
Replace the almond meal and tapioca with 250g white spelt flour. Omit the macadamia nuts.What did you think of this delicious gluten-free and dairy-free Christmas Pudding..let me know below…
Brandy Sauce
The best accompaniment to Christmas Pudding is a good Brandy Sauce. This simple, easy to make Brandy Sauce is a delicious, low sugar option that is the perfect topping. I used rapadura as my sugar but this does add a bit more golden colour to the sauce. You can use caster sugar if you’d prefer…
Yorkshire Pudding (gluten-free)
Yorkshire Pudding was a request from a member – it’s a classic recipe though I’ve given it a Well Nourished twist. Sometimes it’s these simple recipes that give me the most trouble. I think I’ve tested about 15 different versions of this and these are by far the easiest and most fail proof. They produce…
Sweet Roasted Carrots
This Sweet Roasted Carrots recipe turns the humble carrot into something very special. You can of course add in any extra vegetables you like to extend the variety of this dish. Also feel free to mix it up with different coloured carrots if available to you. Health benefits Carrots are rich in beta-carotene, a precursor…
Gingerbread Granola
This Christmas inspired Gingerbread Granola is a super crisp and crunchy, lightly spiced granola that’s delicious all year round. It is perfect to package up and gift too, my kids always loved doing this for teachers at the end of the year when they were little. Health benefits Pecan nuts are a fabulous source of…
Vegan Rice Paper Dumplings
These gluten-free Vegan Rice Paper Dumplings are a delicious vegetarian meal or snack. They are really very easy to make, take a look at the video below to see how they are rolled. If you’re not vegetarian, these Chicken Rice Paper Dumplings are also a winner! Health benefits This is a beautifully balanced plant-based dish,…
Béchamel
This is my take on a classic Béchamel – I love to substitute some of the milk with chicken stock or bone broth, but you could use a vegetable stock if you are vegetarian. If you are vegan or dairy-free, this recipe is for you- Dairy-free Béchamel. I use bechamel sauce as the base for…
Miso Eggplant
This Miso Eggplant (Nasu Dengaku) is a quick and easy side dish and my number one way to enjoy eggplant (or Aubergine depending on where you live). It’s so simple to make, I know you’re going to love the beautiful caramelised umami flavours. Whenever I visit a Japanese restaurant, this is an entrée we always…
Chocolate Beetroot Cake
It might seem unusual to add vegetables to baking, but this Chocolate Beetroot Cake is a match made in heaven and work very well together to create a rich, fudgy, earthy cake. This recipe also happens to be gluten and dairy-free which adds to its versatility. I like to serve this cake as a dessert,…
Lemon Blueberry Oatcakes
These simple blend and cook Lemon Blueberry Oatcakes are like a really substantial hearty pancake. They are so quick to make and good for brekkie, morning tea and pack well in the lunchbox. My kids really love them both warmed and cold. Health benefits Oats are a really nourishing, mineral rich grain that are high…
Maltese Tuna Pumpkin Pie
This Maltese Tuna Pumpkin Pie was a recipe request by a Well Nourished Family member. After a fair bit of research and trials of various flavour combinations, this delicious pie was born. Traditionally, there seemed to be two ways to make the filling, one more chunky (which is what I went with as it requires…
Beef Peanut Lettuce Cups
These Beef Peanut Lettuce Cups are a quick, easy to make healthy family meal. Serve the mince buffet style so the family can make their own ‘cups’ adding whatever they like to serve. It’s a super flavoursome meaty meal, wonderfully hands-on, that is a great way to enjoy fresh ingredients together. Health benefits This dish…
Vegan Vanilla Cake
This Vegan Vanilla Cake is for the many ‘egg-free’ cake requests I’ve received. I’m really proud of this delicious, really easy to make cake. My son took it to school one day and shared it with a very fussy friend who declared it ‘the best cake ever’ (trust me, praise from food fussy teens is…
Simple Gravy
I make gravy in a few different ways, but if I don’t have pan drippings to work with (after cooking a roast), I make this very simple gravy. It’s a lovely sauce to add flavour to any meal. Health benefits A homemade gravy built from real stock, onions, fresh herbs and healthy fats gives you…
Honey Roasted Cauliflower Chickpea Salad
This beautiful Honey Roasted Cauliflower Chickpea Salad is a flavour bomb and a beautiful, nutrient packed side to accompany simply prepared protein. All meats work well with this, from fish to chicken to red meats. I’d suggest grilled haloumi if you are vegetarian and pan-fried tofu or tempeh if vegan. Best of all this salad has a really short prep time and is so quick and easy to make (total time 30 minutes). It’s sweet, savoury, and full of vibrant flavours.
Health benefits
Cauliflower is rich in fibre and antioxidants, which support digestive health and reduce inflammation. Chickpeas provide plant-based protein and are a good source of fibre, vitamins and minerals. The addition of mint and lemon adds a refreshing boost, while almonds offer healthy fats and protein.
Ingredients
The salad features roasted cauliflower florets, chickpeas, and red onion wedges, coated in a honey-paprika-olive oil dressing. Fresh mint leaves and toasted almonds add texture and flavour, with a squeeze of lemon to brighten the dish. For a vegan version, the honey can be replaced with rice malt syrup or maple syrup.
How to make this honey roasted cauliflower salad
Simply toss the medium head cauliflower, chickpeas, and onions with a spiced honey dressing and roast on a baking tray (sheet pan) until golden. In the last few minutes, toast the almonds for a crispy garnish. Once cooled, mix everything together with fresh mint and serve with a wedge of lemon.
Serving suggestions and how to store
Serve this salad warm or at room temperature with a good squeeze of lemon (or lime juice), either on its own or alongside grilled meats or fish. Store leftovers in an airtight container in the fridge for up to 3 days. For best results, add the almonds and mint just before serving to maintain their texture.
Vary this honey roasted cauliflower chickpea salad to suit your dietary needs
For a nut-free version, swap the almonds with one cup sunflower seeds (toasted). To make it vegan, replace the honey with rice malt syrup or maple syrup.
For more easy, healthy salad recipes, click HERE.

Honey Roasted Cauliflower Chickpea Salad
This beautiful Honey Roasted Cauliflower Chickpea Salad is a flavour bomb and a beautiful side to accompany simply prepared protein.
Servings: 4
Ingredients
- 1 head/s cauliflower
- 425 g can chickpeas – drained
- 1 red onion/s – peeled, cut into wedges
- 2 tsp smoked paprika
- 3 tbsp honey
- 3 tbsp olive oil
- Sea salt and freshly ground black pepper – to taste
- 95 g flaked almonds (1 cup)
Serve
- 1 bunch/s fresh mint leaves – leaves picked
- 1 lemon/s – quartered
Instructions
- Preheat the oven to 200°C / 390°F (fan-forced).
- Break the cauliflower into small florets and place on a large baking tray with the chickpeas and quartered wedges of onion.
- Mix the paprika, honey, olive oil and seasoning in a small bowl.
- Pour over the veggies and mix well with your hands to coat the cauliflower, onion and chickpeas.
- Bake in the preheated oven for 25- 30 minutes.
- Place the almonds on a tray and add to the oven to toast for the last 5 minutes.
- Allow it all to cool before mixing together with the mint leaves to serve.
Serve
- Serve with a wedge of lemon – make sure you squeeze over the lemon juice, it really makes the salad!
Make ahead
- Mix through the nuts and mint just prior to serving.
Store
- In an airtight container in the fridge.
Notes
Nut-free
Serve with toasted sunflower seeds instead of the almonds.Vegan
Replace the honey with rice malt syrup or maple syrup.This salad combines such delicious flavours…let me know what you thought in the comments below…
Sourdough Naan Bread
I am always looking for ways to use leftover sourdough starter (discard). This soft, chewy sourdough naan bread not only uses up leftover discard, they are delicious and versatile. We eat them brushed with ghee alongside a curry or dahl or use them as a wrap to make souvlaki. They are best enjoyed warm not…
Teriyaki Chicken Stir-fry
This very quick and easy to make Teriyaki Chicken Stir-fry is sure to become a family favourite – its SO easy to make and you can vary the vegetables to suit your supplies and dietary preferences. I’ve chosen to add ginger to this recipe because I love the flavour (and health benefits) even though it’s…
Chicken Rice Paper Dumplings
These Chicken Rice Paper Dumplings are a delicious and easy to make meal or entree. The tasty mince is wrapped in rice paper and fried to make it crispy on all sides. Dip or pour the sauce and enjoy these flavour bombs! Health benefits Chicken mince offers high-quality protein to stabilise blood sugar and support…
Roasted Cheesy Cabbage (dairy-free)
This Roasted Cheesy Cabbage is a beautiful combination of flavours and a really simple side. I know that cabbage is a great vegetable for its fibre and neutral taste, so giving this underrated veggie a chance to shine was such fun! The result is a cheesy, veggie dish with a bit of crunchy almond crumb…
Spinach Ricotta Galette
Elevate your mealtime with this protein rich Spinach Ricotta Galette – a perfect blend of tender spinach, creamy ricotta, and nutty pastry. A rustic dish that’s both easy and elegant. Get ready to indulge in the savoury goodness of this simple tart. Health benefits The filling brings together protein-rich ricotta, calcium-rich parmesan and antioxidant-packed spinach,…
No (tomato) Sauce
This No (tomato) Sauce is a delicious substitute for those who would like to make some of the tomato based dishes, but find tomatoes irritating. My son doesn’t tolerate a lot of tomato sauce, so this is a common sub, especially when I find capsicum at a good price at the market. I often batch…
Pork Sage Schnitzels with Coleslaw
These Pork Sage Schnitzels with Coleslaw is such a beautiful meal. The flavours of the pork pair so well with the coleslaw and the crunchy, herby crust on the pork is divine. I especially love this kind of meal in the warmer weather- a basic protein with fresh vegetables as a slaw is the essence…