
This traditional Chicken Jalfrezi is a warming, easy to make nourishing Indian curry. It has a tomato base and is packed with tender chunks of chicken and vibrant vegetables. The rich blend of spices creates a tantalising aroma that will have your taste buds tingling with anticipation. Whether you’re a seasoned curry lover or a…
thermomix
Apricot Coconut Cookies
Enjoy in the beautiful flavours of our easy-to-make Apricot Coconut Cookies. These scrumptious treats are not only delicious but also packed with wholesome ingredients. Perfect as a post-school snack or a lunchbox surprise for kids (if nuts allowed or make the variation), these cookies are sure to become a favourite in your household. Health benefits…
Easy Spinach Ricotta Cannelloni
This Easy Spinach Ricotta Cannelloni is a delicious, classic combination of flavours. I’ve made it using mountain bread as I find it the simplest method. But I have included directions for making it with pasta tubes or turning it into a lasagne too. The original method for this has the sauce simmering while the filling…
Noodle Jar
This is one of many upcoming prep-ahead lunch options I’ve developed for you. The Noodle Jar recipe is a fantastic option for those times when you want a warm and satisfying meal and aren’t in the mood for a salad. This recipe allows you to prepare your meal ahead of time, making it convenient and…
Gingernut Biscuit
This gingernut biscuit recipe came from a need to fulfil my love of ginger biscuits, but without breaking the bank. I purchased a pack of gluten-free and vegan gingernuts as a rare treat but based on the biscuit’s popularity with my children I knew I’d have to have a go at replicating these for the…
Peanut Butter Oat Slice
This quick and easy to make Peanut Butter Oat Slice is a sustaining, filling brekkie or afternoon tea. It’s simple, nourishing and delicious. Bonus points is that it freezes well too. Simply pop in the oven or on the sandwich press to reheat it. Health benefits Oats are a really nourishing, mineral rich grain that…
Creamy Vegetable Soup (with crunchy chickpeas)
This divine, nourishing Creamy Vegetable Soup (with crunchy chickpeas) is a protein rich meal or starter. It’s loaded with fibre, good fats, liver and gut loving veggies and it tastes so creamy and delicious. The chickpeas add in lovely flavour and texture and also form a complete vegetarian protein with the cashews.
The curry flavour is very mild, almost unnoticeable but it adds a real depth of flavour (and lots of goodness) that just works beautifully with the cheesiness of the nutritional yeast. There’s so much to love in this wholesome soup.
Health benefits
Cauliflower and sweet potato bring fibre, vitamin C and slow-burning carbohydrates to support steady energy. Cashews add healthy fats and a lovely creaminess while also offering minerals such as magnesium. The mild curry spices gently support digestion, and roasted chickpeas add plant protein and extra fibre to keep you fuller for longer.
Ingredients
For this creamy vegetable soup recipe, you will need cauliflower, sweet potato, celery, onion, garlic cloves, cashews, chicken broth, mild curry powder, nutritional yeast and a topping of roasted chickpeas seasoned with tamari, cumin, smoked paprika and maple.
How to make this Creamy Vegetable Soup
Roast the seasoned chickpeas until crisp. While they cook, sauté the onion and celery, then add garlic, curry spices, cauliflower, sweet potato, cashews and broth. Simmer until tender, blend until smooth and stir in the nutritional yeast. Taste and adjust the seasoning so the flavours really shine.
Serving suggestions and how to store
Serve warm with the crunchy chickpeas and fresh coriander scattered over the top. A drizzle of chilli oil works beautifully if you enjoy a little heat. Store leftovers in the fridge or freezer and reheat gently to maintain that velvety texture.
Vary this Creamy Vegetable Soup to suit your dietary needs
Omit the chickpeas for a legume-free version and add toasted pepitas on top. Swap the nutritional yeast for grated parmesan if dairy is tolerated.
For more healthy soup recipes, click HERE.
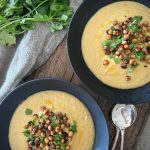
Creamy Vegetable Soup (with crunchy chickpeas)
This divine, nourishing Creamy Vegetable Soup (with crunchy chickpeas) is a protein rich meal or starter. It’s loaded with fibre, good fats, liver and gut loving veggies and it tastes so creamy and delicious.
Servings: 4
Ingredients
- 2 tbsp extra virgin olive oil – or ghee
- 1 onion/s – diced
- 2 stick/s celery – diced
- 4 clove/s garlic – minced
- 2 tsp mild curry powder
- 1 small cauliflower – approx. 400g broken into florets, stem chopped
- 1 sweet potato/s – peeled and diced
- 140 g raw cashew nuts – 1 cup
- Sea salt and freshly ground black pepper – to taste
- 750 ml stock or broth – 3 cups chicken or vegetable
- ¼ cup/s nutritional yeast – see variation below
Crunchy Chickpeas
- 400 g can chickpeas – drained and rinsed
- 1 tbsp tamari
- ½ tsp ground cumin
- ½ tsp smoked paprika
- 1 tbsp maple syrup
To Serve
- ½ bunch/s fresh coriander leaves – finely chopped
Instructions
- Preheat the oven to 200°C / 390°F (fan-forced).
- Drain the chickpeas really well and dry in a clean tea towel.
- Toss in the tamari, cumin, paprika and maple syrup.
- Place on a baking tray (in a single layer) and roast for 20-30 minutes, stirring a few times.
- While they are roasting make the soup.
- Place the onion and celery in a large pot with the olive oil or ghee.
- Saute for 2-3 minutes. Add the garlic and curry powder and saute for a couple of minutes, stirring.
- Then add the cauliflower, sweet potato, cashews, broth or stock and season to taste. Bring to a simmer and cook until the vegetables have softened, 20-30 minutes.
- Allow to cool before pureeing with a stick blender or blender. Add the nutritional yeast and blend again. Taste and adjust the seasoning (salt really brings out the flavour).
Thermomix
- Follow steps 1-5 to make the crunchy chickpeas.
- Place the onion (quartered), celery (roughly chopped) and garlic in the Thermomix bowl. Chop 5 seconds, speed 5.
- Add the olive oil and curry powder; saute 3 minutes, 100deg, speed 1, MC off.
- Add the cauliflower (roughly chopped), sweet potato (roughly chopped) and cashews and chop 5 seconds, speed 5. Add the broth or stock and seasoning.
- Cook 25 minutes, 100deg, speed 2, steaming basket on top to prevent splatter.
- Add the nutritional yeast.
- Blend 30 seconds, speed 6-7 or until smooth. Turn the dial up slowly to prevent splatter and make sure the steaming basket is still on top.
- Taste and adjust the seasoning (salt really brings out the flavour).
Serve
- Once the chickpeas are crunchy (or almost crunchy) remove from the oven and serve over the soup with the coriander. I also added a drizzle of chilli oil (because I love a bit of spice) but this is entirely optional.
Make-ahead
- Re-heat in a pot over a low heat until just hot.
Store
- Store in an airtight container in the fridge or freezer.
Grab Bag Formula Method
- If you've done the **Grab Bag Formula Short Course, this is the method to convert this recipe…
- Place all the ingredients for the soup into the Grab Bag.
- Carefully seal your Grab Bag. I close most of the seal then press out as much air as I can then complete the seal. Place the Grab Bag in the freezer.
- To cook, remove the Grab Bag from the freezer, place on a baking tray and thaw in the fridge overnight.
- Tip the contents of the Grab Bag into a large oven proof dish (with a tight fitting lid) or Dutch oven. It may still be a bit frozen; that’s okay.
- Place the lid on the pot, set your oven to 150°C/300°F (fan-forced) and cook for 2 hours.
- Allow to cool before pureeing with a stick blender or blender. Add the nutritional yeast and blend again. Taste and adjust the seasoning (salt really brings out the flavour).
- ** The Grab Bag Formula Short Course is available to purchase for just AU$46 HERE.ORIf you are a full-access Well Nourished Family member, the course is included in your membership and you can access in the members portal – HERE.
Notes
Legume free
Omit the chickpeas. Perhaps top with toasted pepitas.No nutritional yeast
Sub with grated parmesan cheese.What did you think of this deliciously creamy plan-based vegetable soup…let me know in the comments below…
Chocolate Hazelnut Strawberry Pizza
Member Nicole requested this dessert pizza a while ago…. this Chocolate Hazelnut Strawberry Pizza was voted the best flavour combo. It’s a chocolately base, topped with nutella and fresh strawberries. Ice cream is optional but recommended! Health benefits Although it feels like pure fun, this recipe still leans into wholefood ingredients. The spelt flour offers…
Immune Bombs
These Immune Bombs are a fabulous remedy to make ahead of the cooler weather. They are quick and easy to make and store well in the freezer. If you’re feeling under the weather or just want to get ahead with immune support during the flu season, you can use these to make a fast, no fuss immune supportive, anti-inflammatory tea.
Add the ice block to boiling water, mix in Manuka honey (I love the Barnes Natural’s range if you are in Australia, it’s Aussie made so you’re supporting local beekeepers and has the most beautiful flavour) or another raw medicinal honey and take a moment to relax and enjoy instant immune support!
Warning – the turmeric can stain (hands, benches, plastics). Wash in warm soapy water. Also sunlight helps remove the stains if utensils do become yellowed.
Health benefits
Turmeric & Ginger – The turmeric is anti-inflammatory, antibacterial and antiviral. This, combined with the anti-inflammatory and warming effects of ginger, means that both are wonderful for treating the congestion associated with respiratory infections.
Lemon – Lemon obviously donates a little hit of vitamin C. But it is the zest that impresses the most. Lemon zest is very nutrient dense, an amazing antioxidant and is very anti-bacterial too. It is also very good for stimulating digestion and breaking down mucous. This is why where ever a recipe calls for lemon juice, I always try to incorporate the zest too.
Sea Salt – supports hydration
Black pepper – Black pepper is replete with antibacterial and anti-inflammatory properties.
Coconut oil – The principle medium chain fatty acids in coconut, lauric and capric acid, are anti-inflammatory and support immune and digestive health. The fat also helps the absorption of fat soluble vitamins and active compounds in the turmeric.
Cinnamon – Cinnamon is showing some promising results as an antiviral. It is an anti-inflammatory, warming herb with many antioxidants.
Honey – Honey has been used for centuries to reduce inflammation, promote healing and reduce infection. But not all honey is created equal! Processed honey has NO medicinal qualities. Only real, raw honey possesses these properties, with some types of honey more potent than others. Manuka honey is a type of honey which is potently antibiotic and is receiving much attention in the medical community for its medicinal qualities. Look for a MGO of 400+ -550+ for high grade immune support. I use Barnes Natural’s brand if you are in Australia (you can buy it in store or online at Chemist Warehouse).
The final ingredient to help your body heal is REST. Stop and take the time to sip slowly at this hot cup of tea and allow your body the opportunity to heal. Get enough sleep and give your immune system the chance to fight infection.
Make these Immune Bombs ASAP so they are ready to grab from the freezer at the first hint of a sore throat, cold or feeling run down!
Health benefits
Turmeric and ginger are renowned for their anti-inflammatory and antioxidant properties. Combined with the vitamin C from lemon, black pepper for better turmeric absorption, and honey for its soothing, antimicrobial benefits, this recipe delivers an immunity-enhancing drink to help your body thrive.
Ingredients
This recipe brings together immune-supportive ingredients such as fresh turmeric, ginger, lemon, and black pepper, which aid in combating inflammation and improving digestion. Coconut oil adds healthy fats that help the body absorb the turmeric’s curcumin, while cinnamon adds warming spice and balances blood sugar levels.
How to make Immune Bombs
Blend the turmeric and ginger together until finely minced. Add the rest of the ingredients (except the honey) and blend until smooth. Freeze the mixture in ice cube trays for easy, grab-and-go portions. When ready to enjoy, place a cube in a mug, add boiling water, stir to dissolve, and mix in honey to taste.
Serving suggestions and how to store
Simply drop a frozen Immune Bomb cube into a large mug or thermos, add hot water, and stir to create a nourishing drink. These cubes can be stored in the freezer in an airtight container, making them easy to prepare whenever needed.
Vary this to suit your dietary needs
For a coconut-free version, substitute the coconut oil with ghee, which provides similar health benefits and a rich, buttery flavour. You can also adjust the amount of honey or opt for a different natural sweetener, depending on your preference.
Take a look at the variations (below the main recipe) for suggestions to alter the recipe to suit many specific dietary requirements.
Important
This information is solely for informational purposes and is not intended to take the place of medical advice. Always seek the advice of your health care professional if unwell. Please consider, whilst I would love to help each and every one of you, I am not able to offer individual health or medical advice.

Download your FREE Immune Health Plan ebook – A practical guide filled with simple tips to help support your immune system so you and your family stay fighting fit this winter.
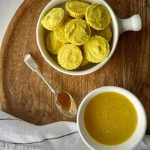
Immune Bombs
These Immune Bombs are a fabulous remedy to make ahead of the cooler weather. They are just so simple to make and store in the freezer. Then if you feeling under the weather or just wanting to get ahead with immune support you can quickly and simply make an immune supportive, anti-inflammatory tea.
Servings: 12 (approx)
Ingredients
- 1 tbsp fresh turmeric root – can sub with 1 tsp ground if you can't source fresh
- 2 tbsp ginger root – fresh (scrubbed or peeled)
- 2 lemon/s – zest and flesh (no pith or seeds)
- ½ tsp sea salt
- ¼ tsp ground black pepper
- 60 ml coconut oil (¼ cup)
- 1 tsp ground cinnamon
- manuka or raw honey – to taste
Instructions
- In a high speed blender or food processor, add the turmeric and ginger and finely mince. If using a Thermomix 10 seconds, speed 8. Scrape sides and repeat if neccesary.
- Add the rest of the ingredients (except the honey) and puree on high for a good minute. If using a Thermomix, blend 20 seconds, speed 9. Scrape the sides and repeat a few more times until smooth.
- Freeze in cubes.
Serve
- Place a cube from the freezer into a large mug or thermos. Add boiling water and stir to dissolve the cube.
- Then mix in the manuka honey to taste.
Store
- Airtight in the freezer.
Notes
Coconut-free
Replace the coconut oil with ghee.Let me know what you thought of these potent Immune Bombs in the comments below…
Anzac Lemon Slice
We have a lot of Anzac baking inspo here in the Well Nourished Family, but this Anzac Lemon Slice is a flavour combination I’ve been dreaming of for a while. So with a few rounds of testing and tweaking I really think this Anzac biscuits inspired slice is special. I’m a big Anzac lover and…
Mushroom Walnut Sausage Rolls
These Mushroom Walnut Sausage Rolls have become a new favourite vegetarian meal. They are deliciously moist but nutty inside with the crunchy pastry case making them an absolute winner in my book. The mixture of mushrooms with nuts gives a satisfying savoury taste that both vegetarians and meat-lovers alike enjoy! Health benefits This recipe is…
Hazelnutella Anzac Biscuit
This new Hazelnutella Anzac Biscuit is sure to become an any time of the year favourite. These biscuits are a delicious twist on the traditional ANZAC biscuit, combining the classic oats and syrup base with a rich Nutella centre. This indulgent biscuit offers the perfect balance between crispy edges and a chewy centre, with a hint of hazelnut that elevates the flavour.
We’ve got quite a few flavour variations on the humble Anzac biscuit here at Well Nourished. Click HERE for even more inspiration!
Health benefits
Using wholemeal spelt flour and rolled oats provides more fibre and nutrients than refined alternatives. Hazelnut meal adds healthy fats, and if you opt to make your own Nutella, you can control the sweetness and avoid additives and vegetable oils. If you can’t make your own nutella, there are some better store bought options available in the supermarket. We’ve also used less refined sugars instead of the usual golden syrup and brown sugar found in traditional Anzacs.
Ingredients
These cookies are made from a simple mix of butter, oats, spelt flour, and hazelnut meal. You can choose from honey, rice malt syrup, or maple syrup as the sweetener, and a homemade or store-bought Nutella for the filling.
How to make Hazelnutella Anzac Biscuit
In a large bowl, start by melting butter with syrup, then stir in bicarb (baking soda) and the dry ingredients to form a dough. Press golf-sized balls of the mixture onto a tray, making indents with your thumb. Add a spoonful of Nutella to each indent before baking them to golden perfection. The longer you bake, the crispier the biscuit becomes. Cool on a wire rack.
Serving suggestions and how to store
Enjoy these biscuits with a cuppa, or as a sweet snack any time of day. Store them in an airtight container in the fridge, or freeze them for later. While the Nutella centre may whiten when frozen, it still tastes delicious.
Vary this Hazelnutella Anzac Biscuit to suit
For a gluten-free version, replace oats with quinoa flakes and spelt flour with buckwheat or another gluten-free flour. To make it dairy-free or vegan, use coconut oil and rice malt syrup. For a nut-free version, swap hazelnut meal with ground seeds. You can also add cacao to the dough for a double chocolate variation.
Take a look at the variations (below the main recipe) for suggestions to alter the recipe to suit many specific dietary requirements.

Hazelnutella Anzac Biscuit
This new Hazelnutella Anzac is sure to become an anytime of the year favourite. The combination of oaty anzacs with the hazelnut meal and nutella centre is a match made in heaven.
Servings: 12
Ingredients
- 100 g butter
- 85 g rice malt syrup, honey or maple syrup – ¼ cup
- 1 tsp bicarbonate of soda
- 30 g coconut sugar or rapadura – ¼ cup this is optional if you need extra sweetness
- 60 g wholemeal spelt flour – ½ cup
- 50 g desiccated coconut – ½ cup
- 115 g rolled oats – 1¼ cup see gluten-free below
- 70 g hazelnut meal – ½ cup – or can sub almond meal or ground seeds
- 2 tbsp Nutella – make your own from this recipe
Instructions
- Pre-heat the oven to 180°C/350°F (fan forced) and line a large biscuit tray with baking paper.
- In a large pot, gently heat the butter and honey or rice syrup until melted. Remove from the heat. Add the bicarbonate of soda and mix very well.
- Add the rest of the ingredients to the pot, and mix until well combined. The mixture should feel wet and sticky but presses together. If it feels a bit dry, add a tiny bit of water to bring them together.
- With wet hands squeeze the mixture into approximately golf sized balls, press between your palms to flatten slightly, make an indent in the centre with your thumb and place well apart on the baking tray (they spread).
- Add about half a teaspoon of Nutella to the indent in the centre of the biscuit.
- Bake until golden (approximately 10-12 minutes).
- The longer they are baked the crispier they become. So if you like a slightly chewy biscuit remove just as they start to brown. For a crunchy biscuit, leave a little longer. I also find the gluten-free version cooks quicker still.
- Cool, undisturbed on the tray (they will harden as they cool).
Thermomix Method
- First, grind your seeds, 10 seconds, speed 8. Set aside.
- Now melt your butter and syrup/honey, 1 minute, temp. 90, speed 3.
- Add the bicarb and mix 10 seconds, speed 3.
- Add the remaining ingredients and mix approx. 20 seconds, reverse, interval speed until combined.
- Roll and bake as per above method.
Store
- Store in an airtight container in the fridge or freezer. The Nutella centre does whiten when frozen, but still tastes great.
Notes
Gluten and grain-free
Replace the oats with quinoa flakes and spelt flour with buckwheat or a gluten-free flour. You may have to adjust the amounts so that the mixture is sticky and moist but able to be squeezed into balls (with wet hands). Just keep adding more quinoa and gluten-free flour until it feels right.Dairy-free
Replace the butter with coconut oil (but they do loose the classic buttery ANZAC flavour). You may need to adjust the oil quantities slightly so the dough holds together.Vegan
Choose the dairy-free variation and rice malt syrup as your sweetener.Coconut-free
Replace the coconut with more hazelnut meal.Fructose friendly
Choose rice malt syrup as your sweetener and omit the rapadura.Double chocolate
Mix 2 tbsp of cacao powder through the biscuit dough.Let me know what you thought of this delicious new version in the comments below…
Basil Dressing
This simple Basil Dressing adds a lot of flavour to anything you add it to. This pairs beautifully with any Italian or Mediterranean flavours. Pour it over salad, steamed or roasted vegetables, potatoes, fish or chicken. It’s super versatile. Health benefits Let’s start with the hero of the dish, basil. Basil is a rich source…
Vegan Snickers Cheesecake
This decadent Vegan Snickers Cheesecake is a real crowd pleaser and perfect for a special occasion. It’s pretty simple to make each of the layers, there’s just a bit of waiting for each part to set. This is very rich and really quite filling so a little slice goes a long way! Health benefits Even…
Healthy Homemade Nutella
Hotly requested, this Healthy Homemade Nutella is a simple way to enjoy this popular spread. The first two ingredients in store bought Nutella is sugar and vegetable oil…two ingredients that certainly don’t serve your health. Home made Nutella is so simple, the only thing essential to a nice creamy spread is a really powerful high…
Eggplant Parmigiana Meatballs
I had these Eggplant Parmigiana Meatballs in a small town in Italy many moons ago and they have stuck with me. I love regular eggplant parmigiana, but why not go to a little extra effort and create meaty plant based meatballs and pair them with a simple tomato sauce and a cheesy topping. Health benefits…
Greek Lamb Souvlaki
This Greek Lamb Souvlaki is such a beautiful feast and best of all, it’s super easy to create. I prepare everything then hand it over to my hubby to cook on the BBQ (while I whip up the hummus) making it the perfect summer family meal. Time saving tip: I get my butcher to dice…
Spelt Profiteroles (Chocolate Eclairs)
Spelt Profiteroles (or Chocolate Eclairs) are surprisingly easy to make. Both are made from a basic Choux pastry and you can fill them with whatever your heart desires. The Choux itself is very low in sugar and the fillings you can choose to suit your own taste. It can be as decadent as your favourite…
Herby Garlic Sourdough
This Herby Garlic Sourdough is my new favourite loaf, perfect for garlic lovers. Just as the name suggests it’s herby – it’s garlic-y – it’s buttery and a little bit cheesy (if you choose to add the parmesan). Once you’ve nailed making a basic sourdough, it’s time to branch out to make this scrumptious loaf!…
Strawberry Custard Filo Tart
This Strawberry Custard Filo Tart is a delicate tart with a beautiful flavour. It’s quick and easy to make for a fast, tasty dessert. Filo pastry is used that gives the shell of the tart a crisp, flaky finish. The special touch in this tart is the coil of filo pastry throughout the middle -…
Mushroom Lentil Pies
These Mushroom Lentil Pies are a delicious protein rich, plant based pie. Despite being meat free, the combination of lentils and mushrooms gives it a distinctly meaty flavour. I love making these in individual ramekins, however one large pie works perfectly well too with no difference in cook time. Health benefits This recipe offers a…
Simple Lemon Curd
This easy Lemon Curd recipe is a delicious spread or filling for a lemon tart. It’s so simple to make, and the flavours can be adjusted to suit your level of tartness. Warning – SO delicious by the spoonful straight from the fridge! Hide at the back out of sight! I often make this when…
Garlic Mushroom Pizza
This gluten-free garlic mushroom pizza is quick and easy to make and will be heaven to mushroom lovers. Unlike most pizza, the base I’ve used here is more a batter than a dough. I often use this when I’m feeling lazy and can’t be bothered with the extra step of rolling the dough. The addition…
Spelt Rock Cake
After several requests for a Spelt Rock Cake, I set to reworking my nan’s original and very traditional recipe. The result is these delicious morsels resembling rocks (in looks only!) and harking back to the years of rations in World War 2 era … simple ingredients and an easy method. I’ve given you some add…