
This simple plant powered vegetarian Pumpkin Thyme Lemon Risotto is a delicious, budget friendly meal. Being oven baked, it is super convenient to pop in the oven and walk away! I love the combination of pumpkin, parmesan and feta throughout creamy rice. Using arborio rice really gives a true risotto texture. If you happen to…
thermomix
Spelt Dutch Baby
This is my spelt version of a Dutch Baby which is essentially a big, puffy, family-style pancake baked in a sizzling-hot buttered skillet. This dish is puffy around the outside and flat in the centre offering the perfect little nest for fresh berries. It has the eggy texture of a crepe with crispy edges and is super simple to make – no flipping, just pour and bake. Make sure you allow enough time for your oven to come up to temperature so that you get a nice puffy pancake – the oven and pan need to be HOT.
Health benefits
This Dutch Baby isn’t just tasty – it’s packed with some health perks too. Using spelt flour adds a nutritious twist, as it’s rich in fibre and easier to digest than regular wheat. Plus, eggs give you a good hit of protein, helping to keep you full and energised throughout the day.
Ingredients
With just a few simple ingredients like butter, large eggs, spelt flour, half cup milk (of your choice) and only a tablespoon sugar, this Dutch Baby is easy to make with pantry staples. You can even customise the toppings to suit your taste or whatever you have on hand, making it versatile for any occasion.
How to make this healthy Dutch Baby pancake
Making this Spelt Dutch Baby is super easy – just blend the batter (or whisk by hand in a bowl), melt butter in an oven-safe pan, and pour the batter into the hot pan (preferably a cast-iron skillet). Pop it in the hot oven and watch it puff up in just 15 minutes. The cook time is a lot quicker than flipping individual pancakes! Once it’s golden brown and ready, serve it up with your favourite toppings for a crowd-pleasing dish. If you own a Thermomix, we’ve also included Thermomix instructions for this recipe.
Serving suggestions and how to store
Serve your Spelt Dutch Baby straight out of the oven while it’s still puffed and golden. Top with a generous amount of fresh berries, a dollop of crème fraîche or coconut yogurt, and a drizzle of maple syrup. We love it for breakfast, brunch or dessert! If you have leftovers, store them in an airtight container in the fridge and reheat in the oven to enjoy later.
Vary this to suit your dietary needs
To make this Dutch Baby dairy-free, simply swap the butter for coconut oil or ghee. For a gluten-free version, use your favourite gluten-free plain flour instead of spelt. You can also get creative with toppings – try adding nut butter, fresh lemon juice, sliced bananas, stewed fruit (apple or stone fruit) with a sprinkle of cinnamon to change things up. For a savory Dutch Baby, click here. Take a look at the variations (below the main recipe) for suggestions to alter the recipe to suit your specific dietary requirements.

Spelt Dutch Baby
This Spelt Dutch Baby is essentially a big, puffy, family-style pancake baked in a sizzling-hot buttered skillet.
Servings: 2
Ingredients
- 60 g butter – (4 tbsp)
- 3 egg/s – at room temperature
- 120 ml milk of choice (½ cup)
- 60 g white spelt flour – (½ cup)
- 1 tbsp coconut sugar or rapadura
To Serve
- 1 cup/s fresh berries – of your choice
- 2 tbsp crème fraîche – or coconut yoghurt
- 2 tbsp maple syrup
Instructions
- Preheat the oven to 200°C / 390°F (fan-forced).
- Place the eggs, milk, flour and sugar into a blender and blend well to make a lump free batter. If you have a Thermomix 7 seconds speed 5. Rest the batter while you heat the butter/pan.
- Place the butter in an oven proof pan (I used a 27cm cast iron skillet) and pop it in the oven for 5-7 minutes (just to melt the butter and heat the pan). Take care not to leave for longer (you don’t want the butter to burn).
- Working quickly, pour the batter into the hot, buttery pan and return to the oven to cook for 15 minutes until it puffs and is golden. Remove from the oven (it will deflate quickly, this is totally normal).
Serve
- Top with your favourite toppings as listed above.
Doubling
- You can either make another pancake straight after the first or use two pans at the same time.
Notes
Dairy-free
Replace the butter with coconut oil or ghee if tolerated.Gluten-free
Replace the spelt with your favourite gluten-free plain flour.What did you think of this delicious dish? Let me know in the comments below…
Bolognese Pasta Bake and Beef Tacos
This Bolognese Pasta Bake & Beef Tacos is such a great ‘combo’ meal that can easily be prepped in an hour to set you up for a couple of delicious, yet totally different meals. The Bolognese Pasta Bake doesn’t require the pasta to be cooked reducing prep time and washing up extra dishes. It is…
Sourdough Brioche
This Sourdough Brioche breads is made with dough that has been enriched with butter and eggs, creating a soft and tender loaf that is a pure delight to eat. Brioche can be enjoyed with your favourite spreads, either fresh or toasted. This is a long project, although requires very little hands on time. The amazing…
Lemon Crumble Tea Cake
This zesty Lemon Crumble Tea Cake is so quick and easy to make and even quicker to eat. It is very tart so if you prefer a sweeter tart, add an extra couple of tablespoons of rapadura to the homemade lemon curd. I know the next time you are offered lemons from a friendly neighbour,…
Banana Bread
This delicious healthy, low sugar Banana Bread is perfect for breakfast or a snack. Most varieties of banana bread are usually high in sugar and low protein, it is not always a sustaining start to the day. In fact, many banana breads are so high in sugar, they are anything but healthy. Until now! Health…
Herby Shapes
These Herby Shapes are a great recipe for the fans of popular store-bought shapes – only these are actually providing some nourishment. They are very quick and easy to make, and you can cut them into any shape you or your kids like. Of course older children may not be so fussed so the quickest…
Passionfruit Coconut Tea Cake
This Passionfruit Coconut Tea Cake is beautifully moist and bursting with flavour. I love the combination of passionfruit and coconut in a cake. This is one cake that will leave you feeling very satisfied. Naturally dairy and gluten-free, this is a great choice to make when there are a number of dietary requirements for your…
Lemon Blueberry Yoghurt Tea Cake
This lemon blueberry yoghurt tea cake is a light and zesty treat that’s perfect for any occasion, from morning tea to dessert. The combination of tangy lemon, sweet blueberries, and creamy yoghurt gives this cake a moist, fluffy texture. Plus, it’s easy to whip up with wholesome ingredients like spelt flour and macadamia nut oil (or butter), making it a healthier option than traditional cakes.
It can be made simply by hand or with a regular food processor and I’ve also included the Thermomix method.
Health benefits
This tea cake offers a nourishing twist on a classic dessert. The yoghurt provides probiotics and calcium, which support gut health, while the blueberries are packed with antioxidants. Using natural sweeteners like rice malt syrup or honey reduces the sugar load, and the inclusion of spelt flour offers more fiber and nutrients than refined white flour.
Ingredients
With ingredients like protein rich free-range eggs, full-fat yoghurt, macadamia nut oil (or butter), and fresh blueberries, this recipe is as wholesome as it is delicious. The natural lemon zest and juice add brightness, while the rice malt syrup or honey provides a subtle sweetness.
How to make lemon blueberry yoghurt tea cake
Preheat your oven to 170°C (fan-forced) and line a loaf tin with baking paper (parchment paper). In a food processor or large bowl, whisk the large eggs, yoghurt (or greek yogurt), oil, sweetener, lemon zest and juice, and vanilla extract. Add the baking powder, baking soda, and sea salt, then gently fold in the flour. Be careful not to over mix! Stir in most of the blueberries and pour the batter into your prepared tin. Top with the remaining berries and bake for 45 minutes or until the centre is firm and a skewer or toothpick inserted into the middle is clean. Cool on a wire rack.
If you own a Thermomix, we’ve also included Thermomix instructions for this recipe.
Serving suggestions and how to store
This lemon yogurt cake is best enjoyed as is, or with a dollop of fresh double cream on the side. It stores well in an airtight container in the fridge for up to three days or can be frozen for longer storage. Just slice and freeze in portions for an easy snack or dessert later.
Vary this lemon blueberry yoghurt tea cake to suit
For a gluten-free version, swap the spelt flour for a gluten-free premix, or use almond meal with a bit of arrowroot or tapioca starch. If you need to make it dairy-free, simply replace the yoghurt with coconut yoghurt and choose either macadamia oil or olive oil. And for a more wholesome twist, you can use wholemeal spelt flour to add extra fibre to the cake. I’ve also substituted the blueberries for strawberries before and it’s really good.
Take a look at the variations (below the main recipe) for suggestions to alter the recipe to suit many specific dietary requirements.
For more delicious, healthy sweet recipes, click HERE.

Lemon Blueberry Yoghurt Tea Cake
The classic combination of blueberry and lemon is so perfect in this moist yoghurt cake. It’s super easy to make and delicious with a cuppa.
Servings: 1 loaf cake
Ingredients
- 2 egg/s
- 120 g natural, Greek or coconut yoghurt – or Greek yoghurt (½ cup)
- 80 ml macadamia nut oil – or melted butter or olive oil (¼ cup)
- 170 g rice malt syrup, honey or maple syrup (½ cup)
- 1 lemon/s – zest and 3 tbsp juice
- 1 tsp vanilla – extract
- 1 tsp baking powder
- ½ tsp baking soda
- ½ tsp sea salt
- 200 g white spelt flour (1 ¾ cups)
- 100 g blueberries (1 cup approx.) fresh (can also use frozen but do not defrost)
Instructions
- Preheat the oven to 170°C/340°F (fan forced). Line a 23cm x 13cm loaf tin with baking paper.
- In a food processor or mixing bowl beat the eggs, yoghurt, oil, sweetener, lemon juice and zest and vanilla until well combined. If using a Thermomix, 30 seconds speed 3.
- Add the baking powder and soda and sea salt and mix for 5 seconds to just combine. For the Thermomix 5 seconds, speed 4.
- Fold in the flour until just combined. Don't over mix it, just combine gently. For the Thermomix lid locked flour symbol for 2 rotations. Then gently fold in three quarters of the blueberries.
- Pour into your lined baking tin, top with the remaining berries and bake for 45 minutes or until firm in the centre.
- Allow to cool on a wire rack.
Serve
- As is or with fresh double cream.
Notes
Gluten-free
Replace the spelt with a gluten-free premix. You can also sub with the same volume of almond meal plus 2 tbsp or arrowroot or tapioca starch. We have also made it with cassava flour. If using cassava flour we have tested with AKN Organics, Cassava flour from Source Bulk Foods, Otto’s Cassava flour or Honest to Goodness Cassava flour. Do NOT use The Lotus organic cassava flour (we suspect this brand adds extra starch to the flour) or sub with tapioca flour.Dairy-free
Replace the yoghurt with coconut yoghurt.Wholemeal cake
You can certainly make this with wholemeal spelt (when I was testing it, only white spelt flour was available for some strange reason).Loved this cake recipe? Let me know in the comments below!
Healthy Easy Shakshuka
I love a good healthy easy Shakshuka, and this one is a great way to eat your veggies for breakfast. The sauce is great to make ahead to make breakfast extra quick and easy. Or if you’re in a rush, you can fast-track this recipe by simplifying the sauce and leaving out the carrot, zucchini,…
Baked Sourdough Donuts
My kids love donuts, so when they recently suggested we try making our own, I thought it might be a good opportunity to create a healthier version of this popular family favourite. These Sourdough Donuts are simple to make and because they are baked in the oven, there is no need for deep frying. Generously…
Honey Burnt Basque Cheesecake (with raspberry sauce)
This Honey Burnt Basque Cheesecake is perfect for celebrating with friends and family. It is deliciously decadent and impressive, yet simple to make. The ruby red raspberry sauce is quite tart, but when paired with the rich creaminess of the cheesecake, the flavours balance perfectly. The cheesecake requires six hours setting time in the fridge…
Carrots with Hazelnut Maple Butter
These Carrots with Hazelnut Maple Butter is an incredibly delicious side dish. It’s a beautiful combination of flavours and textures, and I can’t wait to hear how you love it. This would suit any summery meal, with a grilled or BBQd protein or in the winter months, this is delicious with a roast or a…
Baked Passionfruit Cheesecake (Vegan)
This gluten and dairy-free, vegan Baked Passionfruit Cheesecake is super simple to make and really delicious. Most vegan cheesecakes are raw and don’t hold up so well in the warmer weather. So this is the perfect alternative. It’s not overly sweet so feel free to increase the sweetener if you’re a sweet tooth.
Take note of the times required in this recipe. You need time to soak your cashews and also allow 6 hours (or overnight ideally) for the baked cheesecake to cool fully.
Whilst I’ve made this passionfruit, you could change the flavour to suit your taste or occasion… top with a berry or cherry compote, or stack with fresh fruit or make it indulgent by topping with chocolate ganache.
Health benefits
This vegan passion fruit cheesecake offers around 10 g of protein and 6 g of fibre, making this vegan cheesecake both satisfying and balanced. Cashews provide healthy fats and plant-based protein that help keep you full, while the coconut yoghurt adds beneficial probiotics for gut health. Passionfruit contributes vitamin C and antioxidants that support immune function and skin health. Psyllium husks are the unsung hero here, they bind the mixture beautifully and add a gentle source of soluble fibre that supports digestion and healthy cholesterol balance.
Ingredients
This wholesome cheesecake is made from nourishing staples including raw cashews, coconut yoghurt, almond meal, and desiccated coconut, all naturally sweetened with rice malt syrup, honey, or maple syrup. The base is slightly chewy and caramel-like, while the filling is smooth and tangy from lemon juice and zest. The passionfruit syrup on top adds a burst of tropical flavour that makes this dessert both refreshing and decadent.
How to make this Baked Passionfruit Cheesecake
Start by soaking the cashews until soft, then prepare the crust by combining almond meal, coconut, sweetener and coconut oil in a blender until sticky. Press into a lined tin and chill while you blend the creamy cashew filling. Once baked, the cheesecake develops a golden surface and firm texture while remaining silky inside. Top with homemade passionfruit syrup for a naturally sweet finish that complements the rich filling perfectly. It’s best chilled overnight, allowing the flavours to meld beautifully.
Serving suggestions and how to store
Serve this cheesecake chilled, topped with extra fresh passionfruit or a sprinkle of toasted coconut for crunch. It’s ideal as a summer dessert or for celebrations when you want to offer something both indulgent and nourishing. Store leftovers in the fridge for up to five days or freeze individual slices for a ready-to-go treat.
Vary this Baked Passionfruit Cheesecake to suit your needs
This recipe is naturally vegan, dairy-free, and gluten-free. For a low-fructose version, choose rice malt syrup as your sweetener. You can also experiment with other tropical toppings like mango, pineapple or even berries for a different flavour profile.
For more delicious, easy to make healthy cheesecake recipes, click HERE.

Baked Passionfruit Cheesecake (Vegan)
This gluten and dairy-free, vegan Baked Passionfruit Cheesecake is super simple to make and really delicious.
Servings: 12
Ingredients
Base
- 120 g almond meal – (1 cup)
- 85 g desiccated coconut – (1 cup)
- 55 g coconut oil – (¼ cup)
- 115 g rice malt syrup, honey or maple syrup – (⅓ cup)
- 2 tbsp psyllium husks
- 1 tbsp vanilla
Filling
- 300 g raw cashew nuts – (2 cups)
- 500 g coconut yoghurt – (2 cups)
- 170 g rice malt syrup, honey or maple syrup – (½ cup) – maple will make it sweeter than using rice malt
- 1 lemon/s – juice and zest
- 3 tbsp psyllium husks
- 1 tbsp vanilla
- ½ tsp sea salt
Passionfruit Syrup
- ⅓ cup/s passionfruit pulp – about 4 passionfruit
- 2 tbsp rice malt syrup, honey or maple syrup
- 1 tbsp vanilla
- 1 tsp tapioca flour
- 1 tsp water
Instructions
- Soak the cashews for the filling in water for 4-8 hours (to speed this up, soak in boiling water for 2 hours).
- Preheat the oven to 170°C/338°F (fan-forced). Line a 22cm springform pan with baking paper.
- Make the base by pulsing all the base ingredients in a food processor until they come together to form a sticky dough. Press this into the baking tin, pushing up the sides to form a crust. Pop into the freezer while you make the filling.
- Make the filling by blending all the ingredients together to form a creamy mixture. Scrape the sides as required. If using a Thermomix, blend 1 minute, speed 8, MC on.
- Add the filling to the base and bake for 40 minutes or until golden brown on top and firm in the middle. Allow to cool in the pan on a wire rack or in the fridge overnight (ideally).
- To make the passionfruit syrup, place the passionfruit and rice malt in a small saucepan and bring to a simmer for 4-5 minutes. Mix the tapioca and water in a small bowl and add to the syrup. Stir to thicken slightly. Allow to cool.
Serve
- Pour over the passionfruit syrup, slice and serve.
Store
- Airtight in the fridge or freezer.
Notes
Fructose friendly
Choose rice malt as your sweetener.Let me know what you thought of this delicious vegan baked cheesecake in the comments below…
Apricot Almond Coconut Baked Oatmeal
This delicious Apricot Almond Coconut Baked Oatmeal is so easy and quick to prepare. Eat it hot out of the oven or allow it to cool and cut it into portions to freeze for an instant ready-to-go breakfast. Health benefits Each serving of this breakfast bake provides approximately 11 g of protein and 7 g…
Vegetable dip
This Vegetable Dip is quick and easy to make and a super delicious recipe. It will be sure to impress next time you need to ‘bring a plate’. It’s also a great healthy lunchbox or after school snack with crudites, corn chips or crackers. My kids also love it spread over rice cakes, it really…
Mango Raspberry Ripple (three ingredients)
This Mango Raspberry Ripple is a simple, sugar-free three ingredient dessert is a beautiful combination of flavours and has a lovely mousse like texture. It’s important to use ripe mangos (as they are sweetest). If you have ice block moulds, these can become a refreshing treat on a hot day – just pop in the freezer…
Cauliflower Hummus
This roasted Cauliflower Hummus recipe is a lovely take on the legume based hummus. It’s a beautiful, creamy dip that’s loaded with goodness. I really think that cauliflower is the Swiss Army Knife of vegetables – so versatile, so tasty, stores well and readily available. Impress your friends and family with another use of this fabulous…
Rum Balls
These indulgent yet healthy Rum Balls are a decadent treat for grown-ups. I especially like to make them at Christmas time as they make a delightful present for friends or family. They can be made ahead of time which is also particularly helpful during the festive season when we are entertaining more than usual. Sometimes, rather than make a dessert, I will put a plate of rum balls on the table after dinner which I find is often a simple way of ending a delicious evening on a sweet note.
These healthy rum balls are a deliciously rich, indulgent treat perfect for the holidays or as a homemade gift. Made with dark chocolate, dates, almonds, and a hint of rum (optional), they’re naturally sweetened and packed with fiber and antioxidants. Plus, with variations for different flavors, you can customize them to suit any palate or dietary needs.
Health benefits
Packed with almonds and dates, these rum balls are high in fibre antioxidants, and healthy fats. Dark chocolate adds an additional boost of antioxidants, while using natural sweeteners like honey or maple syrup keeps them free from refined sugar. These treats are rich and satisfying, so a little goes a long way.
Ingredients
Key ingredients include dark chocolate, almonds, almond meal, Medjool dates, orange zest and juice, a touch of rum (optional), and cacao powder (or cocoa powder), pistachios, or coconut for coating.
How to make healthy chocolate rum balls
Melt the chocolate using a double boiler or in the microwave. In a food processor, blend all ingredients (except the coatings) until the mixture holds together. Roll into balls and coat in your choice of cacao powder, pistachios, or coconut. For an extra festive touch, present the balls with mixed coatings or add a touch of gold leaf.
Serving suggestions and how to store
These gluten-free rum balls can be enjoyed as a treat anytime and make wonderful holiday gifts. Store in an airtight container in the fridge for up to a week or freezer for up to three months.
Vary these rum balls to suit your dietary needs
For dairy-free and vegan, use dairy-free chocolate or homemade raw chocolate (best stored in the fridge). For chocolate orange rum balls replace rum with 2 tbsp Cointreau and use zest of a whole orange. For hazelnut rum balls, substitute almonds with hazelnuts and add hazelnut liqueur instead of orange and rum. For expresso rum balls, swap rum and orange for espresso and coffee liqueur for a coffee-flavoured twist. For alcohol-free, skip the alcohol and use extra orange juice or water as needed.
Take a look at the variations (below the main recipe) for suggestions to alter the recipe to suit many specific dietary requirements.

Rum Balls
These indulgent rum balls are a decadent treat for grown-ups. I especially like to make them at Christmas time as they make a delightful present for friends or family.
Servings: 20 small balls
Ingredients
- 100 g 70% dark chocolate – good quality, melted
- 1 tbsp rice malt syrup, honey or maple syrup
- 100 g raw almonds – toasted (1 cup)
- 50 g almond meal (½ cup)
- 8 medjool dates – pitted
- ½ orange/s – zest and juice
- 1-2 tbsp rum – to taste
- 2 tbsp cacao powder – or chopped pistachios or coconut to coat the balls
Instructions
- Melt the chocolate in a heat proof bowl placed over a small pot of simmering water, being careful not to let the hot water touch the bottom of the bowl. Alternatively, you can melt the chocolate in the microwave. Allow the chocolate to cool.
- Place all ingredients (except the coating; shredded coconut, pistachios or cacao) into the food processor and pulse until the mixture holds together when pressed, approximately 20-30 seconds.
- Roll heaped teaspoons of the mixture into round balls (they are indeed indulgent so I tend to make them slightly smaller than a bliss ball).
- Roll the balls in your chosen topping to coat and decorate. Place on a lined tray to set.
- If you are making the rum balls for a gift, it looks beautiful to present them with different coloured coatings. You could even add some gold leaf if you wanted to be extra decadent.
Thermomix method
- Grate chocolate for 8 sec, speed 10. Scrape down the bowl. Melt the chocolate for 2-3 mins, 50, speed 2. Scrape down the bowl and repeat if not fully melted.
- Place all ingredients (except the coating; shredded coconut, pistachios or cacao) into the Thermomix and pulse until the mixture holds together when pressed, approximately 20-30 seconds.
- Follow from step 3 above.
Store
- The rum balls can be stored in an air tight container in the fridge for up to a week.
- Or freeze airtight for 3 months.
Notes
Chocolate Orange
Replace the rum with 2 tablespoons of Cointreau and increase the zest to use the whole orange.Hazelnut
Replace the almonds with toasted hazelnuts and the almond meal with hazelnut meal. Omit the orange juice and rum and instead add 2 tablespoons of a hazelnut liqueur (like Frangelico).Espresso
Omit the orange juice and rum and replace it with a shot of espresso (or 2 teaspoons of good quality instant espresso powder) and 1-2 tablespoons of coffee liqueur (such as Kahlua). Espresso can be bitter so you can adjust the sweetener to taste. I usually replace the honey with two tablespoons of maple syrup here.Alcohol free
Of course, the alcohol can be left out all-together. Add extra orange juice or a little water as needed.Dried pitted dates
Instead of medjool dates, you can use dried pitted dates. Soak double the quantity in boiling water for about 10 minutes, then drain and use.Dairy-free
You can make with my raw chocolate but they are just not as stable out of the fridge so not so suitable for gifts. Or use a dairy-free chocolate.Comment below if you loved these deliciously indulgent rum balls…
Recipe by Kristin Cosgrove
Hi, I’m Kristin Cosgrove. I’m a mum, student of psychology and passionate whole foods cook. I love to share my love for simple, seasonal recipes and my modern approach to cooking for my family. I live on the Surf Coast with my husband and three children.
You can find me on Instagram at @kristinjcosgrove
Turkey Meatball Banh Mi
This Turkey Meatball Banh Mi is my take on the classic Vietnamese Banh Mi sandwich that I ate plenty of as hubby and I explored beautiful Vietnam on an old Russian motorbike, another lifetime ago. Traditionally, they are made with a combination of crusty long rolls (or baguette), a meat of some kind (often very…
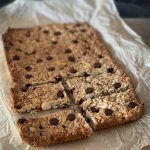
Choc Chip Muesli Bar
This healthy choc chip muesli bar recipe is a quick and easy homemade snack that will become a go-to for kids lunchboxes or an afternoon energy boost. Made with wholesome ingredients, they’re a healthier alternative to store-bought bars, plus they’re super simple to whip up at home. Perfect for batch baking and customising to suit your family’s taste!
I’ve been asked for a healthy choc chip muesli bar recipe that is refined sugar-free and bakes similar to commercial bars, so this is my attempt at that. Commercial, processed muesli bars I’m told are cooked under high pressure and contain large amounts of sugar which is why they have that crispy texture. But I think this recipe is as good as it gets and it certainly has my kids tick of approval.
You can swap the coconut oil for butter if you like, but coconut oil tightens and toughens as it cools so it really contributes to the crispness and firmness of these bars.
If you prefer the texture of a chewy muesli bar, try this No-Bake Muesli Bar.
Health benefits
By skipping the processed sugars, oils and preservatives found in most commercial bars, you’re opting for a cleaner, more nourishing treat. Packed with fibre from oats and healthy fats from coconut oil or butter, these choc chip muesli bars offer a balanced snack to keep you feeling full and energised. The dark chocolate chips are antioxidant rich and low in sugar. You can also boost nutrition by adding mixed nuts or seeds for extra protein and minerals.
Ingredients
This recipe uses pantry staples like oats, coconut oil, vanilla extract and honey (or your preferred sweetener like brown rice syrup), making it easy to customise based on what you have on hand. You can swap in your favourite nuts or seeds, and even add dried fruits or zest for an extra twist of flavour (see variations for ideas).
How to make choc chip muesli bar
To make chocolate chip granola bars, melt the coconut oil with your choice of sweetener, then mix it into the oats and nuts to evenly coat them. After the mixture cools, stir in the choc chips (and any extra mix-ins), press the mix firmly into a slice pan lined with baking paper (parchment paper), and bake until golden. Refrigerating before slicing ensures firm, crumb-free bars. It’s a simple, fuss-free process that delivers delicious results!
If you own a Thermomix, we’ve also included Thermomix instructions for this recipe.
Serving suggestions and how to store
These homemade granola bars are great for lunchboxes or as a grab-and-go snack. Store them in an airtight container in the fridge (for a week) or freezer for up to a month, and enjoy straight from the fridge for the best texture.
Vary this choc chip muesli bar to suit your dietary needs
For a vegan version, use vegan chocolate chips and your preferred plant-based sweetener. To make them gluten-free, swap the oats for quinoa flakes or rolled rice flakes. To make them nut-free, add seeds like pepitas instead of nuts. You can also add a fruity twist with dried apricots or currants, or go for a chocolate-orange flavour by adding orange zest.
Take a look at the variations (below the main recipe) for suggestions to alter the recipe to suit any specific dietary requirements.
For more delicious, family friendly healthy muesli bar recipes, click HERE.
Choc Chip Muesli Bar
This really versatile Choc Chip Muesli Bar is a fabulous staple recipe. You can absolutely vary it with the suggestions I’ve made at the end of the recipe or create your own version.
Servings: 8
Ingredients
- 60 g coconut oil (¼ cup), or butter
- 85 g rice malt syrup, honey or maple syrup (¼ cup)
- 50 g coconut sugar or rapadura (¼ cup), or leave out if you don’t have a sweet tooth
- 1 tsp vanilla
- 230 g rolled oats – or quick oats if you’re after a less textured bar (2 cups)
- 1 cup/s mixed nuts or seeds – of choice
- 85 g chocolate chips (½ cup)
Instructions
- Preheat the oven to 170°C/338°F (fan-forced).
- In a small pot melt the coconut oil (or butter) over a low heat and mix in the sweetener, optional coconut sugar or rapadura and vanilla to combine well.
- Mix in the oats and nuts or seeds of your choice well (so the dry is very well coated by the wet). I do this with wet hands, almost massaging it together until the mixture is super sticky. If you can, pulse this in a food processor, you'll get a firmer, more commercial like bar (see the consistency in the video below).
- Allow the mixture too cool. Stir through the choc chips.
- Line a 18 x 28 cm slice tin and press in the mixture with wet hands so it's nice and firm (make sure it’s really compact).
- Bake for 20 minutes.
- Cool, refrigerate and chill well before cutting. This helps to get nice crumb free slices. If you cut it without first chilling, it will crumble.
Thermomix
- Preheat the oven to 170°C/338°F (fan-forced).
- Melt coconut oil in bowl. 2 minutes, 90, speed 1. Time will vary according to temperature of your oil; adjust time as needed.
- Add in the sweetener, rapadura and vanilla. Mix to combine. 30 seconds, speed 3.
- Weigh in the oats and nuts and combine. 20 seconds, speed 3, reverse.
- Add the choc chips and stir in. 20 seconds, speed 2, reverse (or you can use the spatula to mix by hand.)
- Line a 18 x 28 cm slice tin and press in the mixture with wet hands nice and firm (make sure it’s really compact).
- Bake for 20 minutes.
- Cool, refrigerate and chill well before cutting. This helps to get nice crumb free slices. If you cut it without first chilling, it will crumble.
Store
- Store in an airtight container in the fridge or freezer.
Notes
Choc-orange
Add in the zest of one orange (add with the coconut oil).Make it fruity
Replace the chocolate with currants, dried apricots or the fruit of your choice.Make it coco-nutty
Replace the nuts with a cup of shredded coconut.Vegan
Use vegan choc chips and rice malt or maple syrup as your sweetener.Fructose friendly
Choose rice malt as the sweetener and omit the rapadura.Gluten-free
Replace the rolled oats with the same cup measure of rolled quinoa flakes or rolled rice flakes.I’d love for you to share your version in the comments below the recipe so we can all benefit from your creativity. And a star rating would be great too!
Beetroot Goat Cheese Quiche
This delicious, vegetarian Beetroot Goat Cheese Quiche is perfect for dinner or to make ahead for a picnic. Roasted beetroot is truly the best way to eat this vegetable and pairing it with goat cheese is a wonderful choice. For easy fitting in lunch boxes, use a rectangular tart tin if you have it- the…
Lime Coriander Sauce
Everyone needs a cracking sauce in their repertoire to take a basic meal to the next level. This easy to make, delicious and nourishing Lime Coriander sauce pairs perfectly with chicken, fish, prawns, tofu and vegetables. Health benefits of this Lime Coriander Sauce Cashews provide healthy fats, plant-based protein, and minerals like zinc and magnesium….
Honey Sweetened Marshmallows
These Honey Sweetened Marshmallows are soft, sweet and the ultimate in deliciousness when stirred into a creamy hot chocolate. They are simple to make using just a few ingredients and can be stored in the fridge or freezer to be used in treats like Rocky Road or simply enjoyed just as they are. Health benefits…