
This quick and easy Baked Crumbed Fish is my answer to the fiddly process of crumbing fish fillets. It’s super tasty and really quick and easy to make…the perfect mid week meal. Some examples of firm white fish are snapper, mahi mahi, blue eye and grouper. If in doubt, chat to a fishmonger in your…
thermomix
Savoury Hot Cross Buffins
These Savoury Hot Cross Buffins are a veggie-packed twist on the classic Easter hot cross buns. Quick and easy to make, they are perfect as a savoury snack or breakfast. Truth be told, it’s just a fun way to present a savoury muffin, but don’t spoil the fun! We all need the occasional ‘theme’ to…
Vegan Chocolate Muffins
These easy to make delicious Vegan Chocolate Muffins have been developed by request from a Well Nourished Family member. My kids have been very happy with the testing of these. My son even complained when I’d finished testing saying I had to promise I would come back to them.
Perfect for lunchboxes, picnics, parties or any other time that calls for a sweet treat, these are quick to prepare and use all common pantry ingredients.
Health benefits
These vegan muffins are a treat that’s also relatively nutritious, offering fibre from the spelt flour and coconut sugar, which has a lower glycemic index compared to regular sugar. The cacao powder is packed with antioxidants, and the addition of coconut oil provides healthy fats, making these muffins a better alternative to most bakery-style muffins.
Ingredients
The ingredients for this vegan muffin recipe include your choice of plant based milk (almond milk, oat milk, soy milk or cow if you are not vegan), apple cider vinegar, white spelt flour, coconut sugar, cacao powder (or unsweetened cocoa powder), bicarbonate of soda (baking soda), baking powder, melted coconut oil, vanilla extract, and hot water or coffee. The coffee adds a ‘richer’ chocolate flavour profile if making for adults.
How to make these vegan chocolate muffins
Preheat the oven and line a muffin tray with cases. In a jug, mix the milk and apple cider vinegar and set aside. Combine the dry ingredients in a large bowl, then add the oil and vanilla to the milk mixture and pour the wet ingredients over the dry ingredients. Add hot water or coffee and stir or whisk until just combined. Spoon the batter into the muffin pan lined with muffin cases and bake for 15-20 minutes or until a skewer comes out clean. You don’t want to overcook these as they can start to crumble. Have a look at the 15-minute mark, then check again every minute or so until they’re just right.
Serving suggestions and how to store
Enjoy warm from the oven or once cooled. These muffins store well in an airtight container at room temperature for up to 3 days or can be refrigerated for a longer shelf life. They can also be stored in the freezer for up to a month.
Vary these Vegan chocolate muffins to suit your dietary needs
For a gluten-free version, replace the spelt flour with an all-purpose gluten-free flour blend or almond meal mixed with arrowroot or tapioca flour. To make them extra indulgent vegan double chocolate muffins, fold in dairy-free dark chocolate chips or add a square of chocolate on top before baking.
You can also make this into a whole vegan chocolate cake if you prefer. You will need to bake for 5-10 minutes longer or until a skewer inserted in the middle comes out clean.
For more healthy lunchbox recipes, click HERE. Or for more healthy baked sweet treats, click HERE.

Vegan Chocolate Muffins
These Vegan Chocolate Muffins are quick and easy to make and super delicious!
Servings: 10 muffins
Ingredients
- 120 ml milk (of choice) (½ cup)
- 1½ tbsp apple cider vinegar – or any vinegar
- 180 g white spelt flour (1½ cups)
- 120 g coconut sugar (⅔ cup)
- 40 g cacao powder (½ cup)
- 1 tsp bicarbonate of soda
- 1 tsp baking powder
- 80 g coconut oil (⅓ cup) melted (or macadamia nut oil)
- 1 tbsp vanilla essence
- 120 ml hot water – or hot coffee for an adult twist
Instructions
- Preheat the oven to 180°C/350°F (fan-forced) and line a muffin tray with patty cases or baking paper.
- In a small jug, mix the milk and apple cider vinegar and allow to sit while you mix the dry ingredients. If you're using a Thermomix 5 seconds, speed 5.
- In a mixing bowl combine the flour, coconut sugar, cacao powder, bicarb and baking powder. Whisk together until there are no lumpy bits. (I usually just sit a regular mixing bowl on the Thermomix to weigh the dry ingredients).
- Add the oil and vanilla to the milk and mix, then pour over the dry.
- Add the hot water (or hot coffee) and then whisk to just combine. If you're using a Thermomix 10 seconds, speed 3 (scraping the sides).
- Spoon into patty cases or the lined muffin tray.
- Bake for 15-20 minutes or until a skewer inserted comes out clean.
- To avoid crumbling, it’s important not to overcook them. Check at 15 minutes, then continue checking every minute or two until they’re just cooked through.
- Cool on a wire cooling rack.
Tip
- If you’re out of muffin cases you can make your own parchment paper liners. Cut 15cm x 15cm squares of parchment paper. Place the paper over an upside-down cup and create a fold at four corners to create a ‘tulip’ shaped muffin case. Press on the base to create a good crease and then place it into your muffin tin. Repeat until the number of desired muffin cases are created – quick and inexpensive!
Ice them
- THIS chocolate mousse also makes a fabulous chocolate ganache for icing cakes, either just the mousse part or also drizzled with the raspberry sauce.
Notes
Gluten-free
Replace with an all-purpose gluten-free flour or almond meal plus 2 tbs of arrowroot or tapioca flour. If the mixture is stiff (I find this with some GF pre-mix flours) add 30-40ml more hot water.Vegan Chocolate Chip Muffins
Fold in chocolate buttons or pieces (regular or dairy-free if required) or even pop a square of chocolate on top.I hope you love these muffins as much as my family did, let me know in the comments below.
Chicken Mole
This Mexican Chicken Mole is such a delicious meal. My kids call it ‘chocolate’ chicken due to the addition of dark chocolate. This is a warm and hearty meat-based dish that pairs beautifully with the crunchy, fresh slaw. The vegetarian variation is equally delicious so if you’re looking for a plant-based dish, ‘chocolate’ is still…
Mushroom San Choy Bow
This Mushroom San Choy Bow is a great vegan take on the classic. It’s really quick and easy to make and is a fabulous meal to share buffet style so everyone can build their own to suit their tastes. The pickled carrot really adds to this dish so make sure you add a little to…
Farmhouse Lasagne
This Farmhouse Lasagne is not a quick meal to make but it does my family two good sized serves so that means I get a night off coking which is always a good thing! It’s is a hearty, nourishing meal perfect for feeding a crowd or making ahead for easy weeknight dinners. Packed with layers of rich, delicious meat and vegetable sauce and creamy béchamel, it’s a comforting classic that’s sure to be a family favourite.
Using the Thermomix or a food processor to do the grating and chopping is a huge time saver for this recipe. This is very versatile so feel free to switch up any of the veggies, or you could even sub the mince for chicken or turkey.
Health benefits
Unlike store-bought versions, this homemade lasagne is free from preservatives, additives and damaging vegetable oils. By using high-quality meats, veggies, and homemade sauces, you’re getting a really nutrient-dense meal filled with protein, vitamins, and healthy fats. Plus, by swapping out processed sauces with homemade options, you avoid unnecessary sugars and artificial ingredients, making it a much healthier alternative.
Ingredients
This easy lasagne combines simple, wholesome ingredients like ground beef mince, pork mince, a variety of fresh veggies, rich tomato passata, and a creamy béchamel made with wholemeal spelt flour. It’s a recipe that sticks to whole foods while delivering incredible flavour and texture. You only need to check out the comments below to see this is the best lasagna recipe!
How to make this farmhouse lasagne
To make this classic lasagne recipe, in a large pot or large skillet, saute the garlic, onion, and celery until soft, then add the pork and beef mince and cook until browned. Add the herbs, wine, veggies, stock, and tomato passata, and let it simmer to develop rich flavours. While the meat sauce is simmering, prepare your creamy béchamel sauce. Once both are ready, take a baking dish and layer the lasagna noodles with the meat sauce and béchamel, topping it off with extra cheese (cheddar or parmesan cheese). Bake until golden and bubbly, and enjoy! If you own a Thermomix, we’ve also included Thermomix instructions for this recipe.
Serving suggestions and how to store
Serve your lasagne with a fresh side salad or steamed veggies for a balanced meal. This dish is perfect for meal prepping—it can be stored in the fridge for up to three days or store in the freezer for a quick and easy dinner later. Just reheat in the oven until heated through. If I’m cooking this for two separate meals I assemble the lasagne in two dishes – one casserole dish to eat that night, and a rectangular pyrex or glass lock that I can cook it in, allow to cool, pop the lid on and freeze for another day. Thaw in the fridge, remove the lid and reheat in a moderate oven. If the top browns too much you can cover with baking paper then aluminum foil.
Vary this farmhouse lasagne to suit your dietary needs
You can easily adapt this farmhouse lasagne to suit different dietary needs. For a gluten-free version, swap the lasagne sheets for gluten-free ones and use a mix of buckwheat and rice flour in the béchamel. For a dairy-free option, try a cauliflower-based sauce with nutritional yeast for that cheesy flavour. You can also reduce the meat by substituting pork with cooked lentils for a plant-based boost.
Take a look at the variations below the main recipes to adjust the recipe to suit your dietary requirements and taste.
For more delicious, easy to make healthy lasagne recipes, click HERE.

Farmhouse Lasagne
This Farmhouse Lasagne is not a quick meal to make but it does my family two good sized serves so that means I get a night off! Super versatile so feel free to switch up any of the veggies, or you could even sub the mince for chicken or turkey.
Servings: 8
Ingredients
- 60 ml extra virgin olive oil
- 4 clove/s garlic – minced
- 2 onion/s – diced
- 3 stick/s celery – finely diced
- 500 g free-range pork mince
- 1000 g beef mince
- 1 tsp dried thyme – or (1 tbsp) fresh
- 1 tbsp fresh rosemary leaves – or (1 tsp) dried
- 2 bay leaves
- 125 ml red wine
- 150 g mushrooms – roughly diced
- 2 carrot/s – large, finely diced
- 1 zucchini/s – large, finely diced
- 250 ml chicken broth or stock (can also use beef)
- 680 g tomato passata (puree)
- 1 tsp sea salt – or to taste
- ground black pepper – to taste
- 700 g lasagne sheets – approx.
Béchamel
- 150 g cheddar cheese – or parmesan
- 40 g butter
- 50 g wholemeal spelt flour
- 200 ml chicken broth or stock
- 200 ml milk (of choice)
- Sea salt and freshly ground black pepper – to taste
Instructions
- Heat the oil in a large pan and add the garlic, onion and celery. Saute over a moderated heat with the lid on for 10 minutes, stirring occasionally. You want to sweat the veggies, not brown them.
- Add the pork and beef mince and continue to cook, stirring until cooked through and most of the liquid has gone.
- Add the herbs.
- Turn the heat to high and add the red wine so it sizzles and reduces.
- Add the mushrooms, carrot, zucchini, broth, passata and seasoning.
- Reduce to a simmer for 1 hour with the lid slightly ajar.
- Meanwhile grate the cheese and make the bechemel.
- Melt the butter in a small pot. Add the flour and mix to combine to a paste.
- Now gradually add the milk and stock or broth, stirring as you go. I usually add about a ¼ cup at a time and once it heats and thickens, add more. Be patient here. Mix in about quarter of the cheese once the sauce has thickened nicely.
- Set aside until the meat sauce has cooked. When meat has approximately 10 minutes to go, preheat your oven to 180°C/350°F (fan-forced).
- To assemble, alternate layers of the meat and lasagne sheets finishing with a layer of the bechamel and the remaining cheese.
- I always assemble this into two baking dishes, bake and then keep one for another night or to freeze.
- Bake for 20 – 40 minutes or until the lasagne is cooked through. Fresh pasta cooks quickly, dried sheets will take longer (and the time will vary a lot between brands so check your sheets feel soft when cut before serving).
Thermomix
- Chop the garlic, 5 seconds, speed 5. Next chop the celery and onion, 10 seconds, speed 4.
- Heat the oil in a large pan and add the garlic, celery and onion. Saute over a moderated heat with the lid on for 10 mins, stirring occasionally. You want to sweat the veggies, not brown them.
- Add the pork and beef mince and continue to cook, stirring until almost cooked through and most of the liquid has gone.
- Add the herbs.
- Turn the heat to high and add the red wine so it sizzles and reduces.
- Chop the mushrooms, 3 seconds, speed 4. Chop the carrot and zucchini, 5 seconds speed 4.
- Then add the rest of the ingredients to the pan, stir and reduce to a simmer for 1 hour with the lid ajar. When meat has approximately 10 minutes to go, preheat your oven to 180°C/350°F (fan-forced).
- Rinse the Thermomix, dry with a paper towel, and make the bechemel.
- Grate the cheese, 10 seconds, speed 6 and set aside.
- Add the butter, flour, broth and milk into the bowl and cook, 10 minutes, 90, speed 4, MC on.
- Once the bechamel has thickened, season with a pinch of salt and a grind of black pepper and mix in a quarter of the cheese. Thermomix, 10 seconds, speed 5.
- To assemble, alternate layers of the meat and lasagne sheets finishing with a layer of the bechamel and the remaining cheese.
- Bake for 30 – 45 minutes or until the lasagne is cooked through.
Notes
Reduce the meat
Replace the pork with one can (or cup) of cooked brown lentils.Gluten-free
Chose gluten-free lasagne sheets. replace the spelt flour in the bechamel with gluten-free flour (I like a mix of buckwheat and rice flours 50/50).Dairy-free cheese sauce
Steam half a large head of cauliflower, then puree with a tablespoon of nutritional yeast, a generous pinch of sea salt and pepper and a splash of almond milk to achieve a Béchamel consistency (thick sauce). Top with grated vegan cheese. Another option is this Dairy-free Béchamel Sauce– increase the servings to match the volume of milk and stock required for your meal.Onion and Garlic-free
Replace both with finely diced fennel sautéed with a pinch of cumin and chilli powder.Make your own pasta sheets
If you have the time, making your own pasta sheets is fun and gives an extra special level of deliciousness! Click HERE for the recipe! You will need to reduce the liquid a little since this is fresh pasta.A great meal to make ahead for those evenings where you don’t feel like cooking. Let me know how you enjoyed this recipe in the comments below.
Raspberry and Rosewater Jelly
This Raspberry and Rosewater Jelly is a delicious and nourishing jelly that the kids will love. It’s really quick and easy to make so there’s no need for chemically laden jelly crystals anymore. It was a revolution in my mind as an adult to realise that jelly packets were not needed to make jelly. What…
Creamy Kale Sweet Potato Soup
This Creamy Kale Sweet Potato Soup is a deliciously hearty soup that will warm and comfort the body. Made from simple ingredients, the combination of anti-inflammatory spices, collagen and protein-rich bone broth will nourish your gut. Nutrient dense and fibre-packed from the lentils, nuts and vegetables, it’s a super soup for sure.
For all you need to know about bone broth and how to make it click here. I love having broth ready in my fridge or freezer so that I can whip up a nourishing soup any time it is needed.
Health benefits
This soup is full of nutrient-dense ingredients that support overall well-being. Sweet potatoes are high in fibre and beta-carotene, which converts to vitamin A for immune and skin health. Kale is rich in vitamins K, C, and antioxidants, while red lentils add plant-based protein and fiber, supporting digestion. Coconut milk provides healthy fats for energy and satiety, and ginger, garlic, and turmeric contribute anti-inflammatory benefits.
Ingredients
A base of onion, cloves garlic, and ginger is sautéed in coconut or olive oil before adding diced sweet potato and warming spices like cumin, coriander, and turmeric. Red lentils and veg or chicken broth simmer together until tender, and kale is gently wilted in the coconut milk. A touch of lemon juice brightens the flavours, while toasted cashews, coriander leaves, and chilli flakes add texture and extra depth.
How to make this creamy kale sweet potato soup
To make this sweet potato kale soup, start by sautéing the onion in a large pot until softened, then add garlic, ginger, and spices. Next, add the sweet potatoes, lentils, and broth, simmering until everything is tender. Stir in the lemon zest, kale, and coconut milk, letting the greens wilt. Finally, add the lemon juice, taste, and adjust the seasoning. If a smooth texture is preferred, blend until creamy.
Serving suggestions and how to store
Serve this dairy free soup in a bowl with a sprinkle of toasted cashews, fresh coriander, and chilli flakes for added flavour and crunch. It pairs beautifully with sourdough flatbread or a hearty grain like quinoa. Store leftovers in an airtight container in the fridge for up to three days or freeze for longer-term storage. Reheat gently over low heat to maintain its creamy texture.
Vary this creamy kale sweet potato soup to suit your dietary needs
For a nut-free version, swap cashews for pumpkin seeds. To keep it vegan, use vegetable stock instead of bone broth. If a smoother texture is preferred, blend the soup completely for a creamy consistency—ideal for kids or those who prefer a velvety soup.

Creamy Kale Sweet Potato Soup
This is a deliciously hearty soup that will warm and truly nourish.
Servings: 4
Ingredients
- 1 tbsp coconut oil – or olive oil
- 1 onion/s – diced
- 4 clove/s garlic – crushed
- 1 tbsp ginger root – finely grated
- 500 g sweet potato/s – diced 2-3cm
- ½ tsp ground cumin
- ½ tsp ground coriander
- ½ tsp ground turmeric
- Sea salt and freshly ground black pepper – to taste
- 1 ltr stock or broth – of any kind (chicken or vegetable)
- 60 g split red lentils (⅓ cup)
- ½ lemon/s – juice & zest
- 1 bunch/s kale
- 400 ml canned coconut milk – full fat
- 40 g raw cashew nuts (¼ cup) toasted
- ½ bunch/s fresh coriander leaves – optional, to serve
- chilli flakes – optional, to serve
Instructions
- In a large pot, melt the coconut oil over a moderate heat and add the onion. Saute for 2 minutes.
- Add the garlic and ginger and saute for another minute.
- Add the sweet potato, spices and seasoning and stir-fry for 2-3 minutes.
- Add the stock or broth and lentils and bring to a rolling simmer for 10-15 mins or until the lentils have softened.
- Add the lemon zest, tear the kale from the stems and add to the soup with the coconut milk. Heat for a couple of minutes to wilt the kale.
- Stir through the lemon juice. Taste and adjust the seasoning if necessary.
Thermomix Instructions
- Add the onion (quartered), garlic and ginger (sliced into thin coins) and chop 5 seconds, speed 5. Add the coconut oil and saute 3 minutes, 100 degrees, speed 1, MC off.
- Add the sweet potato (cubed), spices and seasoning and saute 3 minutes, 100 degrees, speed 1, MC on. (If you plan to puree this soup at the end, you can chop 5 seconds, speed 5 before sauteeing.)
- Add the stock or broth and lentils and bring to a rolling simmer, 15 minutes, 100 degrees, speed 1, MC on, or until the lentils have softened.
- In the final few minutes, through the hole in the lid, add the lemon zest, tear the kale from the stems and add to the soup with the coconut milk.
- Remove the lid and stir through the lemon juice. Taste and adjust the seasoning if necessary.
- If you would like a smooth soup, puree 30 seconds, speed 9, MC on.
Serve
- With optional cashews, coriander leaves and chilli flakes.
- This is pictured with the sourdough starter flatbread recipe.
Make-ahead
- Re-heat in a pot over a low heat until just hot.
Store
- Store in an airtight container in the fridge or freezer.
Notes
Nut-free
Replace the cashews with pumpkin seeds.Vegan and vegetarian
Replace the bone broth with vegetable stock.Smooth soup
You can absolutely blend this into a smooth soup if you, if your kids prefer.Love this hearty soup? Let me know in the comments below.
Raspberry Choc Chip Muffins
These Raspberry Choc Chip Muffins are bursting with juicy raspberries and a sprinkle of dark chocolate, the perfect combination. These are perfect for picnics, parties, entertaining friends and even a lunchbox treat. Being made with spelt flour, these are a little easier on the digestion and I love the texture that using half wholemeal brings….
Healthy Apricot Chicken
This healthy Apricot Chicken is a recipe that has been requested by many members… it’s a recipe that is very dear to my heart and goes out to my one of my closest friends and first flat mate Kez. 5 years ago Kez lost her battle with ovarian cancer. She was diagnosed at her 20…
Cashew Queso (vegan cheese dip or sauce)
This creamy Cashew Queso is a delicious vegan cheese dip or sauce with a hint of smoky heat, perfect for nachos, tacos, or drizzling over roasted vegetables. Made with raw cashews, nutritional yeast, and spices, it’s a nutritious, plant-based alternative that doesn’t compromise on flavour.
Make it as a stand alone dip or a side to go with any Mexican inspired meal and you’ll have rave reviews!
Health Benefits
Cashews provide healthy fats, protein, and essential minerals like magnesium and zinc, while nutritional yeast adds a cheesy flavour along with B vitamins. This dairy-free queso is also naturally gluten-free and is made without added oils or artificial ingredients like many store bought dips and sauces, making it a wholesome option.
Ingredients
This queso requires raw cashews, boiling water, nutritional yeast, garlic, a chipotle chilli in adobo (for smoky heat), sea salt, and ground cumin to create its distinctive, creamy taste.
How to make vegan cashew queso
Place all ingredients in a high-speed blender or food processor and blend until smooth and creamy, which should take about one minute. For Thermomix users, blend for two minutes at speed 8, scraping down the sides as needed. If you find the queso too thick, add a little more water to reach your desired consistency, or if it’s too thin, add a few more cashews to thicken it up.
Serving suggestions and how to store
Serve this vegan queso dip warm or chilled. It’s ideal as a dip with tortilla chips, a sauce over Mexican-inspired dishes, or drizzled on roasted vegetables for an added creamy touch. Store any leftovers in an airtight container in the fridge, where it will keep for up to five days and maintain its flavour and texture.
Vary this to suit your dietary needs
If you prefer a milder flavour, replace the chipotle chilli with a teaspoon of smoked paprika to keep the smoky undertone without the heat. For a thicker queso, simply add extra cashews to the blend.
Remember to take a look at the variations (below the main recipe).

Cashew Queso (vegan cheese dip or sauce)
This delicious, cheesy vegan dip would have to be one of the quickest and easiest to make low GI snacks. It’s delicious served with a rainbow of vegetable crudites or corn tortillas. Or make it as a side to go with any Mexican inspired meal.
Servings: 4
Ingredients
- 140 g raw cashew nuts – (1 cup/s)
- ¾ cup/s boiling water
- 2 tbsp nutritional yeast
- 1 clove/s garlic
- 1 chipotle in adobe sauce
- ½ tsp sea salt
- ½ tsp ground cumin
Instructions
- Place all ingredients together in a high speed blender or processor. Process until smooth and creamy, approximately 1 minute. If you're using a Thermomix, 2 minutes, speed 8 (scraping sides).
- If you find it’s too thick, add more water. If it’s not quite thick enough, add more cashew nuts.
- Place in a serving dish and chill until ready to enjoy.
Notes
Tip
It’s got just a hint of heat, but if you prefer a spice-free Queso, replace the chipotle chilli with a teaspoon of smoked paprika.Love this simple recipe? Let me know in the comments below…
Egg-free Spanish Omelette
This Egg-free Spanish Omelette recipe is a tasty vegan breakfast or light meal that’s perfect for those of you who can’t eat eggs. Omelettes are such a staple so by using besan flour (also called chickpea flour), you can have this delicious, nourishing meal any time. You can use this recipe as a base, altering…
Turmeric Coconut Chicken
This Turmeric Coconut Chicken is a really quick and easy to make meal, packed with lots of warming, aromatic spices to support a healthy digestive and immune system. It has a good amount of the anti-oxidant turmeric which is also anti-inflammatory and a great addition to the modern diet. It’s a punchy curry, better for seasoned…
Pineapple Star Anise Granita
This simple but delicious Pineapple Star Anise Granita is a flavour combination that was inspired by a palate cleanser I had at one of my favourite ‘special occasion’ restaurants. It’s a simple and refreshing dessert. I adore this flavour combination and I hope you do too. Health benefits Pineapple is rich in vitamin C and…
Raw Mojito Cheesecake
This Raw Mojito Cheesecake is a great NYE (or anytime) adult dessert. It can be made into one large bowl or lots of little glasses… your choice. The Bacardi is optional, or if I’m making it for my family I will dish out half into individual serves for the kids, then add the Baccardi for…
Jamaican Chocolate Semifreddo
This Jamaican Chocolate Semifreddo was born from my love of a well-made ice cream! There is a flavour called Jamaican Chocolate I enjoyed many years ago that is now etched in my memory because it was absolutely divine. So it was only fair that I replicate the flavours of that delectable treat in this nourishing…
Thai Green Chicken Curry
This Thai green chicken curry is a delicious dish that’s packed with flavour and nourishing ingredients. Made with a homemade green curry paste, chicken, and fresh vegetables, it’s a simple yet delicious meal that’s perfect for busy weeknights or a comforting weekend dinner. Serve it with rice, quinoa, or cauliflower rice for a meal the…
Pine Raspberry Ice Blocks
These Pine Raspberry Ice Blocks are my version of the ‘Calippo’ flavour that my kids love. Their deliciousness really depends on a good, ripe and sweet pineapple. These are perfect on a hot summer’s afternoon: the juicy fruit and the coconut water help hydrate in a fun and flavoursome way. I freeze these in my…
Aussie Meat Pie
This Aussie Meat Pie is based on one my dear nan and I used to make when I was a kid. The iconic meat pie of Australia is a flavoursome mix of beef mince and gravy in a beautiful crisp pastry. Placed in a paper bag with a squirt of tomato sauce, it is a quick take-away lunch common to petrol stations and corner stores. Truth be told, the commercial meat pies are probably more mystery meat and fillers, so this is a recipe that you can sink your teeth into and enjoy every single bite.
Nan always used shortcrust for her pies (no fancy puff pastry in those days) so I’ve done the same here. Her recipe didn’t contain any veggies, but of course I have taken the liberty of adding them here. Feel free to add more, less, or change the veggies about if you like. You can make these pies as individual ones or one large family pie. The possibilities are endless!
I know you’ll love the flavours in my take of the classic Aussie meat pie.
Health benefits
This homemade Aussie Meat Pie offers superior health benefits compared to supermarket or take away options. It’s made with real, fresh ingredients and uses wholemeal spelt flour, which is rich in fibre vitamins, and minerals. The pie is packed with fresh beef, providing high-quality protein, while carrots and spinach add essential nutrients and fibre. Unlike supermarket pies, which often contain processed ingredients, preservatives, and unhealthy fats like vegetable or seed oils, this homemade version uses healthier fats like olive oil or butter. Store-bought pies typically rely on refined flours, excess salt, and low-quality meats, which can negatively affect your health. So making your own pie ensures you’re eating a more nutrient-dense, wholesome meal.
Ingredients
The filling combines beef mince (ground beef), onions, garlic, mustard and a variety of delicious condiments like Worcestershire sauce, tomato paste, and balsamic vinegar. The homemade wholemeal spelt pastry adds a deliciously flaky and wholesome touch. The addition of baby spinach and carrot boosts the nutritional content of this comforting dish.
How to make Aussie Meat Pies
Start by sautéing the onions and garlic before adding the beef mince and thyme. Stir in the condiments and stock, then let the meat pie filling simmer until thickened. Meanwhile, prepare the pastry by processing flour and butter, then kneading until smooth. Roll out the pastry, line your pie dish, fill with the meat mixture, and top with the pastry lid. Bake until golden and crispy.
Serving suggestions and how to store
Serve these Aussie Meat Pies with a side of salad, steamed vegetables or mashed potatoes for a complete meal. To store, place leftovers in an airtight container in the fridge or freezer. Reheat in the oven until just warmed through to retain the crispness of the pastry.
Vary this Aussie meat pie to suit your dietary needs
For a vegetarian version, swap the mince for brown lentils and mushrooms. If you prefer a puff pastry top, you can halve the homemade pastry recipe and use puff pastry for the lid. Garlic-free and gluten-free variations are also included, ensuring this recipe can suit a wide range of dietary needs.
Take a look at the variations (below the main recipe) for suggestions to alter the recipe to suit your specific dietary requirements.
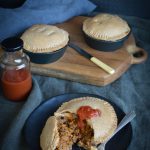
Aussie Meat Pie
This Aussie Meat Pie is based on one my dear Nan and I used to make when I was a kid. She always used shortcrust for her pies (no fancy puff pastry in those days) so I've done the same here.
Servings: 4
Ingredients
- 2 tbsp extra virgin olive oil
- 2 red onion/s – diced
- 4 clove/s garlic – minced
- 500 g beef mince
- 1 tsp dried thyme
- 1 tbsp dijon mustard
- 2 tbsp Worcestershire sauce
- 2 tbsp tomato paste
- 1 tsp balsamic vinegar
- 1 tbsp white miso paste – optional or Vegemite
- 200 ml stock or broth – beef or chicken is fine
- 1 tbsp true arrowroot flour – or cornflour – mixed to dissolve with 1 – 2 tbsp more broth or water
- 1 carrot/s – grated
- 30 g baby spinach – finely chopped, approx (1 cup)
Pastry
- 450 g wholemeal spelt flour
- 180 g butter
- 3 tbsp water
Instructions
Meat filling
- In a medium sized fry pan, soften the onion in the olive oil over a medium high heat for 2-3 minutes.
- Add the garlic, beef mince and thyme and fry, stirring until the beef has browned and any liquid has mostly reduced.
- Add the mustard, Worcestershire sauce, tomato paste, balsamic vinegar and optional miso. Then add the stock (or broth), arrowroot slurry and carrot.
- Simmer for 10 minutes or until the pie filling has a nice ‘pie’ consistency.
- Turn off the heat and mix in the spinach. It doesn’t matter if it wilts completely as it will when you cook the pie.
- While the sauce is simmering, make the pastry.
Pastry
- Note – If using your Thermomix, start with the pastry (wrap and rest in the fridge) then use it to chop the onion, garlic, carrots and spinach.
- In a food processor add the flour and butter and process until it comes together in a coarse crumb (you can also do this by hand by rubbing the butter into the flour mix). Thermomix 10 seconds, speed 6.
- Add the water and process until the dough starts to come together, then gently knead it for a minute (to just bring it together, don’t overwork it). Thermomix 10 seconds, speed 6, then 30 seconds, wheat symbol (to knead).
- Add extra water if necessary teaspoon by teaspoon until it is the proper consistency (see the note about consistency below).
Pie Construction
- If you are baking your pies in the oven, preheat oven to 180°C/350°F (fan forced). Grease and / or line your pie dishes (single serve or large) with parchment paper. I make long strips and place in the base like a cross. I like to sit my individual pie dishes on a tray so that they are easy to get in and out of the oven.
- Roll out the pastry – see note below.
- Use the pie dish of choice to cut circles on the pastry for the bases and lids. Place the base pastry in the dish, fill with the meat and place lid on top, pressing down edges with a fork or spoon to seal the edges. Prick the centre of the pie.
- Bake in the oven for approximately 20 minutes or until golden.
- If you have a pie maker, preheat it while using the cutter to cut the bases and lids for your pies. Working quickly, place the pastry bases in the pie maker. Fill with the pie filling just over the top, then place lids on. Close the pie maker lid and cook until pastry is golden.
Serve
- With salad, vegetables and mash.
Make-ahead
- Re-heat in a low oven until just hot.
Store
- Store in an airtight container in the fridge or freezer.
Notes
Vegetarian
Replace the mince with 1 can brown lentils (drained and rinsed), 200 g mushrooms (finely chopped or pulsed in a food processor) and vegetable stock.Garlic-free
Omit or replace with garlic oil if tolerated.For Dairy and Gluten-free
Click HERE to use this pastry casing instead.Flaky top
If you’d prefer a puff pastry top, have the pastry amount and top with an all-butter puff pastry instead.A note about pastry consistency
As all whole flours are slightly different in their consistency/texture, you will need to judge how much water is needed yourself for all types of pastry. The consistency you are after is that the dough should easily come together in a firm, slightly sticky ball (but not stick to your hands or the bowl). If it cracks as you roll it, it needs more water. If your kitchen is hot (during summer) you will need to work quickly to assemble.A note about rolling pastry
Personally, I find the cleanest and most foolproof way to roll pastry is to roll it between two pieces of parchment or baking paper. Remove the top piece of paper and invert the pastry into the pan before peeling off the bottom layer.Baking note
Always bake pastry items like pies and quiche on the bottom shelf of the oven (makes for a crisper pastry).Enjoy this delicious Aussie Meat Pie inspired by my Nan.
Lime Coconut Mussels
These Lime and Coconut Chilli Mussels are one of my family’s all time favourite meals. I used to think mussels were tricky to cook, something best left to experienced chefs, but this couldn’t be further from the truth. They are super quick and easy to make so it’s a great quick weekend lunch. I’m going…
Nut Butter Fudge
This Nut Butter Fudge is really quick and easy to make. Rich in protein and healthy fats, it is a low-sugar sweet treat. If you’re not able to eat peanuts, you can easily substitute it with another nut or even a seed butter. Plus, it’s gluten-free and dairy-free! As the weather warms up, having another…
Tuna Pasta Bake
This Tuna Pasta Bake recipe is a very adaptable family meal. I love having a tasty tuna recipe to go to as it’s a sure-fire option when I’ve forgotten to get meat out of the freezer! This recipe could also be considered a Mornay since it has a cheesy white sauce, but there are a…
Pork Shiitake Gyoza
These delicious Pork Shiitake Gyoza are like a little flavour bomb. I love the contrast of the crisp, caramelised base and the soft steamed tops and the dipping sauce makes this a heavenly meal or starter. Gyoza is a traditional Japanese cuisine, often served as part of a banquet. They are incredibly moreish so this…
Raspberry Muesli
This delicious, easy to make, naturally sweetened Raspberry Muesli is a fabulous staple for any healthy pantry. Oats are a really nourishing, mineral rich grain that are high in fibre and protein. The nuts and seeds provide more nourishment in the form of fat soluble vitamins, protein and essential fats to keep you feeling full and satisfied.
If you’re looking for an alternative to high-sugar, nutritionally void cereals, you’ll love this! It’s quick and easy to make, and it stores beautifully in your pantry for weeks – just like a box of store-bought cereal.
Health benefits
Packed with fibre-rich oats and loaded with healthy fats from coconut oil, almonds and seeds, this muesli provides lasting energy. The raspberry purée adds a natural source of antioxidants and vitamin C for a bright, nutritious boost to start your day.
Ingredients
With a base of rolled oats, coconut, sesame and sunflower seeds, plus flaked almonds and a touch of rice malt syrup or honey, this homemade granola brings together wholesome ingredients in every bite.
How to make Raspberry Granola
To make this Raspberry Muesli (granola) begin by puréeing the frozen raspberries with coconut oil and a sweetener of choice. I find frozen raspberries are a bit more flavoursome than fresh but you can sub with fresh raspberries if you like. Combine the oats, shredded coconut (or coconut flakes), seeds, and almonds on a tray. Pour the berry mixture over the oat mixture and toss well to coat. Spread out over a baking tray (or baking sheet) and make sure there is just a thin, even layer of muesli so that it toasts (if it’s a deep layer it won’t crisp up). Bake until golden and crisp (about 30-40 minutes) giving it a good stir every 10 minutes. Allow to cool fully.
Serving suggestions and how to store
Enjoy this raspberry muesli in a bowl with milk, yogurt, or fresh fruit for a complete breakfast. It’s also great as an afternoon snack or on a smoothie bowl for a bit of crunch and extra nutrition. Let it cool fully before storing in an airtight container to keep it fresh and crunchy.
Vary this to suit your dietary needs
Unlike many cereals this is already wheat-free. For a nut-free option, swap out the almonds for more seeds like pepitas (pumpkin seeds) or your favourite nut-free alternative. If coconut-free, use macadamia nut oil and replace the coconut with extra oats and nuts. Make it gluten-free by substituting oats with buckwheat groats and flaked millet, quinoa, or rice. If you wanted to add some freeze dried raspberries into the granola after its fully cooled it would be super delicious.
Take a look at the variations (below the main recipe) for suggestions to alter the recipe to suit your specific dietary requirements. For more healthy muesli and granola recipes, click HERE.

Raspberry Muesli
This delicious, easy to make, naturally sweetened Raspberry Muesli is a fabulous staple for any healthy pantry.
Servings: 16
Ingredients
- 200 g frozen raspberries – defrosted
- 50 g coconut oil (¼ cup) melted if solid
- 85 g rice malt syrup, honey or maple syrup
- 350 g rolled oats (3½ cups)
- 150 g shredded coconut (1½ cups) or flaked coconut is fine too
- 70 g sesame seeds (½ cup)
- 120 g sunflower seeds (1 cup)
- 85 g flaked almonds (1 cup)
Instructions
- Preheat the oven to 150°C/ 300°F (fan-forced).
- Purée the raspberries in a food processor or blender. Add the coconut oil and sweetener and blend until well combined. If using a Thermomix, 30 seconds, speed 8.
- On a large oven tray, toss the oats, coconut, sesame seeds, sunflower seeds and flaked almonds together.
- They need to be in a thin layer approx. 1-2cm deep or the mixture won’t toast well. You can use two trays if you don’t have one big tray.
- Pour over the berry blend and toss through the dry mix until it is evenly coated.
- Bake for 30-40 minutes, stirring every 10 minutes until golden and crisp.
Serve
- Serve with your choice of milk, yoghurt and fresh fruit.
Store
- Allow to cool fully before storing in an airtight container.