• Skip to primary navigation
  • Skip to main content
  • Skip to primary sidebar
  • Skip to footer

Well Nourished HomepageWell Nourished

Simple recipes, whole foods, inspired health

  • Family Members
    • Recipe Filter
    • Quick Access Shopping List
    • Membership Tutorials
    • How to be Well Nourished
    • About Well Nourished
    • Where to Shop and what to Buy
    • FAQ
  • Family Members
    • Meal Plans
      • G’s Spring Meal Plan
      • G’s Autumn Meal Plan
      • My Weekly Planner
      • Quick Access Shopping List
      • Ingredient Alert
      • Prep Ahead Plans
      • Hosting Event Plans
      • Wellness & Health Plans
    • Recipe Filter
    • Courses & Community
    • Tips for family’s
      • Getting Kids On-board
      • Planning for Picky Eaters
      • New to Meal Planning
      • Meal Planning Tips & Tricks
    • Nourishing Resources
    • Members Offers
    • What’s New This Week
    • Events
    • Membership Tutorials
    • About Well Nourished
    • FAQ
  • Recipes
    • Meals
      • 30 Minute Meals
      • Budget Friendly
      • Chicken & Turkey
      • Fish & Seafood
      • Freezable Meals
      • Make-ahead Meals
      • Meat
      • Pasta and Noodles
      • Pork recipes
      • Slow Cooked
      • Vegetarian
    • Sweet Recipes
      • Baked Sweets
      • Desserts
      • Ice-blocks
      • No-bake Sweets
    • Breakfast
    • Healthy Lunchbox
    • After School Snacks
    • Savoury Snacks
    • Sides & Salads
      • Salads
      • Side Dishes
    • Soups
    • Drinks & Smoothies
    • Dips
    • Holidays & Entertaining
    • Sauces & Dressings
    • Sourdough Baking
    • Fermenting
    • Staples
    • Members only
    • Members only
  • Shop
    • Membership and Programs
    • Ebooks
    • Free Stuff
  • Affiliates
  • About
    • About Well Nourished
    • Testimonials
    • Join the Family
    • FAQ
  • Resources
    • Find a Practitioner
    • Find whole food
      • ACT
      • NSW
      • NT
      • SA
      • QLD
      • TAS
      • VIC
      • WA
    • Products and Services I Value
    • Whole foods pantry list
    • Ingredients Glossary
  • Wellness Hub
    • Inflammation
    • Perimenopause & Menopause
    • Healthy Kids
      • Healthy Baby
      • Healthy Toddler
      • Healthy Child
      • Immune support for kids
      • Digestion & Food Allergies
      • Healthy Lunchboxes
    • Budgeting & Planning
    • Digestion & Intolerance
    • Immune Health
    • Food as Medicine
    • Foods to Avoid
    • Healthy Habits
    • Sugar
    • Carbs, Protein, Fats
      • Carbohydrates
      • Fats
      • Protein
    • Healthy Food Choices
    • Healthy Home
    • Stress & Mood Disorders
    • Healthy Mind
    • Maternal health
    • Health Challenges
  • Login
    • Well Nourished Family
    • Courses & Community
    • Affiliate Login
  • My account

legumefree

Orange Fennel Mint Salad

December 6, 2016 | Vegetarian, Salads

This Orange Fennel Mint Salad is a delicious dish perfect for any season. The crisp fennel, sweet orange, and fresh mint come together with a creamy yoghurt-based dressing for a light, nutritious side salad.

Christmas day for us is a day of grazing. My whole family are food lovers, so as much as there is excitement around presents, there is also a lot of anticipation for the feast ahead. Christmas lunch generally starts around mid-day with some simply prepared seafood – fresh prawns, oysters, and half shell scallops (this is my favourite way to eat them, recipe here). The main fare happens mid arvo with traditional meats but most of my time and effort in the kitchen goes into preparing beautiful sides, salads and sauces.

This fresh, flavour packed salad is a delicious accompaniment to Christmas meats. The fennel and mint as well as adding amazing flavour, are both brilliant digestive herbs so very helpful as part of a feast!!

Health benefits

Fennel is rich in fibre and vitamin C, promoting gut health and immune support, while the fresh mint aids digestion. The yoghurt in the dressing adds a creamy texture and calcium content, with an option for coconut yogurt to keep it dairy-free.

Ingredients

For the salad: thinly sliced red onion, large fennel bulb, fresh mint leaves, and a large orange with a sharp knife. The vinaigrette requires full-fat natural yogurt (or coconut yogurt), orange juice, olive oil, red wine vinegar, sea salt, and a pinch of paprika. Baby spinach can be added as an optional leafy green.

How to make Orange Fennel Mint Salad

Whisk all dressing ingredients until smooth. Toss the sliced onion and fennel with half the dressing and let rest for 30 minutes. Arrange orange slices and mint leaves on top of the fennel mixture, drizzle with remaining dressing, and serve immediately.

Serving suggestions and how to store

This orange salad is best served fresh, but you can prepare the fennel and onion mixture ahead of time. Store leftovers in an airtight container in the fridge for up to a day.

Vary this Orange Fennel Mint Salad to suit your needs

For a dairy-free or vegan version, use coconut yoghurt or cashew nut cream in the dressing. Replace red onion with thinly sliced radish if preferred.

Take a look at the variations (below the main recipe) for suggestions to alter the recipe to suit many specific dietary requirements.


For lots more sides and salad inspo, take a look at my hugely popular ebook ˜Well Nourished Sides and Salads’– where vegetables become the hero of the dish! It’s great value at just $9.95, click HERE to take a look.


Orange fennel and mint - This Orange, Fennel and Mint Salad is a fresh, delicious accompaniment to rich meats or a heavy meal. Mint and fennel are fabulous digestive herbs.
Print Recipe
4.75 from 4 votes

Orange, Fennel and Mint Salad

Simple, clean flavours that compliment many meals and meats, this Orange, Fennel and Mint Salad is easy to make and super delicious.
Prep Time15 minutes mins
Total Time15 minutes mins
Course: Salad
Servings: 4

Ingredients

  • 1 red onion/s (small) halved & thinly sliced
  • 2 bulb/s fennel -halved & thinly sliced
  • ½ bunch/s fresh mint leaves - leaves picked from stems
  • 1 orange/s -peeled, halved & thinly sliced

Dressing

  • 1 tbsp natural, Greek or coconut yoghurt
  • 2 tbsp orange juice
  • 1 tbsp extra virgin olive oil -extra virgin
  • 1 tbsp red wine vinegar
  • Pinch sea salt
  • ¼ tsp sweet paprika

Optional:

  • 100 g baby spinach (approx. or any leafy green)

Instructions

  • Make your dressing by combining all of the ingredients together in a bowl and whisking to combine.
  • Place the onion and fennel in a bowl and toss through half of the dressing. Allow to rest for 30 minutes (or more).
  • Prepare your orange and mint leaves, arrange on top of the fennel and onion, drizzle with the remaining dressing and serve immediately.

TIP-

  • You can bulk this salad out with shredded lettuce or baby spinach to make a bigger salad.
  • If oranges are out of season, replace with nectarines or peaches. Pomegranate pearls are also beautiful in this salad.

Notes

Onion-free

Replace the onion with four radishes, sliced thinly.

Dairy-free and vegan

Replace the natural yoghurt with coconut yoghurt (or cashew nut cream).
 

I'd love to hear how you enjoy this salad. Post a comment and rate this recipe below. 

Matcha Yoghurt Panna Cotta with Raspberry Ice

November 28, 2016 | No-bake Sweets, Desserts

This Matcha Yoghurt Panna Cotta with Raspberry Ice is a beautiful dessert that combines the creamy richness of panna cotta with a hint of earthy matcha and the bright, tangy flavour of raspberry ice. It not only tastes fabulous, but will also help to protect and support your body through the festive season. You have a choice of making it with dairy or dairy-free. Perfect for a light yet indulgent treat.

Health benefits

Either way it is a delicious, nourishing, gluten-free dessert because not only is it a fabulous source of antioxidants (via the Matcha and berries), but it also supports your digestion too (via the organic gelatin and probiotics in the yoghurt). The raspberries are also rich in vitamin C. It’s a light, refined-sugar-free treat that can be made dairy-free or vegan. Food as medicine!

Ingredients

For the raspberry ice, you’ll need raspberries, water, rice malt syrup (or maple syrup), and lime juice. The matcha green tea panna cotta base includes coconut milk (or cream), vanilla extract, sweetener, matcha (green tea powder), gelatin, and natural yogurt (or Greek yogurt).

How to make this matcha yoghurt panna cotta

This gluten-free, low-sugar matcha panna cotta has a really short prep time. For the raspberry ice, blend raspberries, water, sweetener, and lime juice, then freeze until solid. For the panna cotta, warm coconut milk or cream in a small saucepan with vanilla, sweetener, and matcha, then whisk in gelatin. Blend with yoghurt until smooth, then pour into ramekins and chill for 4 hours. When ready to serve, scrape the raspberry ice and top each panna cotta.

Serving suggestions and how to store

Serve garnished with fresh mint leaves and a sprinkle of matcha powder. Store leftovers in an airtight container in the fridge for up to 3 days.

Vary this matcha yoghurt panna cotta to suit your needs

For a dairy-free matcha panna cotta, use coconut milk and coconut yogurt (such a great dairy-free dessert). If you prefer a coconut-free dessert, use regular cream and yoghurt.

Remember to take a look at the variations (below the main recipe). Here, you’ll find suggestions to alter the recipe to suit your dietary goals  (dairy-free and fructose friendly).


For more delicious, easy to make healthy desserts and sweet treats, click HERE.

Matcha panna cotta
Print Recipe
5 from 1 vote

Matcha Yoghurt Panna Cotta with Raspberry Ice

A beautiful, delicious and nourishing dessert - this Matcha Yoghurt Panna Cotta with Raspberry Ice is really easy to make and surprisingly good for you.
Prep Time15 minutes mins
Cook Time10 minutes mins
Chill4 hours hrs
Total Time4 hours hrs 25 minutes mins
Course: Dessert
Cuisine: Asian
Servings: 2 people

Ingredients

Raspberry Ice

  • 125 g raspberries (1 cup) fresh or frozen (defrosted)
  • 80 g water (⅓ cup)
  • 2 tbsp rice malt syrup or maple syrup
  • 1 tbsp lime juice

Matcha Yoghurt Panna Cotta

  • 270 ml canned coconut milk -or regular pouring cream
  • 1 tsp vanilla -powder, extract or essence
  • 2 tbsp rice malt syrup or maple syrup
  • 2 tsp matcha (I use Matcha Tea Haus everyday blend)
  • 2 tsp grass-fed or organic gelatin
  • 250 g natural, Greek or coconut yoghurt (1 cup) or coconut yoghurt

Instructions

Raspberry Ice

  • In a powerful food processor or blender, blend all of the ingredients together to a puree. If using a Thermomix 10 seconds, speed 7.
  • Line a small tray with baking paper and pour the puree (through a sieve, optional) into the lined tin. Freeze until solid (you can make this ahead).

Matcha Yoghurt Panna Cotta

  • Place the coconut milk or cream into a medium sized pot over a low heat.
  • Add the vanilla, sweetener and matcha and stir well until the mixture just starts to warm (it needs to be only luke warm, so don't overheat). If using a Thermomix 1 minute, temp 70, speed 2.
  • Sprinkle over the gelatin, let it sit for a minute and then whisk in. If using a Thermomix 30 seconds, speed 3.
  • Add this mixture and the yoghurt into a blender and mix at a medium speed to ensure it is super smooth. If using a Thermomix 30 seconds, speed 5-6.
  • Taste the mixture to ensure it is sweet enough. I personally love this unsweetened, but if you feel you need more sweetness, add more rice malt or maple syrup and blend to combine.
  • Divide the mixture between 2 ramekins. Pop in the fridge for about 4 hours (or more) to set.
  • To invert your pannacotta from the mould, sit in a bowl of hot water for 3 seconds, run a knife just around the rim of the mould and carefully invert onto a serving plate. You could also set it in a glass (and don't invert).
  • Scrape the raspberry ice with a fork and place on top of the panna cotta.
  • Garnish with mint leaves and a sprinkle of matcha powder and serve immediately.
  • Enjoy!

Store

  • Airtight in the fridge.

Notes

Dairy-free

Choose the coconut milk and coconut yoghurt. 

Coconut-free

Choose the cream and regular yoghurt.
Please note, this is a sponsored post. Know that I will only ever share products or services on this website that I believe will add value or benefit the health of the Well Nourished community. 
 

I'd love to hear how you enjoy this delicious Panna Cotta? Post a comment below. 

Lamb Shoulder with Mint Chutney

November 23, 2016 | Make-ahead Meals, Red Meat, Slow Cooked

This is the last of the series of recipes I have developed for JamieOliver.com and his series of ’10 recipes to save your life’. Slow cooked Lamb Shoulder with a mint chutney is probably one of my most cooked meals when entertaining a crowd as it can be prepared ahead and requires little time of me in the kitchen once the guests arrive (I hate missing out). This makes it a timely recipe ahead of the festive season and one I know you are just going to love.

The chutney is optional but highly recommended. We make it spicy, but you can always leave out the chilli if spice isn’t your thing. It does seem to loose some of it’s spiciness when combined with the lamb (my kids handle a two chilli chutney fyi).

Health benefits

Lamb is a great source of protein, zinc, and vitamin B12, which supports energy levels and immunity. Unlike store-bought marinades, this homemade version uses fresh herbs and minimal salt, making it a healthier choice. The fresh mint sauce not only adds a burst of flavour but also aids digestion, making this meal as nutritious as it is delicious.

Ingredients

For this recipe, you’ll need a bone-in lamb shoulder, which gives the best flavour and texture. Fresh rosemary, garlic cloves, and lemon infuse the lamb with rich, savoury notes, while the mint chutney adds brightness. The ingredients are simple but deliver big on taste.

How to make this slow-roasted lamb shoulder

To make this dish, you’ll slow-cook the lamb shoulder over lemon halves, which act like a natural rack and infuse the meat with subtle citrus notes. After cooking the lamb for 4 hours, blend up the mint chutney in a food processor. Once the lamb is tender, remove the foil, grill the top for a crispy finish, and serve with the chutney.

Serving suggestions and how to store

Serve this lamb shoulder with a simple side salad or steamed veggies dressed with olive oil, lemon juice, and seasoning. Store any leftover meat in an airtight container in the fridge, and reheat it in the oven, covered, for 15 minutes at 150℃. This lamb is perfect for making ahead for a stress-free gathering.

Vary this to suit your dietary needs

For a garlic-free version, replace garlic with cumin powder and a pinch of chilli flakes in the baste. You can also swap the garlic inserted into the lamb with anchovy fillets, and omit the garlic in the mint chutney.

Take a look at the variations (below the main recipe) for suggestions to alter the recipe to suit your specific dietary requirements.


For moreeasy to make, delicious meal recipes, click HERE.

Lamb shoulder with mint chutney - My Lamb Shoulder with Mint Chutney is so quick easy to make & is a great dish to entertain with. The lamb melts in your mouth & the mint chutney is divine.
Print Recipe
4.92 from 12 votes

Lamb shoulder with Mint Chutney

This lamb shoulder with mint chutney is a tender, fall-apart roast that’s easy to prepare and perfect for feeding a crowd. The slow-cooked lamb is infused with garlic and rosemary, while the fresh mint chutney adds a zesty kick. It’s a hearty, delicious meal that pairs beautifully with simple salads or roasted veggies.
Prep Time15 minutes mins
Cook Time4 hours hrs
Total Time4 hours hrs 15 minutes mins
Course: Main Course
Servings: 4

Ingredients

  • 1 lamb shoulder (1.5-2kg approx.) bone in (if it has the shank attached, have your butcher cut the tendon at the base so it doesn't pop up when it is cooking and pierce the foil)
  • 1 lemon/s -halved and bases trimmed so they can sit flat, flesh side up
  • 6  clove/s garlic -peeled and halved (or quartered if large)
  • 160 ml water (⅔ cup)

Baste

  • 2 tbsp fresh rosemary leaves - chopped finely
  • 1 clove/s garlic - peeled and crushed
  • 1 tbsp extra virgin olive oil - extra virgin
  • 1 tsp sea salt - or to taste
  • ground black pepper - to taste

Mint Chutney

  • 1 bunch/s fresh mint leaves - large (1 cup firm packed), leaves picked off the stems
  • 1 clove/s garlic - crushed
  • 1 red chilli/s - whole
  • ½ tsp sea salt - or to taste
  • 1 lemon/s - juice
  • 1 tsp red wine vinegar

Instructions

  • Preheat the oven to 250℃/480℉ (fan-forced).
  • Prepare the baste by mixing all of the ingredients together in a small bowl.
  • Place the lemon halves in a large roasting tray, flesh side up.  Sit the lamb on top of the lemons (so the lemon acts like a rack).
  • Pierce the flesh of the lamb with a pairing knife 12-14 times. Push the slivers of garlic into the holes.
  • Rub the lamb with the marinade and add the water to the bottom of the tray.
  • Now cover with foil making sure the edges are sealed well. I use at least 3 pieces of foil and tuck it under the tray so it is firmly sealed. The lamb needs to steam to make it fall apart when it's done. Any gaps in the foil it can dry out so take your time and seal it carefully.
  • Put it in the oven and immediately turn it down to 150℃/ 290℉. Cook for 4 hours.
  • Whilst that's cooking make the chutney by combining the mint, garlic, chilli and salt in a food processor and processing to a paste. Mix in the lemon juice and vinegar and store in the an airtight container in the fridge until the lamb is ready to serve.
  • When the lamb is ready, remove the foil and put it under the grill for 5-10 minutes or until the top is crispy.
  • Rest the lamb for a few minutes before serving with the mint chutney and tongs to pull apart the meat.

Make-ahead

  • If you want to make this ahead, cook it for the full 4 hours, but don't remove the foil until you are ready to serve.
  • Reheat it in a 150℃ oven (still covered) for 15 minutes, then remove the foil and put it under the grill for 5-10 minutes or until the top is crispy.

Store

  • Any leftover meat in an airtight container in the fridge.

Notes

Serve

I love this with a big fresh salad or steamed veggies simply dressed with lemon juice, olive oil, salt and pepper. My ebook 'Well Nourished - Sides and Salads' has plenty of fabulous accompaniments to this delicious meal - it's a bargain at $9.95. Check it out HERE.

Garlic-free

Replace the garlic in the baste with 1 tsp of cumin powder and a good pinch of chilli flakes. Replace the garlic (that's inserted into the meat) with pieces of anchovy fillets. Omit the garlic in the mint chutney.
 

I'd love to hear how you like this, one of my families all time favourite meals. Post a comment below or rate this recipe.

Raw Coffee Slice

November 9, 2016 | No-bake Sweets, Desserts

This Raw Coffee Slice is a rich and creamy treat that’s perfect for coffee lovers. With a nutty hazelnut base, a creamy coffee cashew layer, and a choice of dark chocolate toppings, it’s a deliciously indulgent dessert that’s both gluten-free and can be made vegan.

With the silly season fast approaching, I thought it timely to share a decadent desert that is perfect for entertaining (or even Christmas day). Dessert is something I always look to pre-prepare and this can be made weeks ahead if necessary. When I have friends over I really don’t want to spend a minute more than necessary in the kitchen (I hate missing out)!

I know I share lots of kid friendly recipes here (and if you check below I have a chocolate variation that is more family friendly). But sometimes it’s nice to have something just for the grown-ups. Having said that – my daughter is crazy for coffee flavoured anything (she’ll even try to sip black, unsweetened coffee if given the chance). I think I may have developed my kids taste for ‘bitters’ a bit too much!!

Health benefits

Made with raw cashews and hazelnuts, this slice is packed with healthy fats, fibre, and magnesium to support health and energy levels. Coffee offers an antioxidant boost, while the dark chocolate topping adds richness and a dose of flavonoids.

Ingredients

For the base, you’ll need hazelnuts, rice malt syrup (or honey/maple syrup), and cacao powder. The filling combines soaked cashews, your choice of sweetener, coconut oil, and espresso coffee. For the topping, use melted dark chocolate or make a raw chocolate alternative if you prefer.

How to make Raw Coffee Slice

To make the base, grind hazelnuts until they form a meal, then mix with sweetener and cacao until combined. Press into a lined tin and freeze. For the filling, drain and blend cashews, adding sweetener, coconut oil, and coffee, blending until smooth. Spread over the base and freeze until set. Top with melted chocolate or raw chocolate and chill until firm.

Serving suggestions and how to store

Cut into squares once set and store in an airtight container in the fridge for up to a week or in the freezer for longer storage. These are delicious straight from the freezer for a treat!

Vary this Raw Coffee Slice to suit your needs

For a vegan option, use rice malt or maple syrup and raw chocolate. If you’re not a coffee fan, replace it with extra cacao and water for a double chocolate flavour. For a coconut-free version, swap coconut oil with cacao butter.

Take a look at the variations (below the main recipe) for suggestions to alter the recipe to suit many specific dietary requirements.


For more delicious, easy to make healthy sweet recipes, click HERE.

Raw coffee chocolate slice - This Raw Coffee Slice is an easy to make vegan cheesecake slice that will impress coffee lovers. It's dairy- & gluten-free, a delicious after dinner treat
Print Recipe
4.75 from 4 votes

Raw Coffee Slice

I think Chocolate and Coffee are a match made in heaven. This nourishing Raw Coffee Slice is a guilt-free slice of heaven. Gluten, dairy, refined sugar and grain-free. 
Prep Time20 minutes mins
Total Time1 hour hr
Course: Dessert
Servings: 12 squares

Ingredients

Base

  • 200 g hazelnuts
  • 85 g rice malt syrup, honey or maple syrup (¼ cup)
  • 1 tbsp cacao powder (unsweetened Dutch process or raw)

Filling

  • 350 g raw cashew nuts (soaked for minimum 2-3 hours)
  • 85 g rice malt syrup, honey or maple syrup (¼ cup)
  • 70 g coconut oil (⅓ cup)
  • 50-70 ml espresso coffee -cooled (approx. 2 shots)

Chocolate topping (2 choices)

Melted Chocolate

  • 150 g dark chocolate -melted

OR Raw Chocolate

Instructions

Base

  • Grind the hazelnuts in a food processor or powerful blender until a meal forms. If using a Thermomix, 5 seconds, speed 7.
  • Add the sweetener and cacao and mix until well combined. If using a Thermomix, 10 seconds, speed 4.
  • Press into a lined 20 x 30cm slice tin and put in the freezer whilst you make the filling.

Filling

  • Drain the liquid from your cashews and rinse well.
  • Process to form a paste. If using a Thermomix, seconds, speed 7.
  • Add the rest of the ingredients and process until smooth and creamy. If using a Thermomix, 1 minute, speed 7. You may need to scrape the sides a few times.
  • Spread the filling over the base and put back in the freezer to set (about 20 minutes).

Chocolate topping

  • Either melt the dark chocolate in a bowl over a pot of hot water or make the raw chocolate by combining all the ingredients together.
  • Once the filling is set, pour over the melted chocolate and set in the freezer (approx. 5 minutes).
  • Cut it into squares and store in the freezer until ready to serve.

Store

  • Store in an airtight container in the fridge or freezer.

Notes

Don't like coffee?

Replace it with a heaped tablespoon of cacao and 70ml water for a double chocolate slice.

Vegan and dairy-free

Choose raw chocolate on top. For vegan choose rice malt or maple syrup as your sweetener.

Fructose friendly

Choose rice malt syrup as your sweetener.

Coconut-free

Replace the coconut oil with cacao butter.


I love receiving your feedback, post a comment below. 

Indian Spiced Mince and Peas

October 26, 2016 | Budget Friendly, 30 Minute Meals, Make-ahead Meals, Red Meat, Freezable Meals, Vegetarian

I love Indian cuisine, especially this Indian Spiced Mince and Peas recipe – I’d go so far to say it is my favourite kind of food. So I was especially thrilled to see a curry on Jamie Oliver’s list of ’10 recipes to save your life’. In case you hadn’t heard, as part of Jamie Oliver’s Food Revolution, I was one of 10 people selected world-wide to put my spin on 10 of Jamie’s favourite staple recipes.

I’ve shared quite a few of my favourite Indian style curries already here on the website (Quick and Easy Dhal, Simple Vegetable Curry and my very popular Chicken and Almond curry) so I thought for this part of the challenge I’d share this really quick, budget friendly family favourite – my Indian Spiced Mince and Peas.

This Indian Spiced Mince and Peas dish is a quick, delicious meal that combines aromatic spices with juicy tomatoes, tender beef mince and sweet peas. It’s perfect for busy weeknights and can easily be served with rice, quinoa, or a low-carb alternative like cauliflower rice.

Health benefits

Beef mince provides a great source of high-quality protein and essential vitamins like B12, which is crucial for energy production and brain function. The spices (turmeric powder, ginger, coriander powder, garam masala) in this dish add anti-inflammatory benefits, while the coriander (cilantro) and peas boost its fibre and vitamin content.

Ingredients

This recipe calls for simple ingredients like beef mince (ground beef), garlic cloves, fresh ginger, onions, tomatoes, and fresh or frozen peas. A variety of spices such as cumin powder, garam masala, and coriander powder add rich, Indian-inspired flavours to the dish. The recipe also provides flexibility with add-ins like vegetables or different grains.

How to make Indian Spiced Mince and Peas

Start by sautéing onions in your choice of fat, then add garlic, ginger, and spices to bloom the flavours. Stir in the beef mince and tomatoes, cooking until the mince is browned. Add peas in the final minute to keep them fresh and vibrant, then garnish with fresh coriander before serving.

Serving suggestions and how to store

Serve with rice, quinoa, or cauliflower rice. It’s also delicious paired with a fresh leafy salad or steamed vegetables, and a dollop of natural yoghurt. A side of nann bread never goes astray too. Store leftovers in an airtight container in the fridge for up to 3 days, or freeze for longer storage.

Vary Indian Spiced Mince and Peas to suit your dietary needs

To make it vegetarian, replace the beef mince with canned brown lentils. For an onion and garlic-free version, use extra ginger to enhance the flavour. You can also add more vegetables to boost the nutritional value.

Take a look at the variations (below the main recipe) for suggestions to alter the recipe to suit any specific dietary requirements.

Print Recipe
4.92 from 12 votes

Indian Spiced Mince with Peas

Dinner won't get any more budget friendly, easier or tastier then my Indian Spiced Mince with Peas. This is one meal sure to go on regular rotation. Gluten, grain and dairy-free.  
Prep Time5 minutes mins
Cook Time10 minutes mins
Total Time15 minutes mins
Course: Main Course
Cuisine: Indian
Servings: 4

Ingredients

  • 30 g butter, ghee or coconut oil (2 tbsp)
  • 1 onion/s (large) chopped
  • 2 clove/s garlic - chopped
  • 1 tbsp ginger root - peeled and finely grated
  • 2 tsp ground coriander
  • ½ tsp ground turmeric
  • 1 tsp ground cumin
  • 1 tsp garam masala
  • 1 tsp sweet paprika
  • 1 tsp sea salt - or to taste
  • chilli flakes - to taste (optional)
  • 500 g beef mince
  • 4-5 roma tomatoe/s - roughly chopped
  • 150 g peas (1 cup) fresh or frozen
  • ¼ bunch/s fresh coriander leaves - to serve

Serve

  • Rice, quinoa or cauliflower rice (to serve)

Instructions

  • In a large frypan or wok, heat the butter, ghee or coconut oil and sauté the onion over a medium heat for a few minutes to soften.
  • Add the garlic, ginger and spices and fry, stirring well for about a minute.
  • Now add the mince and tomatoes and stir-fry until the mince is cooked.
  • Add the peas and cook for a minute or two. Stir through the coriander and serve immediately.
  • Taste and adjust the seasoning if necessary.

Tip

  • Other vegetables can be added to the mix when stir frying. Cut them small so they cook quickly with the mince.

Serve

  • With rice or cauliflower rice (pictured here).
  • I also serve with a leafy salad or steamed vegetables.
  • It's lovely with a dollop of natural yoghurt too.

Make-ahead

  • Re-heat in a pot or wok over a low heat until just hot.

Store

  • Leftovers are great for school lunches (in the thermos) or even wrapped in a fresh spring roll.
  • Store in an airtight container in the fridge.
  • Can also be frozen.

Notes

Different or more vegetables

Go ahead - it's a great base to add to. 

Onion and Garlic-free

Replace the onions and garlic with and extra 2cm's of ginger.

Vegetarian

Replace the mince with two cans of brown lentils (drained and rinsed). Serve with rice or quinoa to ensure you have a complete protein.
 

I'd love for you to share how you like this delicious, super simple recipe. Post a comment below or rate this recipe.

Creamy Mexican Chicken

October 19, 2016 | Make-ahead Meals, Chicken, Freezable Meals

This Creamy Mexican Chicken recipe combines tender chicken with rich flavours from chipotle, tomatoes, and almonds. The dish is finished with a zesty guacamole and fresh coriander, making it perfect for a hearty family meal that’s loaded with flavour and nourishment whilst being easy to prepare.

I love to cook – it’s almost a kind of creative release when I step into the kitchen. I rarely plan too far beyond a core ingredient (generally protein) and never really know what’s going to happen until I check out what veggies and flavour boosters are in the fridge.

This is basically how I bring recipes together to share with you. I put together a combination of flavours in a first run and if I think it is up to a ‘Well Nourished’ standard, I scribble it on a piece of paper and come back to it another day for a formal trial run (and hope I can find that piece of paper – I really need a better system).

My aim with every recipe is obviously to make it as delicious and nourishing as possible (and also simple to make). In my household, it doesn’t matter how ‘healthy’ a meal is, if it doesn’t taste good, then no ones happy (kids because they don’t like it, hubby and I because they are complaining, food’s going to waste and we don’t want it for the lunch the next day because we aren’t really enjoying it also)!!

But I digress – back to this recipe for Creamy Mexican Chicken which simply ticks all the boxes. Delicious, nutritious, tasty as anything and SO quick and easy to make. There are no complaints when this is on the menu!

Health benefits

This gluten-free dish offers protein from chicken and black beans, which also add fibre for a filling and balanced meal. Almonds provide healthy fats and vitamin E, while chipotle adds a smoky spice rich in antioxidants. With the avocado in guacamole, you’ll also get a boost of healthy monounsaturated fats.

Ingredients

To make this creamy Mexican chicken, you’ll need boneless chicken thighs, garlic, canned tomatoes, chipotle in adobo sauce, raw almonds, celery, chicken broth or stock, black beans, fresh coriander (fresh cilantro), avocados, lime juice, and seasoning. These ingredients come together to create a smoky, creamy, and satisfying meal.

How to make creamy Mexican chicken

In a blender, combine the garlic, tomatoes, chipotle, almonds, celery, stock, and salt to create a smooth sauce. Pour the sauce over the chicken and black beans in a large pot, then simmer on low heat for about 30 minutes. For guacamole, mash the avocado with lime juice and season to taste. When the chicken is tender, stir in the fresh coriander, and serve with guacamole on the side.

Serving suggestions and how to store

Serve this dish with a slaw, rice, or as a filling for tacos, corn tortillas or flour tortillas. Leftovers can be stored in an airtight container in the refrigerator and it freezes well too. Reheat gently over low heat to preserve the creaminess of the sauce.

Vary this creamy Mexican chicken to suit your needs

For a vegan version, substitute the chicken with tempeh and use vegetable stock. Make it nut-free by swapping almonds for sunflower seeds. If you’re cooking gluten-free, check that your chipotle is certified gluten-free. For a slow-cooked option, bake in a cast iron pan at 150°C for 90 minutes for a melt-in-your-mouth result. This can certainly cooked in a slow cooker. However, as the speed and temperature varies between the many brands of slow cookers, base the amount of liquid you add and the cook time on a similar style of recipe in the guide book for your specific slow cooker. The general rule of thumb is to halve the liquid and double the cook time, but understanding your own slow cooker is the best guide.

Take a look at the variations (below the main recipe) for suggestions to alter the recipe to suit many specific dietary requirements (including vegan).


For more delicious, easy to make healthy meal recipes, click HERE.

Creamy Mexican Chicken - This Creamy Mexican Chicken is super quick and easy to make and a delicious, healthy meal. It is dairy-free, gluten-free and family friendly.
Print Recipe
4.95 from 20 votes

Creamy Mexican Chicken

Seriously simple to make, but SO delicious to eat. This Creamy Mexican Chicken is just divine and gluten, grain and dairy-free.
Prep Time10 minutes mins
Cook Time30 minutes mins
Total Time40 minutes mins
Course: Main Course
Cuisine: Mexican
Servings: 4

Ingredients

  • 500 g boneless and skinless chicken thighs -roughly diced (or drumsticks)
  • 2 clove/s garlic -finely chopped
  • 400 g diced tinned tomatoes
  • 1-2 chipotle in adobe sauce *see note below
  • 70 g raw almonds (½ cup)
  • 3 stick/s celery -roughly chopped
  • 120 ml chicken broth or stock (½ cup)
  • 1 tsp sea salt - or to taste
  • 400 g can black beans -drained and rinsed (or 1 cup cooked black beans)
  • 1 bunch/s fresh coriander leaves -finely chopped

Quick guacamole

  • 2 avocado/s -peeled and flesh removed
  • 1 lime/s (small) - juice
  • Sea salt and freshly ground black pepper -to taste

Instructions

  • * Note - Chipotle in Adobe sauce are available in most big supermarkets or gourmet delis. They are the flavour hero of this dish and give it a little heat and a beautiful smokey flavour (obviously the more you add the spicier it becomes - 1 chili pepper is still mild, 2 chili peppers add a tiny amount of heat). Once you've opened the can, store leftovers in an airtight glass jar in the fridge. They last forever this way and trust me, you will make this meal again! If you happen to have the paste (so no visible chili peppers), then 1tsp is about the same as 1 chipotle chilli.
  • If you don't have chipotle you can sub with a heaped teaspoon of cumin and smokey paprika. This option will have no heat at all. If you only use just one chipotle, perhaps add ½ teaspoon of cumin and smokey paprika too.
  • Place the garlic, tomatoes, chipotle, almonds, celery, stock and sea salt in a food processor or high speed blender and process until smooth. If using a Thermomix, 1 minute, speed 7.
  • Put your chicken thighs into a large pot with the black beans and sauce, cover and simmer over a low to moderate heat for approx. 30 minutes. If using a Thermomix, add the chicken and black beans to the sauce and cook 30 minutes, temp 90, reverse lowest speed.
  • To make the guacamole, mash the avocado and mix with the lime juice and seasoning.
  • Once the chicken is cooked, mix through the coriander and serve with the guacamole (and any of the suggestions below).

Serve

  • with a slaw or simple salad (here I've served it with shredded cabbage, mint, shallots and grated carrot tossed in the juice of one lime) 
  • with rice or quinoa (a good choice for corn-free)
  • as a sauce for nachos in tacos or tortilla wraps if your not dairy-free, my family love a dollop of sour cream too 

Make-ahead

  • Re-heat in a pot over a low heat until just hot.

Store

  • Store in an airtight container in the fridge.
  • Can also be frozen.

Grab Bag Formula Method

  • If you've done the **Grab Bag Formula Short Course, this is the method to convert this recipe...
  • Place the garlic, tomatoes, chipotle, almonds, celery, stock and sea salt in a food processor or high speed blender and process until smooth.
  • Into your Grab Bag, place the chicken thighs, sauce and black beans. Carefully seal your Grab Bag. I close most of the seal then press out as much air as I can then complete the seal. Place the Grab Bag in the freezer.
  • To cook, remove the Grab Bag from the freezer, place on a baking tray and thaw in the fridge overnight.
  • Tip the contents of the Grab Bag into a large oven proof dish (with a tight fitting lid) or Dutch oven. It may still be a bit frozen; that’s okay. Place the lid on the pot, set your oven to 150°C/300°F (fan-forced) and cook for 2 hours.
  • ** The Grab Bag Formula Short Course is available to purchase for just AU$46 HERE.
    OR
    If you are a full-access Well Nourished Family member, the course is included in your membership and you can access in the members portal - HERE.

Notes

Vegan

Replace the chicken with slices of tempeh and the broth with vegetable stock. 

Nut-free

Replace the almonds with toasted sunflower seeds.

Slow cooked

I have also slow cooked this in a cast iron pan in the oven 150℃ for 90 minutes.

Garlic-free

Replace the garlic with a tsp of cumin powder.

Legume-free

Simply omit the beans.

Gluten-free

Just make sure the Chipotles are gluten-free (generally they are but please check if you are coeliac).
 

Hope you enjoy it and I'd love to hear how you enjoy it? Post a comment below.

Spiced Breakfast Muffin

October 5, 2016 | Breakfast, After School Snacks, Baked Sweets

I know you are just going to love this Spiced Breakfast Muffin recipe. It’s protein rich, gluten-free, grain-free and dairy-free, but super light and fluffy in texture. Its also really easy to whip up and the muffins freeze really well too. My kids often have these on their way to early morning swim squads or for afternoon tea – perfect high energy food! They are only slightly sweet, so if you’d like to add more sweetener for a sweet muffin, do so.

The best breakfast

In my many years consulting as a naturopath and assessing patients diets, the one meal where many people struggled (nutritionally), was breakfast. I found that so many people were searching for more energy, productivity and better general health; spending large sums of money on supplements and searching for the ‘magic bullet,’ but also neglecting the one meal that could improve both their short and long-term health.

Those patients that took my advice and changed their ways reported at follow up consults that since eating a nourishing breakfast, they snacked less and found it easier to make healthier food choices right throughout the day. They had better concentration, a happier mood and more energy to exercise. They also had the motivation to prepare a healthy dinner in the evening.

In my professional opinion, if you want to improve your overall health and wellbeing, start the day right with a nourishing breakfast. That’s the reason why my very first book ‘Rise and Shine’ was focussed on starting the day by fuelling your body with a wholesome brekkie.

Health benefits

There’s so much nutrition in these very low sugar, gluten free breakfast muffins. Sweet potatoes are a fantastic source of fibre and vitamins, while apples add natural sweetness and antioxidants. The nut butter provides healthy fats and protein (along with the eggs and buckwheat flour), making these muffins a satisfying and nutrient-dense breakfast option. The warming spices, such as cinnamon and mixed spice, help regulate blood sugar and enhance flavour.

Ingredients

This recipe combines nutrient-rich sweet potatoes and apples with creamy nut butter to create a dense and deliciously light muffin base. I recipe tested this with almond butter, cashew butter and also ABC (almond, brazil, cashew). The addition of buckwheat flour and bicarbonate of soda (baking soda) helps the muffins rise, while a choice of natural sweeteners like honey or rice malt syrup gives a gentle sweetness.

Instructions to make these gluten-free spiced breakfast muffins

Begin by steaming the diced sweet potato and apple until soft. Puree them in a blender or food processor, then combine with nut butter, spices, eggs, and sweetener. Add the dry ingredients – buckwheat flour and bicarbonate of soda, blending until everything is incorporated. Pour the muffin batter into lined muffin tin and bake until a skewer comes out clean.

Serving suggestions and how to store

These muffins are delicious served warm with a pat of butter or alongside your favourite smoothie. Store them in an airtight container in the fridge for a few days, or freeze for longer storage.

Vary this spiced breakfast muffin to suit your needs

For a nut-free option, substitute the nut butter with sunflower seed butter or hulled tahini. You can also experiment with different gluten-free flours, such as almond meal (almond flour), depending on your preference. If you prefer sweeter muffins, drizzle with honey or maple syrup after baking.

Take a look at the variations (below the main recipe) for suggestions to alter the recipe to suit many specific dietary requirements.


For more delicious, make ahead, healthy breakfast recipes, click HERE.

This Spiced Breakfast Muffin is a light & fluffy gluten-free way to start the day or treat. They are easy to make & dairy-free too.
Print Recipe
4.88 from 24 votes

Spiced Breakfast Muffin

These Spiced Breakfast Muffins are a nourishing, gluten-free way to start your day. Made with sweet potato, apple, and a blend of spices, they offer a balance of natural sweetness and warmth from cinnamon and mixed spice. Plus, they pack in plenty of protein and healthy fats thanks to the nut butter base.
Prep Time10 minutes mins
Cook Time20 minutes mins
Total Time30 minutes mins
Course: Breakfast, Snack
Servings: 12 muffins

Ingredients

  • 200 g sweet potato/s -peeled and diced 1-2cm
  • 1 green apple -peeled and diced (large)
  • 250 g nut butter (1 cup) *see note below
  • 1 tsp ground cinnamon
  • 2 tsp mixed spice
  • Pinch sea salt
  • 3 egg/s
  • 85 g rice malt syrup, honey or maple syrup (¼ cup)
  • 30 g buckwheat flour (¼ cup)
  • 2 tsp bicarbonate of soda

Instructions

  • Preheat the oven to 180℃/350℉ (fan-forced). Line your muffin tray with safe, non-stick large muffin cases.
  • Start with steaming the sweet potato and apple until cooked (mine took about 5 minutes).
  • Once they are cooked, allow to cool for a few minutes and puree in a food processor or high speed blender. If using a Thermomix, blend 10 seconds, speed 5.
  • Add the rest of the ingredients and blend until just combined. If using a Thermomix mix 20 seconds, speed 5.
  • Pour the batter into the muffin cases and bake for 15-20 minutes or until cooked (skewer inserted is clean).

Serve

  • warm with butter
  • with a smoothie (our favourites are Coco-beet Berry Smoothie, Tropical Green Smoothie, or a Chocolate Breakfast Smoothie.

Store

  • Store in an airtight container in the fridge or freezer.

Notes

Nut-free

You can sub the nut butter with hulled tahini and/ or sunflower seed butter (Sunbutter). I’ve also had feedback that using regular butter half half with the sun butter works well too (though haven’t tested it myself).

Another flour

You can certainly use another flour if you wish – any flour (except coconut) or even almond meal can be subbed 1:1.

Timesaving tip

Steam your apple/ sweet potato at dinner time and simply blend and bake in the morning - delicious hot muffins for brekkie. 

No sweet enough

These are not super sweet, especially if you make them with rice malt syrup. If you bake them and would like them to be sweeter, then serve with honey or maple. 


I just adore this recipe, it will definitely become a staple in my household. I’d love to hear what you think, post a comment below and let me know what you think.

Thai Vegetable Stir Fry

September 28, 2016 | Make-ahead Meals, Freezable Meals, Vegetarian

This Thai vegetable stir fry is a fresh, vibrant dish packed with colourful veggies and a rich, creamy sauce made from coconut milk and cashews. With loads of flavour from ginger, garlic, and a hint of lime, this stir fry is delicious and can be served over rice, noodles, or even quinoa.

This super tasty Thai Vegetable Stir Fry is my next twist on Jamie Oliver’s “10 recipes to save your life.” It’s a delicious, easy to make meal that proves vegetables need not be boring or tasteless!

As part of Jamie Oliver’s Food Revolution, I was one of 10 people selected world-wide to put my spin on 10 of Jamie’s favourite staple recipes. This is #8, my twist on Jamie’s ‘Veggie Noodle Stir Fry’

Health benefits

The massive variety of seasonal vegetables is enough to make this Stir Fry a very healthy meal loaded with fibre, vitamins, minerals and antioxidants. The cashew nuts add good fats and protein. The lime juice, zest and also the ginger and garlic support immune function. The tofu is a great protein source for vegetarians.

Coriander (also called cilantro) is a classic example of food as medicine.  It is extremely anti-inflammatory, anti-bacterial and also an amazing detoxifier and heavy metal chelator. Medicinally, it is used frequently for arthritis, inflammatory digestive disorders and to bind and excrete heavy metals in the blood. Needless to say, it is a very beneficial addition to any diet.

Ingredients

For this gluten-free recipe, you’ll need fresh ginger, garlic cloves, coriander, (cilantro), lime, fish sauce, canned coconut milk, toasted cashews, mushrooms, carrots, broccoli, cauliflower, snow peas, red capsicum, and firm organic tofu (optional). A garnish of coriander leaves and sliced spring onions finishes it off beautifully.

How to make creamy Thai stir-fried vegetables

To make the stir fry sauce, process the ginger, garlic, chilli, coriander, lime zest and juice, fish sauce, coconut milk, and half the cashews in a blender until smooth. Warm the sauce on low heat, then set aside. In a wok, stir-fry the vegetables over a medium high heat starting with shiitake mushrooms, followed by carrots, broccoli, cauliflower, snow peas (or sugar snap peas), and capsicum (bell peppers). Mix with the warmed sauce, then serve as is or over rice or noodles, garnished with the remaining cashews, coriander and spring onion (green onions).

If you own a Thermomix, we’ve also included Thermomix instructions for this recipe.

Serving suggestions and how to store

Serve this stir fry over rice, noodles, or zoodles and top with fresh coriander and cashews. Leftovers can be stored in the fridge or freezer in an airtight container for easy meal prep. Just reheat on low heat until warmed through.

Vary this Thai vegetable stir fry to suit your needs

For a soy-free version, replace tofu with chicken, or simply omit it. To make it nut-free, swap the cashews for sunflower seeds. Vegetarians or vegans can replace fish sauce with sea salt. You can also skip the garlic and add extra ginger for a garlic-free version. You could also swap the coriander for thai basil if you’re not a fan.

Take a look at the variations (below the main recipe) for suggestions to alter the recipe to suit many specific dietary requirements.


For more delicious, easy to make vegetarian meals, click HERE.

Thai veggie stir-fry - This Thai Vegetable Stir Fry is an easy to make, super tasty vegetarian (vegan) meal that the whole family will love. Recipe includes Thermomix method.
Print Recipe
4.94 from 16 votes

Thai Vegetable Stir-fry

A quick to make, super tasty stir-fry sauce. It has such a beautiful flavour that will make your veggies shine. Gluten, grain and dairy-free. 
Prep Time15 minutes mins
Cook Time15 minutes mins
Total Time30 minutes mins
Course: Main Course
Servings: 4

Ingredients

  • 1 tbsp ginger root -peeled (approx. 5 cm)
  • 2 clove/s garlic
  • 1 red chilli/s (optional)
  • ½ bunch/s fresh coriander leaves -and stems
  • 1 lime/s -juice and zest
  • 1 tbsp fish sauce
  • 250 ml canned coconut milk (1 cup)
  • 150 g raw cashew nuts (1 cup) toasted
  • 75 g mushrooms (I used shiitake), sliced (1 cup approx.)
  • 2 carrot/s -sliced
  • 1 broccoli -broken into florets
  • ½ cauliflower -broken into florets
  • 10 snow peas (or green beans)
  • 1 red capsicum/s -sliced
  • 180 g firm organic tofu -cubed (optional)
  • ½ bunch/s fresh coriander leaves -to garnish
  • 2 spring onion/s -sliced, to garnish

Instructions

  • In a food processor or powerful blender, process the ginger, garlic, chilli and coriander (leaves and stems) to a fine paste. If using a Thermomix 10 seconds, speed 7.
  • Add the lime zest, juice, fish sauce, coconut milk and half the cashew nuts. Process until it forms a smooth sauce and put half the sauce in a small pot over a low heat to warm (don't let it boil). Taste and adjust the balance of flavours (it should be pretty good, but best to check). If using a Thermomix 20 seconds, speed 8. Then heat 5 minutes, temp 90, speed 2.
  • Now prepare and cook your vegetables.
  • Heat a little oil (I use coconut or macadamia nut oil) in a wok or large frypan over a high heat. Add the mushrooms and cook for one minute stirring constantly. Add the carrot, broccoli and cauliflower and stir for a minute then add the snow peas, capsicum and tofu.
  • Cook, stirring for another minute or so then take off the heat.
  • In a big mixing bowl combine the warmed sauce and vegetables (so the vegetables are covered in sauce).

Serve

  • Serve as is or over noodles, zoodles, rice or quinoa and garnish with the remaining cashew nuts.

Make-ahead

  • Re-heat in a pot over a low heat until just hot.

Store

  • The leftover sauce (or finished dish) are perfect to refrigerate or freeze in a jar or airtight container for your next, fast stir fry. You can of course use all of the sauce if you like your stir-fry saucy!

Notes

Soy-free

Feel free to replace the tofu with cooked chicken  (I often use left over roast chook). Replace the tamari with coconut aminos and sea salt.

Nut-free

Replace the cashews with the same amount of sunflower seeds.

Vegetarian and vegan (and seafood-free)

Replace the fish sauce with a teaspoon of sea salt. 

Legume-free

Replace the tofu with chicken or simply omit it.

Garlic-free

Replace the garlic with an extra 2cm piece of ginger. 

Safe, non-stick Wok (minus toxic teflon)

I own the Solidteknics 30cm Dual Handle wok - my most used and favourite piece of cookware. I also use it for cooking pasta dishes, it's the perfect size and shape. Click HERE to shop for their great range of non stick cookware (that lasts a life time - legit!).


I'd love your feedback on this delicious staple. Post a comment or rate this recipe.

Healthy Nut Butter Brownie

September 20, 2016 | After School Snacks, Baked Sweets

This healthy nut butter brownie is a delicious way to satisfy your chocolate cravings with a nutritious twist! Made with a base of almond or cashew butter, a touch of tahini, and sweetened naturally, these brownies are rich, fudgy, and perfect as a wholesome treat.

It’s a super simple and a delicious school holiday sweet treat that the kids can easily make themselves. After the first batch my 12 yr old declared a pinch of sea salt would make them better. So the next lot we added the sea salt and I agree, they were even more delicious (so my little protégé is tracking well – ha ha)!

Health benefits

These gluten-free, grain-free brownies are packed with healthy fats from nut butter, which can help keep you satisfied without a sugar spike. With dark chocolate and optional cacao powder for an antioxidant boost, they’re a more nourishing way to indulge in a chocolatey treat. Plus, the egg adds a small dose of protein, helping balance these brownies out for a more filling snack.

Ingredients

For this recipe, you’ll need these wholesome ingredients – your favourite nut butter (such as almond or cashew), hulled tahini, an egg, a liquid sweetener like rice malt syrup, honey, or pure maple syrup, a touch of bicarbonate of soda, sea salt, and dark chocolate chips or chunks. If you need a dairy-free option, choose a dairy-free chocolate or cacao nibs.

How to make healthy nut butter brownie

Preheat your oven to 180°C (fan-forced) and line a loaf tin with baking paper. Blend all ingredients except the chocolate (pieces or chips) in a food processor until well combined, or mix by hand in a medium bowl if your nut butter is soft enough. Taste the batter and adjust sweetness if desired. Fold in the chocolate chips, pour into your baking dish lined with parchment paper, and bake for 15–17 minutes or until golden on top. Let cool slightly before slicing into 8–10 squares.

Serving suggestions and how to store

Enjoy these nut butter brownies on their own or paired with a dollop of yogurt or a side of fresh berries. Or for dessert you could serve with ice-cream or cream. Store in an airtight container at room temperature for up to 2 days, or freeze for up to a month for a convenient snack option.

Vary this healthy nut butter brownie to suit your needs

For a double-chocolate version, add 30g of raw cacao or unsweetened cocoa powder to the batter. Make it dairy-free by choosing a dairy-free chocolate. If you prefer a sesame-free option, simply replace tahini with more nut butter. For a fructose-friendly treat, stick with rice malt syrup as your sweetener. While peanut butter can be used, almond or cashew butter generally yields the best texture. Sorry, this is not suitable for vegan. For more brownie recipes, click HERE. 

Take a look at the variations (below the main recipe) for suggestions to alter the recipe to suit many specific dietary requirements.


For more easy to make, delicious, healthy sweet recipes, click HERE.

Nut butter brownie - This Healthy Nut Butter Brownie is gluten, grain and dairy-free, super easy to make and really delicious. The recipe includes the Thermomix method.
Print Recipe
5 from 5 votes

Healthy Nut Butter Brownie

Seriously simple, this nourishing Nut Butter Brownie is so delicious and as easy as can be to make. 
Prep Time10 minutes mins
Cook Time20 minutes mins
Total Time30 minutes mins
Course: Snack
Servings: 10

Ingredients

  • 260 g nut butter (1 cup) eg; almond, cashew, ABC, hazelnut (not peanut)
  • 1 tbsp hulled tahini 
  • 1 egg/s
  • 85 g rice malt syrup, honey or maple syrup (¼ cup)
  • ½ tsp bicarbonate of soda
  • Pinch sea salt
  • 50 g dark chocolate -buttons (or chopped up squares, I've used Green and Blacks dark chocolate chopped up). For dairy-free use a dairy-free chocolate or cacao nibs.

Instructions

  • Pre-heat oven to 180°C/ 350°F (fan forced). Line a large loaf tin (I used 24 x 13cm) with baking paper.
  • Add all the ingredients except the chocolate into a food processor and blend until combined. If using a Thermomix, blend 10 seconds, speed 5.
  • If your nut butter is soft enough, you can also mix this by hand with a bit of muscle.
  • I recommend tasting the batter to check it will be sweet enough for your tribe. You can add more if you think you need to, or add more chocolate chunks.
  • Fold in the chocolate. If using a Thermomix reverse, 5 seconds, speed 4.
  • Press into the base of the tin and bake for 15-17 minutes until they have risen and are golden brown on top.
  • Allow to cool a little and slice into 8-10 squares.

Store

  • In an airtight container for 2 days or freeze for up to a month.

Notes

Double-choc

Add 30g of raw cacao or Dutch process cocoa to the batter.

Dairy-free

Choose a dairy-free chocolate. 

Sesame-free

Replace the tahini with nut butter.

Fructose friendly

Choose rice malt syrup as your sweetener. 

Peanut butter

I think the other nut butters listed produce the best texture.
 
If you're after a nut-free sweet treat, my beautiful ebook "The Well Nourished Lunchbox" contains over 50 nut free recipes - you can find out more about it HERE.
 

I'd love to hear how you like this simple, yet delicious treat. Post a comment or rate this recipe. 

Mexican Minestrone

September 7, 2016 | Budget Friendly, Make-ahead Meals, Freezable Meals, Vegetarian, Soups

https://www.jamieoliver.com/Loaded with vegetables and plant powered fibre, my next twist on Jamie Oliver’s “10 recipes to save your life” is a Mexican Minestrone. It may be a soup, but trust me this is no starter!

As part of Jamie Oliver’s Food Revolution, I was one of 10 people selected world-wide to put my spin on 10 of Jamie’s favourite staple recipes. This is #7, my twist on Jamie’s ‘Minestrone’

This Mexican minestrone is a hearty, veggie-packed soup that brings a fresh twist to classic minestrone with smoky spices and a hint of spice. Loaded with beans, veggies, and a quick homemade guacamole topping, it’s a wholesome dish that’ll warm you up and keep you full. Perfect for an easy family dinner or a quick, healthy lunch.

Health benefits

The massive variety of seasonal vegetables combined with black beans is enough to make this Mexican Minestrone a very healthy, fibre, vitamin and mineral loaded meal. The protein and fibre from the beans help keep you full and energised. The addition of fresh guacamole brings healthy fats, making this a balanced and satisfying meal. If you use a homemade bone broth for the stock, then you are going to derive even more nutrition from this minestrone. For more about the healing powers of bone broth, see here.

Ingredients

For this recipe, you’ll need diced onions, sliced celery, smoked paprika, ground cumin, a few drops of Tabasco (optional), sea salt, black pepper, garlic, diced carrots, your choice of stock (chicken, beef, or vegetable), tinned diced tomatoes, diced zucchini, diced red capsicum, black beans (drained and rinsed), seasonal greens like spinach or kale, and fresh coriander (cilantro) for serving. The quick guacamole topping is made with a large avocado, natural full-fat yogurt, a squeeze of lime juice, and salt and pepper to taste.

How to make this Mexican minestrone soup

In a large pot, add a splash of olive oil and sauté the onion and celery over medium heat until they start to soften. Stir in the paprika, cumin, and sea salt, letting the spices cook until fragrant. Add the Tabasco (if using), garlic, and carrots, cooking for another couple of minutes. Pour in the stock and tomatoes and bring to a simmer. Add the zucchini, capsicum, and black beans, letting everything simmer for 10 minutes until the veggies are tender. For the guacamole, simply mash the avocado and mix it with yogurt, lime juice, and seasoning. Stir in the greens at the end until just wilted.

Serving suggestions and how to store

Serve your Mexican minestrone hot, topped with a dollop of guacamole and fresh coriander leaves. Store leftovers in an airtight container in the fridge for up to 3 days or freeze for longer storage. To keep guacamole fresh, store it in an airtight container with a little extra lime juice on top to prevent browning.

Vary Mexican minestrone to suit your needs

For veggie-fussy kids, try puréeing part or all of the soup. Make it vegetarian or vegan by using vegetable stock and skipping the yogurt in the guacamole. For a legume-free option, omit the beans. If you’re avoiding garlic and onions, substitute with finely chopped fennel and add a little extra cumin and chili flakes.

Take a look at the variations (below the main recipe) for suggestions to alter the recipe to suit many specific dietary requirements.


For more delicious, easy to make healthy soups, click HERE.

Mexican Minestrone - This Mexican Minestrone recipe is my next recipe to feature on JamieOliver. com. It is a plant powered meal that the whole family will love.
Print Recipe
5 from 8 votes

Mexican Minestrone

This plant powered Mexican Minestrone is more a healthy, hearty meal than a starter. It's a delicious twist on the classic.
Prep Time20 minutes mins
Cook Time30 minutes mins
Total Time5 minutes mins
Course: Soup
Cuisine: Mexican
Servings: 4

Ingredients

  • 2 onion/s - diced
  • 2 stick/s celery - finely sliced
  • 1 tsp smoked paprika
  • 1 tsp ground cumin
  • 2 drop/s tabasco - to taste (optional)
  • Sea salt and freshly ground black pepper - to taste
  • 2 clove/s garlic - finely diced
  • 2 carrot/s (large) finely diced
  • 1 ltr stock or broth (chicken, beef or vegetable)
  • 800 g diced tinned tomatoes (2 cans)
  • 1 zucchini/s - diced
  • 1 red capsicum/s (red pepper), diced
  • 2 can black beans - drained and rinsed
  • 60 g greens (spinach, kale, silver beet, chard) - whatever's in-season (2 cups approx.)
  • ½ bunch/s fresh coriander leaves - to serve

Quick guacamole

  • 1 avocado/s (large)
  • 1 tbsp natural, Greek or coconut yoghurt
  • Sea salt and freshly ground black pepper - to taste
  • ½ lime/s (small) juice

Instructions

  • In a large pot, add a splash of olive oil and sweat the onion and celery over a medium heat, covered for 5 minutes or until starting to soften.
  • Add the paprika, cumin and sea salt and stir for a few minutes until you smell the spices.
  • Add the optional tabasco, garlic and carrots and cook for a couple of minutes.
  • Now add the stock and tomatoes and bring to a slow simmer.
  • Add the zucchini, capsicum and black beans and simmer for 10 minutes or until the vegetables are just cooked. Taste and adjust the seasoning and spiciness.
  • Make your guacamole by mashing your avocado and mixing through the yogurt, seasoning and lime juice.
  • Lastly add the greens and cook until they are just wilted (only a few minutes).

Serve

  • Serve immediately topped with a dollop of guacamole and fresh coriander leaves.

Make-ahead

  • Re-heat in a pot over a low heat until just hot.

Store

  • Store soup in an airtight container in the fridge or freezer.
  • Store guacomole in an airtight container (squueze over extra lime juice) in the fridge.

Grab Bag Formula Method

  • If you've done the **Grab Bag Formula Short Course, this is the method to convert this recipe...
  • Place all your prepared ingredients (except the greens, coriander and guacamole) into the Grab Bag.
  • Carefully seal your Grab Bag. I close most of the seal then press out as much air as I can then complete the seal. Place the Grab Bag in the freezer.
  • To cook, remove the Grab Bag from the freezer, place on a baking tray and thaw in the fridge overnight.
  • Tip the contents of the Grab Bag into a large oven proof dish (with a tight fitting lid) or Dutch oven. It may still be a bit frozen; that’s okay.
  • Place the lid on the pot, set your oven to 150°C/300°F (fan-forced) and cook for 2 hours.
  • Taste and adjust the seasoning and spiciness. Lastly add the greens and cook until they are just wilted (only a few minutes).
  • ** The Grab Bag Formula Short Course is available to purchase for just AU$46 HERE.
    OR
    If you are a full-access Well Nourished Family member, the course is included in your membership and you can access in the members portal - HERE.

Notes

Veggie fussy kids

You can always puree part or all of the soup - out of sight out of mind works for many kids.

Vegetarian and Vegan

Choose vegetable stock, omit the yoghurt from the guacamole.

Legume-free

Omit the beans.

Garlic and onion-free

Replace the onion with one small fennel bulb, finely chopped. Replace the garlic  with a tsp of cumin powder and a pinch of chilli flakes. 
 

I'd love to hear how you like this Mexican Minestrone? Post a comment below and let me know.

Zucchini Mint Feta Soup (in just ten minutes)

August 25, 2016 | Make-ahead Meals, Freezable Meals, Vegetarian, Soups

This zucchini mint feta soup is a comforting and nourishing dish that’s perfect for any season. Easy to make, it combines the mild taste of zucchini with the freshness of mint and the creaminess of feta, making it a delicious addition to your meal rotation.

One vegetable my kids really dislike is zucchini (or spew-kini as they like to call it). For those of you who have followed me for a while, you’ll know that my kids have a great appetite for whole foods and genuinely love a wide range of vegetables. One of the reasons this is the case is because no matter what, I have and always will, persist with offering them vegetables, even the ones previously proclaimed ‘gross’!

Spew-Kini or not, they eat zucchini most days because it sits well behind other flavours, undetected. But not one to hide every unliked vegetable (more about why hiding food is not the best approach here), I also regularly present it in its whole form and like with this soup, often they surprise me and love it. This Zucchini Salad is another surprise favourite (apparently raw is less like ‘spew’)

The best part about this soup is that it is incredibly quick and easy to make and the result is surprisingly very tasty (because lets face it, it’s not the most flavoursome veggie).

Health benefits

Packed with nutrients, this creamy soup offers a great way to boost your vegetable intake. Zucchini is low in calories and high in fibre, which supports digestive health. The feta cheese provides calcium and protein, essential for strong bones and muscle health. The mint and home-made bone broth, are a fabulous digestive tonic, perfect for keeping those important good bugs happy, happy. With just a few simple ingredients, this soup is a great choice for a healthy meal.

Ingredients

For this recipe, you’ll need onion, clove garlic, zucchini, and chicken stock or bone broth. Season with sea salt and freshly ground black pepper to taste, and add fresh mint leaves picked from the stems, along with crumbled feta cheese.

How to make this creamy zucchini soup

In a medium-sized pot, sauté your diced onion in a little olive oil, butter, or ghee for about 2 minutes until translucent. Add the crushed garlic and diced zucchini, followed by the broth and seasoning. Bring everything to a boil, then simmer for 7-10 minutes until the zucchini is tender. Allow the mixture to cool slightly, then stir in the fresh mint before pureeing it in a blender or with an immersion blender until smooth and creamy.

If you own a Thermomix, we’ve also included Thermomix instructions for this recipe.

Serving suggestions and how to store

Serve your zucchini, mint, and feta soup warm, topped with extra feta and additional seasoning, if desired. Leftovers can be stored in an airtight container in the fridge for up to 3 days or frozen for longer storage. Reheat over a medium heat until warmed through.

Vary zucchini mint feta soup to suit your dietary needs

To make this soup vegetarian, simply substitute the chicken stock with vegetable broth. For a dairy-free version, omit the feta or replace it with cashew cheese or coconut yogurt, and choose olive oil for cooking. If you’re looking for a vegan option, follow the same substitutions. If you want to skip onion and garlic, you can use finely diced fennel sautéed with a pinch of cumin and chilli flakes for a different twist.

Take a look at the variations (below the main recipe) for suggestions to alter the recipe to suit many specific dietary requirements.


For more delicious, quick and easy to make healthy soups, click HERE.

This zucchini mint feta soup couldn't be easier to make & is very tasty. It takes just 10 minutes to make this healthy soup too.
Print Recipe
4.84 from 12 votes

Zucchini Mint Feta Soup

This has to be the quickest soup ever. Nutrient rich and delicious, my Zucchini Mint Feta Soup is sure to become a favourite.
Prep Time5 minutes mins
Cook Time10 minutes mins
Total Time15 minutes mins
Course: Soup
Servings: 2

Ingredients

  • 1 onion/s - diced
  • 1 clove/s garlic - crushed or diced
  • 300 g zucchini/s - diced
  • 250 ml chicken broth or stock (1 cup)
  • Sea salt and freshly ground black pepper - to taste
  • ¼ bunch/s fresh mint leaves - picked from the stems
  • 90 g feta cheese - crumbled (½ cup)

Instructions

  • In a medium sized pot, sauté your onion in a little olive oil, butter or ghee for about 2 minutes.
  • Add your garlic, diced zucchini, broth and seasoning and bring to the boil. Cook at a rolling simmer for 7-10minutes or until the zucchini has softened.
  • Allow to cool a little, add the mint and then puree in a blender until smooth and creamy.
  • Serve with a dollop (or crumble) of feta and more seasoning (if needed).

Thermomix Method

  • Chop the onion and garlic, 5 seconds, speed 4.
  • Add the fat of your choice and sauté the onion for 2 minutes, temp 100, speed 1.
  • Add the zucchini and process 5 seconds, speed 5.
  • Add the broth and seasoning and cook for 8 minutes, 100, speed 2.
  • Allow to cool a little, add the mint and puree 30 seconds, speed 7-8.
  • Serve as above.

Make-ahead

  • Re-heat in a pot over a low heat until just hot.

Store

  • Store in an airtight container in the fridge or freezer.

Notes

Vegetarian

Use vegetable broth (stock) instead of the chicken stock.

Dairy-free

Omit the feta or replace with cashew cheese or coconut yoghurt. Choose olive oil to cook in.

Vegan

As per vegetarian and dairy-free above. 

Onion and garlic-free

Replace the onion and garlic with a small bulb of fennel, finely diced and sautéed with a pinch of cumin and chilli flakes. 
 

Let me know how you like this simple soup. Post a comment below. 

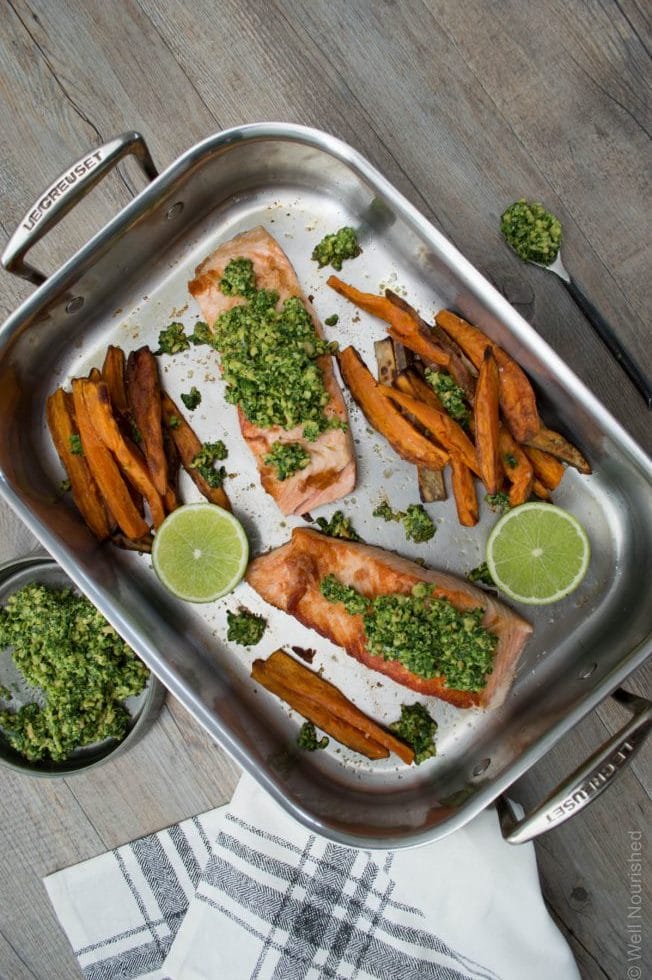
Crispy Salmon with Coriander Lime Pesto (and sweet potato chips)

August 17, 2016 | Fish & Seafood

I buy fresh fish from my Farmers Market every weekend and this Crispy Salmon with Coriander Lime Pesto is my families favourite way for me to cook it. My kids fish preference is always Salmon or Trout (they are less keen on white fish unless I make my fish cakes).

Paired with this zesty pesto and creamy sweet potatoes, this meal is simply sensational and it’s my next twist on Jamie Oliver’s ’10 recipes to save your life’. As part of Jamie Oliver’s Food Revolution, I was one of 10 people selected world-wide to put my spin on 10 of Jamie’s favourite staple recipes. This is #6, my twist on Jamie’s ‘Salmon with Pesto dressed veg’.

Health benefits

This dish is packed with nutrition and perfect for busy weeknights. The hero, salmon, is a rich source of protein and omega-3 fatty acids which are essential for good health.

Store-bought pestos often contain damaging vegetable oil which are always best avoided. This home made pesto is super simple to make. The amazing healing herb coriander (also called cilantro in some cultures) is a classic example of food as medicine.  It is extremely anti-inflammatory, anti-bacterial and also an amazing detoxifier and heavy metal chelator.  Medicinally, it is used frequently for arthritis, inflammatory digestive disorders and to bind and excrete heavy metals in the blood.  Needless to say, it is a very beneficial addition to any diet.

The cashew nuts add good fats and protein.  The lime juice, zest and also the garlic further support immune function.  So this pesto is just what the doctor ordered this winter.

Ingredients

This gluten-free dish features crispy-skinned salmon fillets, roasted sweet potato chips, and a fresh pesto made with coriander which is a nice change form basil pesto, lime, spinach, and toasted cashews. The pesto is flexible, with options to adjust for dietary needs.

How to make this baked pesto salmon recipe

Roast sweet potato chips in a baking pan (baking sheet) until golden and crisp. Then prepare the pesto sauce by blending coriander, spinach, lime, cashews, and Parmesan. Finally, pan-sear the fresh salmon fillets, cooking them skin-side down until crispy, and serve with a generous spoonful of pesto and sweet potato chips. If you own a Thermomix, we’ve also included Thermomix instructions for this recipe.

Serving suggestions and how to store

Serve with lime, steamed greens (or any other veggies) or a simple green salad for extra colour and nutrients. Leftover pesto can be stored in the in an airtight container in the refrigerator for up to 3 days, and salmon can be refrigerated for up to 2 days.

Vary this salmon with coriander lime pesto to suit your needs

For a dairy-free option, substitute Parmesan with nutritional yeast. For nut-free, use sunflower seeds in the pesto and extra virgin olive oil. To make it garlic-free, simply omit the garlic from the pesto.

Take a look at the variations (below the main recipe) for suggestions to alter the recipe to suit many specific dietary requirements.


For more delicious, easy to make, healthy meals, click HERE.

Salmon with coriander pesto
Print Recipe
4.80 from 10 votes

Crispy Salmon with Coriander Lime Pesto (and sweet potato chips)

This crispy salmon with coriander lime pesto and sweet potato chips is a delicious and nutritious meal. The salmon's crispy skin, paired with a zesty, nutty pesto, creates a delicious combination that’s easy yet impressive.
Prep Time20 minutes mins
Cook Time20 minutes mins
Total Time40 minutes mins
Course: Main Course
Servings: 4

Ingredients

  • 3 sweet potato/s (large)
  • 4 salmon filllet -skin on (or Trout if you prefer)

For the Coriander Lime Pesto

  • 1 bunch/s fresh coriander leaves
  • 30 g baby spinach (approx. handful)
  • 1 clove/s garlic -crushed
  • 60 g raw cashew nuts (¼ cup) toasted
  • 30 g parmesan cheese (2 tablespoons) finely grated
  • 1 lime/s -juice and zest
  • 20 ml macadamia nut oil (1 tablespoon)
  • 1 red chilli/s (optional)

Serve

  • 1 lime/s - quartered

Instructions

Start with roasting your sweet potato chips:

  • Pre-heat your oven to 220℃/420℉ (fan-forced).
  • Add ghee, coconut oil, lard (or the fat of your choice) to a baking dish and pop into the oven to heat until the fat is hot.
  • Cut your sweet potato to form thin chips. Add to the hot fat, season with salt and pepper and toss in the fat so they are evenly coated. Make sure they are in a single layer or they won't crisp up so well.
  • Bake for 20 minutes or until golden.

Now make your pesto:

  • In a food processor grate the parmesan and set aside. If using a Thermomix, 10 sec, speed 7.
  • Place the coriander, spinach and cashews in the processor and pulse until just chopped. If using a Thermomix, turbo 2-4 times.
  • Mix in the parmesan, lime juice and zest, garlic and macadamia oil (and optional chill) until combined. If using a Thermomix 10 seconds, reverse speed 4.
  • You have control over the texture of this pesto. For a chunky pesto process less, or smoother process more.
  • Set aside.

Lastly cook your salmon (start this 5 minutes before your chips will be ready):

  • Cut your fish to portion. I try to buy mid-sections of the fish so they are all approx. the same thickness (so they cook in the same amount of time).
  • Pat the flesh dry with a paper towel and then rub with a little olive oil and season well on both sides with sea salt and pepper.
  • Heat a non-stick or well seasoned cast iron pan so that it is moderately hot and cook the salmon skin side down for 4-5 minutes until the skin crisps. Don't try to turn or flip it to early or the skin will stick.
  • Using a thin spatula careful turn the fish and cook for 2 - 3 minutes or until just cooked through (remember it will continue to cook after you take it from the heat).

Serve

  • Serve the salmon on a warm plate with a dollop of pesto, the sweet potato chips and fresh lime juice (or fresh lemon juice).
  • I also serve with steamed greens or a simple green salad.

Notes

Dairy-free

Sub the parmesan for nutritional yeast and a pinch of sea salt. Cook the sweet potato in lard or coconut oil. 

Nut-free

Replace the cashews with toasted sunflower seeds and the macadamia nut oil with olive oil.

Garlic-free

Omit the garlic.
 

I'd love to hear how you like this recipe. Post a comment below and let me know.

Samon with Coriander Lime Pesto

Healthy Raspberry and Coconut Slice

August 10, 2016 | Healthy Lunchbox, After School Snacks, Baked Sweets

This Healthy Raspberry and Coconut Slice is a deliciously simple treat that satisfies your sweet tooth while still being packed with wholesome ingredients. It’s gluten-free, and can easily be made nut-free, making it a versatile dessert option for a variety of dietary needs.

My nana was instrumental in developing my passion for food and cooking. So many of my childhood memories are centre around food and cooking in her old kitchen. My nan used to pick me up from school every Friday and in summer, we stopped at the corner deli for an ice block and in winter, we stopped at Peters by the Sea in Scarborough for hot chips (which I always got wrapped in paper, even after cups had become the norm because it somehow felt more special).

Our weekends together were centred around gardening, tending to the chooks and ducks and cooking – loads of cooking. One of the many things we used to make was an old fashioned Raspberry Coconut Slice. So it’s long overdue I put my healthy spin on this classic. I hope you like it.

Health benefits

This slice is not only a tasty dessert but also packed with nutrients. The almond meal provides healthy fats and protein, while the chia seeds and raspberries add a boost of fibre and antioxidants. The use of coconut oil adds medium-chain fatty acids, which can support metabolism and energy levels.

Ingredients

The base of this slice is made with coconut oil, almond meal (or a nut-free alternative), desiccated coconut, and a touch of natural sweetener like rice malt syrup or honey. The raspberry layer is kept simple with just raspberries and chia seeds, while the coconut topping gives it a delicious crunch with shredded coconut and egg whites.

How to make healthy raspberry and coconut slice

Start by mixing the base ingredients together and pressing them into a baking tray. Bake until golden, then set aside to cool. For the raspberry layer, mash the raspberries and mix with chia seeds in a small bowl, then spread this over the base. The coconut topping is just egg whites, coconut, and a sweetener of your choice, which you’ll spread on top and lightly grill until golden (watching it carefully so it doesn’t burn). Cool in the fridge before slicing for a nice crumb free slice. If you own a Thermomix, we’ve also included Thermomix instructions for this recipe.

Serving suggestions and how to store

Serve this raspberry coconut slice as a healthy dessert or a snack with a cup of tea. It’s perfect for lunchboxes or afternoon treats. Store it in an airtight container in the fridge for up to a week, or freeze it to enjoy later.

Vary this healthy raspberry and coconut slice to suit

For a nut-free version, swap the almond meal for wholemeal spelt or a gluten-free flour. If you’re avoiding gluten, simply use the almond meal or gluten-free flour option. To make this slice fructose-friendly, choose rice malt syrup as your sweetener.

Take a look at the variations (below the main recipe) for suggestions to alter the recipe to suit your specific dietary requirements.


For more delicious, easy to make and healthy sweet treats, click HERE.

Raspberry coconut slice
Print Recipe
4.75 from 39 votes

Healthy Raspberry and Coconut Slice

My healthy version of the classic Raspberry and Coconut Slice, this is an easy to make, low sugar treat.
Prep Time20 minutes mins
Cook Time25 minutes mins
Total Time45 minutes mins
Course: Dessert, Snack
Servings: 12 slices

Ingredients

Base

  • 100 ml coconut oil (½ cup) melted
  • 115 g rice malt syrup or honey (⅓ cup)
  • 125 g almond meal (1¼ cup) see below for nut-free
  • 140 g desiccated coconut (2 cups)
  • 1 egg/s -beaten

Raspberry layer

  • 100 g frozen raspberries (1 cup) defrosted
  • 1 tbsp chia seeds

Coconut topping

  • 140 g shredded coconut (2 cups)
  • 1 egg/s -the white only
  • 2 tbsp rice malt syrup or honey

Instructions

  • Preheat the oven to 180℃/350℉ (fan forced).
  • Line a 20 x 30cm (approx.) baking pan with baking paper.
  • Make the base by mixing all of the ingredients together until well combined (by hand or in a food processor). If using a Thermomix 10-15 secs speed 4.
  • Press into the baking tray to form an even layer (I used the back of a large, wet spoon and press firmly).
  • Bake for 15-20 minutes until golden and set. Set aside to cool.
  • For the raspberry layer mash the raspberries roughly and mix through the chia. Set aside.
  • For the coconut topping, combine the egg white and sweetener by whisking with a fork. Mix in the shredded coconut.
  • Now assemble by spreading the raspberries over the base and top with the coconut mixture.
  • Pop under a grill for a couple of minutes, watching it carefully so it doesn't burn. It should only take a few minutes.
  • Chill in the fridge to fully set, then cut into squares. If you try to cut without chilling it will crumble.

Store

  • Store airtight in the fridge or freezer. I hope you enjoy this yummy slice.

Notes

Nut-free

Sub the almond meal with the same quantity of wholemeal spelt flour or a gluten-free or grain-free flour.

Gluten-free

Choose the almond meal option or gluten-free flour option (above).

Fructose friendly

Choose Rice malt syrup as your sweetener.

Short cut

You can use a good quality raspberry jam instead of making the chia jam. 
 
For 150 pages of nut-free recipes and lunchbox inspiration, take a look at my best selling ebook The Well Nourished Lunchbox. Click HERE to find out more.


Do you have a childhood recipe that you'd like me to take a look at making a healthy version. If so, post a comment below and I'll add it to my 'to do' list.

Healthy Raspberry and Coconut Slice

Simple Green Salad with Seeds and an Orange Balsamic Vinaigrette

July 27, 2016 | Salads

As you may already know, as part of Jamie Oliver’s Food Revolution, I was one of 10 people selected to put my spin on 10 of Jamie’s favourite staple recipes. This is a task right up my alley as I just love the endless possibilities of food creation. So my next JamieOliver.com recipe ‘to save your life’ is a ‘simple green salad’.

I serve a simple green salad with most meals I make, especially in winter. Really, “salad in winter I hear you ask?” Absolutely – nature has given us an abundance of greens in winter for a reason, to keep our immune systems strong. Plus, the addition of a acid (citrus/vinegar) and oil dressing improves the absorption of fat soluble vitamins from your whole meal.

I find I cook more stodgy meals – casseroles, bakes, curries, slow cooks in winter and a simple green salad just lifts the meal and adds a little freshness. Many people think a salad needs lots of ingredients but it doesn’t, especially when you have cooked vegetables in your main meal.

I also love to add toasted seeds to my salads, it is a really simple way to add texture and crunch, as well as nourishing essential fats, vitamins and minerals.

So here it is, one of my favourite, very simple green salads.

Health benefits

Greens provide essential vitamins like vitamin A, vitamin C, and K, crucial for immunity, while the citrus dressing enhances fat-soluble vitamin absorption. The toasted seeds add a satisfying crunch and supply healthy fats, minerals, and antioxidants.

Ingredients

This mixed green salad recipe features a base of mixed greens (any you like such as baby spinach, butter lettuce, romaine, rocket etc) and toasted seeds for texture (sunflower seeds or pumpkin seeds are my favourite) Plus, a citrusy balsamic dressing that adds bright flavour with orange juice, zest, olive oil, and balsamic vinegar.

How to make this simple green salad

Wash and dry the greens, then toast the seeds in a pan until golden. Combine the dressing ingredients in a jar and shake well. Arrange the greens in a bowl, sprinkle with seeds, drizzle the dressing over, toss well just before serving.

Serving suggestions and how to store

Serve alongside casseroles, roasts, or curries to add lightness and freshness. Any extra seeds or dressing can be stored in the fridge for up to a week.

Vary this simple green salad to suit your dietary needs

Feel free to add any extra ingredients to this basic salad – tomatoes or cherry tomatoes, red onion, avocado, radish, cucumber, fresh herbs or any other fresh veggies. You can also add cheese like shaved parmesan, feta, goat cheese.

Timesaving tip

I wash my leaves when I get home from the market with my weekly shop. I wash them, spin in the salad spinner and then store them in a large airtight container lined with paper towel. They stay fresh all week and are ready to eat. It saves me time and money.


For more incredible, healthy and delicious salad recipes, click HERE.

Nature has given us greens in winter to keep our immune systems strong. This simple green salad lifts a meal & adds freshness.
Print Recipe
5 from 1 vote

Simple Green Salad with Seeds and an Orange Balsamic Vinaigrette

This simple green salad with seeds and a refreshing orange balsamic vinaigrette is a perfect side dish, especially in winter. With immune-boosting greens and a tangy dressing to enhance nutrient absorption, it’s an easy way to add freshness to heavier, warming meals.
Prep Time10 minutes mins
Total Time10 minutes mins
Course: Salad
Servings: 4

Ingredients

  • 120 g leafy greens (I work off a big handful per person). You can choose one green but I love to use a heap of different leaves and herbs. Edible flowers are also a beautiful addition.
  • 75 g mixed seeds - sunflower, pumpkin and sesame seeds (½ cup) toasted

Dressing

  • 60 ml orange juice (¼ cup)
  • 1 orange/s -zest
  • 60 ml extra virgin olive oil -extra virgin
  • 2 tbsp aged balsamic vinegar
  • Sea salt and freshly ground black pepper -to taste

Instructions

  • Wash your leaves well and spin dry in a salad spinner.
  • Toast your seeds in a pan, stirring continuously until  lightly toasted.
  • Make your dressing by putting all of the ingredients in a jar and shaking well to combine.
  • Arrange your leaves in a salad bowl and sprinkle with the seeds (approx. one tablespoon per person).
  • Drizzle over enough dressing to coat (but not drown the leaves).
  • Any extra seeds or dressing can be stored in a jar in the fridge.
  • It really doesn't get a whole lot more simple than that!

Notes

Different dressing

For other awesome, easy to make and healthy salad dressings, click HERE.

For lots more sides and salad inspo, take a look at my hugely popular ebook ˜Well Nourished Sides and Salads’- where vegetables become the hero of the dish! It’s great value at just $9.95, click HERE to take a look.

Granola with Chai Spiced Nut Clusters

June 28, 2016 | Breakfast

This delicious breakfast Granola with Chai Spiced Nut Clusters is a mouthwatering combination of flavours and textures and my latest twist on Jamie Oliver’s ‘recipes to save your life.’

It’s such an honour to be selected by JamieOliver.com to put my spin on 10 of Jamie’s recipes. He has always been one of my favourite foodies and such an inspiration to me.

If you’re after more than muesli or cereal for brekkie, check out my fabulous collection of healthy, delicious breakfast recipes that take 5-10 minutes to make (yes, in the real world), click HERE.

So here it is, my spin on Jamie’s  DIY Oaty Fruit Cereal….I hope you enjoy it!

Health benefits

Rich in healthy fats, fibre and protein from the nuts, seeds, and oats, this low sugar granola offers sustained energy and supports digestion. The warming chai spices add antioxidants, which help reduce inflammation and improve immunity.

Ingredients

This chai-spiced granola recipe combines a mix of nuts like almonds, macadamias, and pecans, along with oats, coconut, and a chai spice blend featuring two teaspoons ground cinnamon, two teaspoon ground cardamom, a teaspoon ground ginger, and quarter teaspoon ground cloves. For sweetness, choose from rice malt syrup, honey, or pure maple syrup.

How to make this healthy granola

Start by toasting the nuts and sesame seeds on a baking tray (baking sheet), then coat them with the chai spice mix and a drizzle of sweetener. Spread out so it’s in a thin, even layer. On a second tray, combine oats and coconut with the remaining spices and sweetener. Bake until everything is golden and fragrant, then break the nuts into clusters and mix with the oats and coconut.

Serving suggestions and how to store

Serve with yogurt, milk, or a sprinkle of fresh fruit. This healthy muesli also makes a great after school snack. Store in an airtight container for up to a month, making it perfect for easy, grab-and-go breakfasts.

Vary this granola with chai spiced nut clusters to suit

For a gluten-free option, use rolled quinoa flakes instead of oats. Coconut-free? Substitute the coconut with additional nuts, seeds, or oats. For a sesame-free variation, swap the sesame seeds for more nuts or seeds.

Take a look at the variations (below the main recipe) for suggestions to alter the recipe to suit many specific dietary requirements.


For more delicious, health and easy to make breakfast recipes, click HERE.

Chai spiced granola - This Granola with Chai Spiced Nut Clusters recipe is a mouthwatering combination of flavours and textures and my latest twist on Jamie Olivers fruity cereal
Print Recipe
4.89 from 9 votes

Granola with Chai Spiced Nut Clusters

A wholesome breakfast such as this is so important to ensure good mood, energy, concentration and focus throughout the day. There is nothing in a cereal box that is good enough, so spend a little time every now and then and make a batch of my Granola with Chai Spiced Nut Clusters to keep in the pantry for a great start to the day.
Prep Time5 minutes mins
Cook Time30 minutes mins
Total Time35 minutes mins
Course: Breakfast
Servings: 8 cups (approx)

Ingredients

  • 450 g nuts (3 cups) I used almonds, macadamias, pecans, cashews and hazelnuts
  • 35 g sesame seeds (¼ cup)
  • 2 tsp ground cinnamon
  • 2 tsp ground cardamom
  • 1 tsp ground ginger
  • ½ tsp ground cloves
  • ¼ tsp sea salt
  • 6 tbsp rice malt syrup, honey or maple syrup
  • 270 g rolled oats (3 cups)
  • 200 g shredded coconut (2 cups)

Instructions

  • Pre-heat your oven to 180℃/350℉.
  • In a small bowl mix all of the spices to make a chai spice mix.
  • Take two baking trays.
  • Line one of the baking trays with a silicon coated baking paper (I use 'If You Care' brand). To this add your nuts and sesame seeds and toast in your preheated oven for 10 minutes.
  • Remove from the oven and add half the spice mix. Toss to coat the nuts.
  • Now drizzle with 3 tablespoons of sweetener so that most of the nuts and seeds are coated.
  • In the second baking tray place the oats (or GF flaked grain), coconut, remaining spice mix and toss to mix.
  • Drizzle with the remaining 3 tablespoons of sweetener.
  • Bake both trays for 10 minutes. Remove from the oven and allow the nuts to cool completely.
  • Stir the oat/coconut mix and bake for another 10 minutes or until toasted to your liking.
  • Once they are cool, break the nuts up into clusters and mix through the toasted oats/coconut.

Serve

  • With the yoghurt, milk and fruit of your choice.

Store

  • Store in an airtight container for up to a month.

Notes

Gluten and grain-free

Substitute the oats with rolled quinoa flakes.

Fructose friendly 

Choose rice malt syrup as your sweetener. 

Coconut-free

Substitute the coconut flakes for more nuts, seeds and/or oats or quinoa flakes. 

Fructose friendly

Choose rice malt as your sweetener.

Vegan

Choose rice malt or maple syrup as your sweetener.

Sesame-free

Replace the sesame seeds with another seed or nuts. 


I'd love to hear how you enjoy this crunchy, delicious start to the day - post a comment!

Meatballs & Kale In Lemony Garlic Broth

June 26, 2016 | Budget Friendly, Make-ahead Meals, Chicken, Freezable Meals

This comforting meatballs and kale in lemony garlic broth recipe is perfect for a nourishing, warming meal with rich flavours from herbs, tender meatballs, and a zesty, savoury broth.

This cracking recipe is thanks to my lovely friend Irena from Irena Macri | Food Fit For Life. I’m a huge fan of Irena’s work – her recipes are delicious, nutritionally balanced, easy to make.

This recipe is super popular for very good reason!

Health benefits

Packed with protein from the meatballs and chicken broth and loaded with antioxidants from the kale and garlic, this soup is a great immunity booster. The fresh lemon juice adds vitamin C and enhances digestion, making it a wholesome, healthy option.

Ingredients

This recipe uses ground turkey, chicken, or pork mince for the meatballs, seasoned with fresh herbs and cloves garlic. The chicken broth includes nutrient-rich kale, leek, garlic, carrot, potato, and a splash of lemon and lime juice for a refreshing tang.

How to make Meatballs & Kale In Lemony Garlic Broth

Start by blending leeks, herbs, garlic, and lime zest for the meatballs, then mix with mince and seasoning. Form into meatballs and fry until golden. For the broth, sauté leek, lemon peel, carrot, and potato, then add garlic, cumin, star anise, chicken stock, and fish sauce. Combine everything, add kale, and finish with a squeeze of lemon and lime juice for an added burst of flavour. If you own a Thermomix, we’ve also included Thermomix instructions for this recipe.

Serving suggestions and how to store

Serve hot with crusty bread or a side salad for a balanced meal. This soup can be stored in an airtight container in the fridge and reheated gently on the stovetop until warmed through.

Vary this to suit your dietary needs

Try swapping the herbs with sage or oregano, or use basil instead of parsley for a fresh twist. For a different protein source, fish mince works well too, adding a unique flavour to the broth.

These Meatballs & Kale In Lemony Garlic Broth is a delicious, healing meal that's gluten, grain & dairy-free. It is such a wonderful combination of flavours
Print Recipe
4.86 from 7 votes

Meatballs and Kale in a Lemony Broth

This delicious, zesty soup come meal is so nourishing - truely food as medicine!
Prep Time20 minutes mins
Cook Time20 minutes mins
Total Time40 minutes mins
Course: Main Course
Servings: 4

Ingredients

For the meatballs

  • ½ leek (pale part), roughly cut (or 2 spring onions)
  • ¼ bunch/s fresh parsley leaves (about 10 g)
  • ¼ bunch/s fresh mint leaves (optional)
  • 4-5 sprig/s fresh thyme leaves (1 tablespoon approx.)
  • 1 clove/s garlic
  • 1 lime/s -zest
  • 600 g ground mince (turkey, chicken or pork mince)
  • 1 tsp sea salt - or to taste
  • ½ tsp ground black pepper
  • 1 tsp butter, ghee or coconut oil

For the soup

  • 2 tbsp extra virgin olive oil - extra virgin
  • ½ leek (green and pale part)
  • 1 lemon/s (5 peels of the skin)
  • 1 carrot/s (large) peeled and diced into halves
  • 1 potato/s (large) peeled and diced into small cubes
  • 3 clove/s garlic - sliced
  • 1 tsp ground cumin
  • 2 star anise
  • 750 ml chicken broth or stock (3 cups)
  • 1½ tbsp fish sauce
  • Sea salt and freshly ground black pepper - to taste
  • 10-12 stem/s kale - torn off the stem and into smaller pieces
  • ½ lime/s - juice
  • ½ lemon/s - juice (approx. 2 tablespoons)

Instructions

  • If you have a food processor, place leeks, parsley, mint, thyme, garlic, and lime zest inside with an S-blade on. Blitz a few times, until the ingredients are finely ground up. If using a Thermomix 10 seconds, speed 5. Alternatively, chop everything very finely using a knife.
  • Transfer to a large mixing bowl together with the mince, salt and pepper. Mix really well, until well incorporated. If using a Thermomix, 40 seconds reverse speed 3 (you may need to use the spatula to help mix it through).
  • Heat coconut oil in a large skillet over medium-high heat. Roll the mixture into small meatballs, about 20g each, smaller than a Ping-Pong ball. Fry the meatballs for 7-8 minutes, turning them throughout so they go golden-brown on all sides.
  • In the meantime, add the olive oil, the other part of the leek, lemon peel, carrot and potato to a medium saucepan. Sauté for a few minutes, then add the garlic, cumin, star anise, chicken stock and fish sauce. Season with some salt and pepper and bring to boil.
  • Add the meatballs and cook over medium heat, covered, for 3-4 minutes. Prepare the kale and add to the soup, stir through and cook for a further 5 minutes, covered. Test the potato and once soft, remove from the heat and add the lime and lemon juice.
  • Stir and taste for salt. Let it sit for 5 minutes off the heat before serving.

Make-ahead

  • Re-heat in a pot over a low heat until just hot.

Store

  • Store in an airtight container in the fridge.

Notes

Herbs

Other herbs like sage and oregano can be used instead of thyme and coriander or basil will work well instead of parsley.


Let us know how you like this delicious, nourishing meal. Please post a comment and rate this recipe below!

Healthy Dukkah Spice Mix

June 22, 2016 | Dips

This healthy dukkah spice mix is one of those condiments that I always have in the fridge. It is really easy to make and this delicious collection of nuts, seeds and aromatic spices is so versatile and adds an amazing flavour and texture to many simple meals.

My favourite ways to eat it are…

  • Sprinkle on poached or scrambled eggs
  • Over steamed vegetables
  • Over a simple green salad
  • With olive oil and a good crusty sourdough
  • With hummus (recipe here)
  • On a baked potato or sweet potato
  • Over avocado with lime (avocado and dukkah on toast is delicious)
  • Delicious with my Moroccan Carrot Salad
  • Make some gut healing Labne and roll it in dukkah for a delicious savoury cheese
  • In this Red Cabbage Slaw (recipe HERE).
  • Dip crusty bread or pita in olive oil then dukkah

Health benefits

As well as tasting amazing, it also adds extra nutrition to your meals. The macadamia nuts are a fabulous source of protein, essential fats and many minerals and antioxidants. The sesame seeds are a rich source of calcium and magnesium. The chia are also a great source of omega-3 essential fats. The spices are wonderful warming antioxidants and also have anti inflammatory properties making it a fantastic addition to a balanced diet.

Ingredients

Dukkah can be made with any combination of toasted nuts and seeds. Having macadamia nuts as the base is my personal favourite, though you can sub them with hazelnuts, pistachios, almonds, cashews, pine nuts or walnuts (or a mixture). This particular combination includes lightly toasted macadamia nuts, sesame seeds, chia seeds, and a blend of spices including turmeric, cumin, coriander, black pepper, and cinnamon, seasoned with sea salt for a savoury touch.

How to make a healthy dukkah spice mix

In a food processor, pulse the macadamia nuts until roughly chopped. You can also grind them by hand in a mortar and pestle. Then, combine with the sesame seeds, chia seeds, and spices. Store in an airtight jar in a cool place to keep it fresh and ready for use.

Serving suggestions and how to store

Dukkah can be sprinkled over avocado toast, stirred into hummus, or used as a coating for baked goods or meats. For best freshness, store in an airtight jar in the fridge or freezer.

Vary this healthy dukkah to suit your dietary needs

To make this nut-free, replace macadamias with a combination of toasted sunflower seeds and pumpkin seeds. If you need a sesame-free version, simply omit the sesame seeds. Adjust the spices as desired to suit your taste preferences.

Take a look at the variations (below the main recipe) for suggestions to alter the recipe to suit many specific dietary requirements.

Dukkah - This healthy Dukkah Spice Mix is an easy to make a versatile flavour enhancer. It's gluten, grain and dairy-free & can make the most basic meal outstanding!
Print Recipe
5 from 1 vote

Healthy Dukkah

This healthy dukkah spice mix is a versatile blend that adds a delicious crunch to meals, whether sprinkled over salads, roasted veggies, or used as a delicious crust for fish and meats.
Prep Time10 minutes mins
Total Time10 minutes mins
Servings: 2 cups

Ingredients

  • 190 g macadamia nuts (1½ cups) lightly toasted
  • 70 g sesame seeds (½ cups) lightly toasted
  • 1 tbsp chia seeds
  • 1 tsp ground turmeric
  • 1 tsp ground cumin
  • 1 tsp ground coriander
  • 1 tsp ground black pepper
  • ½ tsp ground cinnamon
  • 1 tsp sea salt

Instructions

  • In a food processor or Thermomix, pulse the macadamia nuts so they are roughly chopped.
  • Mix with the rest of the ingredients and store in an airtight glass jar in the fridge to use whenever you feel like it.
  • You can adjust the spices and seasoning to your own taste.

Store

  • In an airtight jar in a cool cupboard or the fridge or freezer.

Notes

Nut-free

Replace the macadamia nuts with ac combination of toasted sunflower and pumpkin seeds. 

Sesame-free

Omit the sesame seeds.


What are your favourite ways to eat dukkah? Post a comment below.

Grain-free Streusel

June 14, 2016 | After School Snacks, Baked Sweets

This grain-free streusel recipe combines a delicious nutty streusel topping with a moist almond meal-based batter, creating a wholesome treat that’s perfect for morning tea or an after-dinner dessert.

This grain and gluten-free treat is so easy to make and really delicious. It’s one of my kids favourite after school or weekend snacks, hot out of the oven it’s so yum!

Health benefits

Packed with nutrient-dense ingredients like walnuts, almonds, and quinoa flakes, this streusel offers a good source of protein, fibre, and healthy fats, while honey or maple syrup provides a natural sweetness that keeps things refined-sugar-free. I like to try to have a fair bit of variety in my families diet to really extend the nutrients they are consuming and often include naturally gluten-free foods, especially baked goods. My baked treats are always wheat-free (more about why we do our very best to avoid wheat HERE)

Ingredients

The recipe uses walnuts or pecans for the streusel, butter, your preferred natural sweetener, quinoa flakes, cinnamon, and a pinch of sea salt. The batter is made with almond meal (almond flour), arrowroot flour (or tapioca flour), coconut, vanilla extract, baking powder, and more.

How to make this Grain-free Streusel

Preheat your oven, then mix the streusel ingredients in one bowl and the batter ingredients in another. In a loaf pan lined with parchment paper, layer half of the batter, sprinkle half the streusel, then add the remaining batter and top with the rest of the streusel. Bake until golden brown and aromatic. If you own a Thermomix, we’ve also included Thermomix instructions for this recipe.

Serving suggestions and how to store

Serve this streusel warm from the oven or cooled with a dollop of Greek yogurt (or ice cream for a dessert). Leftovers can be kept in an airtight container in the fridge or freezer to maintain freshness.

Vary this grain-free streusel to suit your needs

For dairy-free, swap butter with coconut or macadamia oil. If avoiding quinoa, rolled oats work as a substitute. Coconut can be replaced with extra nut meal, and rice malt syrup makes it fructose-friendly. You can also bake this into muffins, just bake for approximately 20 minutes. Take a look at the variations (below the main recipe) for suggestions to alter the recipe to suit many specific dietary requirements.


Note: this recipe isn’t nut-free, but check out my Well Nourished Lunchbox ebook for 50+ nut-free, lunchbox friendly recipes.


For more delicious, healthy sweet treats, click HERE.

Grain free Streusel - This moist, grain, gluten and dairy-free Streusel is so easy to make and really delicious. It’s a family favourite, especially hot out of the oven.
Print Recipe
4.60 from 5 votes

Grain-free Streusel

This delicious, nutrient dense Grain-free Streusel is a very satisfying treat that's easy to make and even easier to eat. Watch out, it's very moorish!
Prep Time10 minutes mins
Cook Time35 minutes mins
Total Time45 minutes mins
Course: Snack
Servings: 1 loaf

Ingredients

Streusel Layer

  • 125 g pecan or walnuts (1 cup) chopped
  • 20 g butter -melted
  • 2 tbsp rice malt syrup, honey or maple syrup
  • 50 g rolled / flaked quinoa (½ cup)
  • 1 tsp ground cinnamon
  • Pinch sea salt

Batter

  • 50 g butter -melted
  • 85 g rice malt syrup, honey or maple syrup (¼ cup)
  • 1 egg/s
  • 150 g almond meal (1½ cups)
  • 2 tbsp true arrowroot flour 
  • 20 g desiccated coconut (¼ cup)
  • 1 tsp vanilla -powder, extract or essence
  • 1 tsp baking powder

Instructions

  • Preheat the oven to 180℃/350°F (fan-forced).
  • Start with the streusel. In a small bowl, mix the butter and sweetener until combined. Add the dry ingredients and mix to combine.
  • Now for the batter. In a mixing bowl mix the butter, sweetener and egg until well combined. Add the almond meal, arrowroot, coconut, vanilla and baking powder and mix until well combined.
  • Line a small loaf tin (approx. 20 x 12cm) with baking paper and scrape half of the thick batter into the tin.
  • Top with approx. ½ of the streusel mix (use damp hands to spread the sticky mixture across). Then place the rest of the batter on top and finish with the remaining streusel.
  • Bake for 30-40 minutes (watch during cooking as with top heating ovens, you may need to cover with foil if the topping is browning too fast).

Thermomix Method

  • Start with the streusel. Pulse the nuts to chop using the turbo button 3-4 times and set aside.
  • Melt the butter, 1 minute, temp 90, speed 4.
  • Add the sweetener and mix, 10 seconds, speed 4.
  • Add the quinoa flakes, sea salt, cinnamon and nuts, and mix to combine, reverse, 10 seconds, speed 4.
  • Set aside.
  • Without washing the bowl, melt the butter 1 minute, temp 90, speed 4.
  • Add the sweetener and egg and mix 30 seconds, speed 4.
  • Add the rest of the ingredients and mix 20 seconds, speed 4.
  • Go to step 4 above.

Store

  • Store in an airtight container in the fridge or freezer.

Notes

Dairy-free

Replace the butter with coconut or macadamia nut oil.

No Quinoa flakes

You can substitute with rolled oats if you’d like (though no longer GF).

Coconut-free

Substitute the coconut with more nut meal. 

Fructose friendly

Choose rice malt syrup as your sweetener. 

Nut-free

This is not the recipe for you. For 150 pages of nut-free recipes, take a look at my super popular ebook 'The Well Nourished Lunchbox'. Click HERE to find out more and read the rave reviews.
 

I'd love to hear how you like this recipe - post your comment below. 

Fish – simple ways to enjoy it

June 11, 2016 | 30 Minute Meals, Fish & Seafood, Members only

Fish is not only a really healthy source of protein and essential fats, it’s also super quick to cook so it’s a great choice for your weekly meal plan if you are time poor. It is best to obviously source a sustainably caught, local fish. If you are after a variety that is only farmed,…

This content is for members only – but right now, you can unlock it all with 80% off your first 3 months! Get instant access to 1,200+ healthy, delicious recipes, customisable meal plans, shopping lists, ad-free browsing, live chat with a naturopath, and our easy-to-use app. No contracts. Cancel anytime.

Claim your discount now!

Already a member? Log in here

Lamb – simple ways to enjoy it

June 7, 2016 | Red Meat

There are many ways to enjoy the many cuts of lamb. This guide ‘Lamb – simple ways to enjoy it’ lists the most common cuts of lamb and the best way to cook them. Lamb is a protein my family would eat about once a week. Simply prepared with a lovely side or salad is one…

This content is for members only – but right now, you can unlock it all with 80% off your first 3 months! Get instant access to 1,200+ healthy, delicious recipes, customisable meal plans, shopping lists, ad-free browsing, live chat with a naturopath, and our easy-to-use app. No contracts. Cancel anytime.

Claim your discount now!

Already a member? Log in here

Chicken – simple ways to enjoy it

June 7, 2016 | Chicken

There are many ways to enjoy the many cuts of chicken. This guide ‘Chicken – simple ways to enjoy it’ lists the most common cuts of chicken and the best way to cook them. Chicken is one of my favourite proteins. My family would eat it 2-3 times per week. Simply prepared chicken and a lovely…

This content is for members only – but right now, you can unlock it all with 80% off your first 3 months! Get instant access to 1,200+ healthy, delicious recipes, customisable meal plans, shopping lists, ad-free browsing, live chat with a naturopath, and our easy-to-use app. No contracts. Cancel anytime.

Claim your discount now!

Already a member? Log in here

Beef – Simple ways to enjoy it

June 7, 2016 | Red Meat

There are many ways to enjoy the many cuts of beef. This guide ‘Beef – Simple ways to enjoy it’ lists the most common cuts of beef and the best way to cook them. The cut of meat you choose will have a unique amount of fat, tenderness and flavour depending on what part of the…

This content is for members only – but right now, you can unlock it all with 80% off your first 3 months! Get instant access to 1,200+ healthy, delicious recipes, customisable meal plans, shopping lists, ad-free browsing, live chat with a naturopath, and our easy-to-use app. No contracts. Cancel anytime.

Claim your discount now!

Already a member? Log in here

Turkey Sage Spaghetti Meatballs

June 1, 2016 | Budget Friendly, Make-ahead Meals, Pasta and Noodles, Chicken, Freezable Meals

This Turkey Sage Spaghetti with Meatballs is my twist on Jamie Oliver’s  famous “recipe to save your life”. Jamie nominated his Classic Tomato Spaghetti for me (and a small group of cooks) to reinvent. Now, it’s hard to mess with a classic, but the naturopath in me couldn’t resist adding a boost of protein and vegetables to turn this simple staple into a more balanced, nutritionally complete meal.

So that’s exactly what I did and not only is this Turkey Sage Spaghetti Meatballs a very nourishing meal, it’s also absolutely delicious and really very quick and simple to make. It can also be made ahead and reheated to serve.

Health benefits

Turkey is a vitamin and mineral rich source of protein. It is a rich source of tryptophan which is a precursor of the neurotransmitter serotonin, our feel-good hormone. It’s also a great source of vitamin B12, which makes it a great option for those who suffer from anxiety and mood disorders. I like to cook with it occasionally to add a little nutritional variety to my families diet. The assortment of vegetables included in the meatballs and sauce contributes lots of plant-based fibre and nutrition.

You can serve this dish the traditional way, with whole wheat or gluten-free spaghetti. Or for even more nutritional bang for your buck, serve it with zoodles (courgettes/zucchini spiralized) or quinoa. Whatever your preference, these are SO delicious!

What you need to make this Spaghetti Meatball recipe

You’ll need turkey mince, fresh sage, almond meal, an egg, and a few staple veggies like onion, garlic, and spinach for the meatballs. The tomato sauce uses roma tomatoes (or canned), fresh basil, onion, garlic, and olive oil for a delicious, authentic Italian touch.

How to make Turkey Sage Spaghetti Meatballs

Start by cooking the tomato sauce with diced onion, cloves garlic, and tomatoes, allowing it to simmer to bring out the flavours. While the sauce is simmering, mix the meatball ingredients in a large bowl, roll them into golf ball-sized portions, and cook them in a hot pan. Once browned, simmer the meatballs in the sauce until cooked through.

Serving suggestions and how to store

Serve these meatballs with your favourite pasta, gluten-free spaghetti, or zoodles, topped with fresh basil (or parsley) and grated Parmesan or nutritional yeast. They also pair well with a simple green salad. Leftovers can be stored in the fridge in an airtight container or frozen for easy meals later on.

Vary turkey sage spaghetti meatballs to suit your needs

For nut-free meatballs, swap almond meal with breadcrumbs. If you need an egg-free version, just leave out the egg. You can also replace onion with fennel or omit garlic, using cumin and cayenne for extra flavour. Check out the variations below the main recipe for all of my tips on how to adapt it to your specific dietary needs.

PS- this dish is photographed in the stunning Solidteknics safe, non-stick, everlasting cookware. More about it HERE.


For more delicious, easy to make healthy meals, click HERE.

Turkey bacon and sage meatballs - These Turkey and Sage Spaghetti Meatballs are a nutritionally balanced, easy to make delicious meal for the whole family. Gluten and dairy free.
Print Recipe
4.78 from 9 votes

Turkey Sage Spaghetti Meatballs

Turkey sage spaghetti meatballs are a wholesome twist on a classic family favourite. With tender turkey mince, fresh sage, and a rich homemade tomato sauce, these meatballs are delicious served over spaghetti or zoodles for a gluten-free option. This is a go-to recipe when you're looking for something comforting and nutritious.
Prep Time30 minutes mins
Cook Time35 minutes mins
Total Time1 hour hr 5 minutes mins
Course: Main Course
Cuisine: Italian
Servings: 6

Ingredients

Tomato Sauce

  • 1 bunch/s fresh basil leaves
  • 1 onion/s -finely diced
  • 2 clove/s garlic -finely sliced
  • 1 kg roma tomatoe/s (or 2 x 400g tins of chopped tomatoes)
  • 1 tbsp red wine vinegar (or balsamic vinegar)
  • 1 tbsp extra virgin olive oil -extra virgin

Turkey and Sage Meatballs

  • 1 rasher/s bacon - short cut, finely diced
  • 1 red onion/s -finely diced
  • 1 clove/s garlic -crushed
  • 30 g baby spinach -finely chopped (1 cup approx.)
  • 1 carrot/s (large) grated
  • 500 g turkey mince
  • 50 g almond meal (½ cup)
  • 1 egg/s
  • 2 tbsp fresh sage leaves (or 1 tablespoon dried sage)
  • Sea salt and freshly ground black pepper -to taste
  • 300 g spaghetti - I love quinoa and rice spaghetti

Instructions

Start with the tomato sauce:

  • Pick the basil leaves from the stalks, finely chop the stalks and set aside the basil leaves which you can also roughly chop or tear.
  • Peel and finely dice the onion and garlic. I generally chop this in the Thermomix garlic 5 seconds, speed 5 then add the onion, 10 seconds speed 5. I then add this to a small pot (to make the sauce) and without washing the Thermomix, use the bowl to make the meatballs. 
  • Put a saucepan on a medium heat and add 1 tablespoon of olive oil and the onion and garlic. Cook for around 7 minutes, or until soft and lightly golden.
  • If using fresh, cut the tomatoes in half, then roughly chop them or carefully open the tins of tomatoes.
  • Stir in the basil stalks for a few minutes, then add the fresh or tinned tomatoes and the vinegar.
  • Season with a tiny pinch of salt and pepper, then continue to simmer for around 20 minutes (for canned tomatoes) or 30 minutes for fresh, stirring occasionally.
  • Once cooked, remove from the heat and stir in the basil leaves (reserving a few to garnish).
  • Meanwhile…

Prepare the meatballs:

  • Prepare (chop or grate) your bacon, onion, garlic, spinach and carrot (by hand or in a food processor). Thermomix garlic first 5 seconds speed 5, then the onion, bacon, carrot and spinach, 20 seconds speed 4-5 (until chopped finely).
  • Place in a large mixing bowl with the turkey mince, almond meal, egg, sage and seasoning. Thermomix add the mince, almond meal, egg, sage and seasoning and mix 30 seconds, on reverse speed 3 (you may need to scrape the sides to make sure the ingredients are evenly combined).
  • Wash your hands well and squeeze the mixture to combine all of the meatball ingredients.
  • Roll it into approx. golf ball sized meatballs and set aside until ready to cook.
  • To cook, place a little olive oil in a large non-stick or cast iron pan and heat over a medium-high heat. Cook the meatballs for about 5 minutes or until brown, turning to cook on both sides.
  • Once the meatballs are almost cooked, pour over the tomato sauce and let simmer for 5 minutes or until the meatballs are cooked firm.

Serve

  • With the reserved basil leaves and finely grated Parmesan cheese (or nutritional yeast for dairy-free).
  • With al dente whole wheat or gluten-free pasta, zoodles or quinoa.
  • I also serve with a simple green salad.

Make-ahead

  • Re-heat in a pot over a low heat until just hot.

Store

  • Store in an airtight container in the fridge.
  • Can also be frozen (cooked meatballs in sauce). Or, you can freeze the meatballs prior to cooking.

Notes

Nut-free

Replace the almond meal with breadcrumbs.

Egg-free

Simply omit the egg.

Onion-free

Replace the onion with finely diced fennel in the sauce and omit in the meatballs. 

Garlic-free

Replace the garlic with a teaspoon of ground cumin and a pinch of cayenne in the sauce and the meatballs. 
 
Check out all 10 twists on Jamie's Classic Tomato Spaghetti HERE.


Enjoy and I'd love to hear how you liked it. Post a comment below!


Garlic Mushroom Omelette Wrap

May 17, 2016 | Budget Friendly, 30 Minute Meals, Breakfast

This simple, delicious Garlic Mushroom Omelette Wrap recipe is SUPER special. You see it’s the first of ten recipes I’ll be sharing with JamieOliver.com for Jamie’s Food Revolution campaign starting this Friday 20th May 2016.

A few months back I was one of ten lucky people, chosen worldwide to put my spin on ten of Jamie’s recipes that will save your life. The first is a Cheese Omelette and this is my spin… a Garlic Mushroom Omelette Wrap. It is a delicious, nutrient dense ‘anytime meal’ that my whole family adores and I hope you love it too!

Health benefits

Mushrooms are a wonderful source of antioxidants, fibre, vitamin D and a powerful immune boosting food. The garlic offers more immune support as does the protein from the cheese and egg. Spinach and thyme add a fresh touch along with extra vitamins and minerals. This is one healthy combo!

Ingredients

This wrap uses simple ingredients: butter or oil, mushrooms, garlic, fresh thyme, baby spinach, eggs, and cheddar cheese. A dash of sherry vinegar or a substitute adds a subtle tang.

How to make a Garlic Mushroom Omelette Wrap

This recipe serves 1 person, so multiply the ingredients to feed as many as you need. In a hot pan, melt butter or oil and sauté garlic, mushrooms, and thyme until golden. Add vinegar and spinach to wilt, then set aside. Beat the eggs, season, and pour them into the pan to form a thin omelette. Sprinkle with cheese, add the mushroom mix, and fold the omelette into a egg wrap.

Serving suggestions and how to store

Serve this wrap fresh from the pan or wrap it in foil for an easy, on-the-go meal. Leftovers can be stored in the fridge and gently reheated in a pan or microwave.

Vary this to suit your dietary needs

For a dairy-free option, skip the cheese, or use a dairy-free alternative. Swap cheddar with your favourite cheese, like feta, for a different flavour. To keep it gluten-free, ensure your vinegar is gluten-free.

Take a look at the variations (below the main recipe) for suggestions to alter the recipe to suit many specific dietary requirements.


For more delicious, quick easy and healthy breakfast recipes, click HERE.

Mushroom omelette wrap
Print Recipe
4.86 from 7 votes

Garlic Mushroom Omelette Wrap

My Garlic Mushroom Omelette Wrap is a delicious, nutrient dense dish that my whole family adores. It's great for brekkie or for a fast lunch or dinner. 
Prep Time10 minutes mins
Cook Time10 minutes mins
Total Time20 minutes mins
Course: Breakfast, Main Course
Servings: 1

Ingredients

  • 20 g butter, ghee or olive oil
  • 150 g mushrooms -any combination, I like Swiss Brown, shiitake and oyster, sliced or torn
  • 1 clove/s garlic -finely chopped
  • ½ tsp fresh thyme leaves
  • ½ tsp sherry vinegar -can substitute red wine vinegar with a pinch of sweetener dissolved into it
  • 10 g baby spinach (approx. 1 handful/s)
  • 2 egg/s
  • 10 g cheddar cheese

Instructions

  • Heat a large non-stick or cast iron pan over a medium-high heat and add the butter, ghee or olive oil.
  • Once it has melted add the garlic, mushrooms, thyme and a good pinch of sea salt and black pepper. Stir well so that the mushrooms are coated in the butter.
  • Cook for 3-4 minutes stirring occasionally, until the mushrooms soften and brown.
  • Add the vinegar and spinach and stir for 30 seconds to just wilt the spinach. Set aside.
  • Crack the eggs into a mixing bowl, season with a pinch of sea salt and black pepper, then beat well with a fork until fully combined.
  • Add a little more butter to the hot pan, then carefully pour in the eggs.
  • Tilt the pan so that the egg thinly coats the base of the pan.
  • Grate the cheese onto a board and sprinkle over the egg.
  • Now add the mushrooms to the centre of the omelette wrap and fold in the edges to form a parcel.

Notes

Dairy-free

Just leave out the cheese. You can also swap the cheddar with goat or cows feta or any other cheese you like really.

Gluten-free

Ensure the vinegar you use is gluten-free.

Tips

You can wrap this in foil for a meal on the go. To make a thicker, more sturdy wrap, double the eggs.
 

Let us know how you enjoy this delicious recipe. Post a comment and rate this recipe below!

Kids in the Kitchen
Encouraging kids to cook is so important! Loads of kids love following my kids on Youtube. Here’s a video recipe of my Mushroom Omelette wrap.

  • <
  • Page 1
  • Interim pages omitted …
  • Page 41
  • Page 42
  • Page 43
  • Page 44
  • Page 45
  • Interim pages omitted …
  • Page 49
  • >

Primary Sidebar

Join the community

Social Media

Join over 140,000 followers

Nourish Your Inbox

Nourish Your Inbox!

Christmas Meal Planning Ebook

Sign up today for your FREE:
• Chocolate Ebook
• Subscribers Only Special Offers
• Practical Health & Nutrition Tips
• New Whole Food Recipes

WN App

Join the Family

Join the Family

Join The Family

The Well Nourished Family Membership is your complete solution to your families health and wellbeing. With 1200+ whole food recipes and SO MUCH MORE. Join for a limited time for over 80% OFF!

JOIN & SAVE 80%

Upgrade Your Membership – Recipe Only

Health Programs & Courses – Public

Health Programs & Courses

Health Programs & Courses

Whether you’re looking for effortless meal creation, lunchbox inspiration or strategies to raise adventurous eaters, our expert-led resources will guide you every step of the way.

Find Out More

Programs and Courses – FAM only

Affiliate promo – public

Become an Affiliate

Looking to partner with a respected, Australian-run health and wellness brand to expand your reach and your income?

Find out More

Featured Lunchbox Ebook – Public

From the Shop

See More

Footer

Logos

Well Nourished HomepageWell Nourished

As featured on

Footer-social

Connect with us

  • About Well Nourished
  • Sitemap
  • Contact
  • Privacy Policy
  • Website Terms of Use
  • Affiliates

© Well Nourished 2026

A Firstnature site

Not feeling quite yourself?
If you're dealing with skin flares, gut issues, fatigue or joint pain, this five-minute quiz will help you understand what's actually driving it.
TAKE QUIZ

Rate This Recipe

Your vote:


A rating is required
A name is required
An email is required